Top 10 Qs You'd want to know
FAQ-ID:1019
Not sure what to do after registration? Take it easy, now we’ll show how to get your workplace up and running in 5 simple steps!
With the correct settings and user-defined rules, a virtual workplace in WorkDo can perform real-life routine practices and operations of your workplace. Here’s how!
Start WorkDo in 5 Steps
STEP 1 │ Create a Workplace
The first thing you should do after registration is to create a virtual workplace, then you can follow the next step and bring your teammates and collaborate on board.
View file:WorkDo Quick Start Settings
STEP 2 │ Invite Teammates to Your Workplace
In this step you could either ask your teammates to join your workplace or have the workplace admin send join invites.
- Trial run:We recommend you invite at least 1 to 3 people assigned with different roles into the workplace to help try out all the tools and features in the trial run.
- Adoption:Invite the rest of the your team into the workplace and deligate their roles accordingly by repearting Step 3 and 4.
How to invite people to a workplace?
Can I join the company workplace on my own?
View file:WorkDo Quick Start Settings
STEP 3 │ Set Workplace Admins
You are assigned as the workplace owner by default upon creating the workplace. The ownership can be transferred if need be, you should also assign other members, typically HR and/or IT staff, as admins to help manage the workplace and various settings.
How to add admins to workplaces or groups?
View file:WorkDo Quick Start Settings
STEP 4 │ Set Tool Roles
Wanna enable payroll management, automated leave system, overtime calculation or Wi-Fi / GPS clock in / out? Whatever you need, they are in the tool box!
Just as a company has different people and managers to access different data and files, the tool roles in WorkDo ensure that members would use the tools and access the data with their permission for information compartmentalization.
How to activate / deactivate a tool?
Why do I have limited tool access?
View file:WorkDo Quick Start Settings
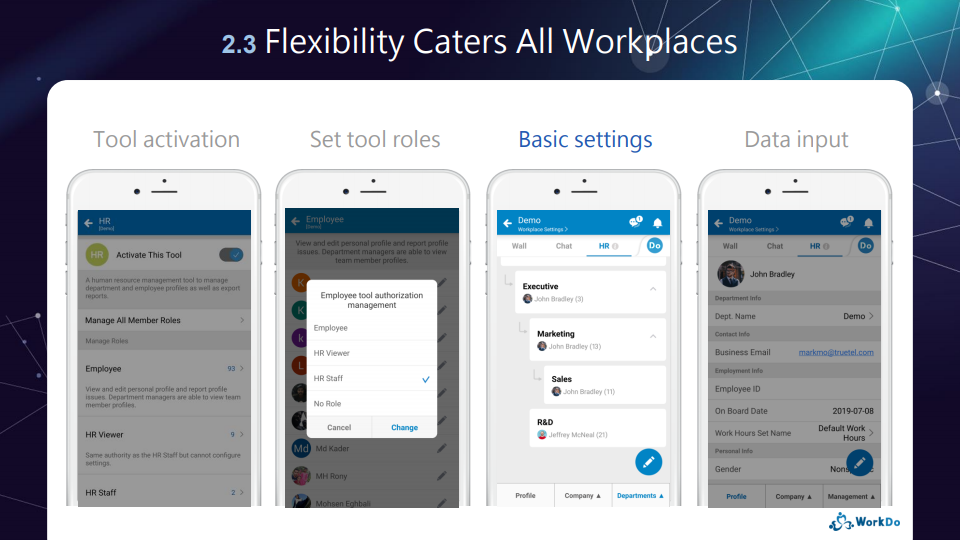
STEP 5 │ Customize Tool Settings
Taking into consideration that each workplace operates differently, the tools in WorkDo are just as flexible to cater to workplaces of various industries and team cultures. In this step, you will learn how to customize the tool settings that can best represent how your workplace truly operates.
View file:WorkDo Quick Start Advanced Tools
 Reminders
- Although listed as admins only, all users are able to create workplaces, i.e. Step 1, however, from Step 2 forward, are only the admins are allowed.
- By now, your workplace should be up and running, but if you need more detailed explanation, please use the guides below.
Download Quick Start Settings (Step 1 to 4) Download User Guides (Step 5)
Relevant Questions
What do different roles do in a workplace/group?
How do I sign up for WorkDo?
How to create a workplace?
Can I join the company workplace on my own?
How to invite people to a workplace?
How to add admins to workplace or groups?
What are tools?
How to activate / deactivate a tool?
Why do I have limited tool access?
What’s the difference between “Leave” and “Leave Pro”?
FAQ-ID:1074
The calendar on your WorkDo dashboard gives you an overview of all your workplace’s upcoming events and tasks. It is a personalized calendar that is for you only. However, if you prefer to use an external calendar, feel free to integrate your WorkDo events into an external calendar!
Just enable the Calendar Subscription function in your Workplace Settings and copy the link then paste into your external calendar to subscribe, simple as that!
Subcribe / Cancel Calendar Subscription
STEPS │ App
- Click the Workplace Settings on the workplace page.
- Click your profile.
- Select Calendar Subscription.
- Enable the function.
- Subscribe │ A blue checkmark will indicate it is enabled and a subscription link is shown. Copy the link and paste it into your external calendar to receive updates from your workpalce.
- Cancel Subscription │ Toggle the button to disble it.
STEPS │ Web
- Click the Workplace Settings on the workplace page.
- Select Calendar Subscription.
- Enable the function.
- Subscribe │ A blue checkmark will indicate it is enabled and a subscription link is shown. Copy the link and paste it into your external calendar to receive updates from your workpalce.
- Cancel Subscription │ Toggle the button to disble it.
Reminders
- For iPhone users, just click subscribe and the link will be automatically copied to your calendar.
- If you are in multiple workplaces, please switch workplaces and follow te steps described in this FAQ to obtain the calendar subscription links.
- Not every external calendar shares the same subscription method, please check with your calendar on how the subscription service works.
- Most external calendars do not provide real-time updates and synchronization. Please check your calendar’s information to ascertain the update times and frequency.
- You will no longer receive updates once you cancelled the calendar subscription or updated the link.
Relevant Questions
A personalized Dashboard Calendar just for you.
What are federated accounts?
Multi-Language Support.
What is user Do-ID, and how to set one?
Receive email notifications.
How to set the Daily Reminder?
What are the benefits of using the Dashboard?
What is WorkDo Network?
What kind of third-party software integration does WorkDo offer?
FAQ-ID:1072
WorkDo charges by the workplace’s headcount, and it is quite easy to calculate the total cost! Simply pick a preferred plan for your workplace, then multiply by the number of people who will be using WorkDo. Easy, peasy!
What do I do if an employee has resigned? What’s the total cost?
Well, if your team has new employees on board before the next billing date, they will take the place of those who have left. And if the additional employees exceed the original headcount, the extra cost will be added to the next billing statement.
Here are some examples!
1 │ Monthly Payment
WorkDo will do a headcount every month then bill the workplace accordingly. If the workforce in your workplace fluctuates regularly, then monthly payment may be your preferred method.
 Monthly Payment Plan Example
- First Payment │ Subscribed Premium Plan on May 15th, 2020. The billing date is the 15th of each month.
Users Count│10 members in the workplace.
10 members in the workplace.
Fee │ 10 members x $3 USD Premium Plan per user = $30 USD. - Second Payment │ Billed on June 15th, 2020.
Users Count │5 new employees joined the workplace on May 20th, 2020.
Fee │ 15 members x $3 USD Premium Plan per user = $45 USD. - Third Payment │ Billed on July 15th, 2020.
User Count │3 employees left on June 25th, 2020.
Fee │ 12 members x $3 USD Premium Plan per user = $36 USD. - Fourth Payment │ Billed on August 15th, 2020.
User Count │ 8 new employees joined the workplace on July 16th, 2020 then 3 employees left on July 19th, 2020.
Fee │ 17 members x $3 USD Premium Plan per user = $51 USD.
2 │ Yearly Payment
WorkDo will do a headcount every year, if new employees join the workplace, the additional fee will be reflected the following month in proportion to the remaining months of the plan. Therefore, for workplaces with their workforce steadily increases, the yearly payment plan can save more money in the long run!
To sum up:
- Save big and get 33% off by choosing the yearly payment!!!
- New employees could fill in the headcount of resigned employees, no additional and hidden costs!
- Only when the workplace’s purchased headcount is full will the cost of new employees will be charged to the workplace on the next billing date.
Yearly Payment Plan Example
- First Payment │ Subscribed Premium Plan on May 15th, 2020. The billing date is set to the 15th of each month when there is a difference to be paid, else the billing date is May 15th, 2021.
User Count │ 10 members in the workplace.
Fee │ 10 members x $2 USD Premium Plan per user per month x 12 months = $240 USD. - Second Payment (Difference pay off) │ Billed on October 15th, 2020.
User Count │ 5 new employees joined the workplace on October 16th, 2020.
Fee │ Pay off the difference of 5 members starting from October 15th, 2020 to May 14th, 2021.
5 members x $2 USD Premium Plan per user per month x 7 months = $70 USD. - Third Payment │ Billed on January 15th, 2021.
User Count │2 employees resigned on December 31st, 2020 then 4 new employees joined the workplace on January 12th, 2021.
Fee │ 2 members will count towards to originally purchased headcount, making the difference to be 2 new additional members from January 15th, 2021 to May 14th, 2021.
2 members x $2 USD Premium Plan per user per month x 4 months = $16 USD. - fourth Payment │ Billed on May 15th, 2021.
User Count │ 1 new employee joined the workplace on April 14th, 2021 then 2 employees resigned on May 1st, 2021.
Fee │ The total of 16 users will be billed for the second year starting from May 15th, 2021 to May 14th, 2022.
16 membersx$2 Premium Plan per user per month x 12 months = $384 USD.
Reminders
- There are different paid plans with different features, please refer to the to choose the best plan for your workplace.
- The scenarios provided in this FAQ serve as examples only, please choose the preferred plan based on your actual needs.
- WorkDo offers enterprise discounts to companies with more than 100 employees, please contact us for details.
Relevant Questions
Is WorkDo free of charge?
How do I change the subscription plan and payment plan?
What payment currencies does WorkDo accept?
What are the differences between Free Plan and Premium Plan?
Credit card information update.
Billing information update.
The payment failed, how do I resolve it?
FAQ-ID:1038
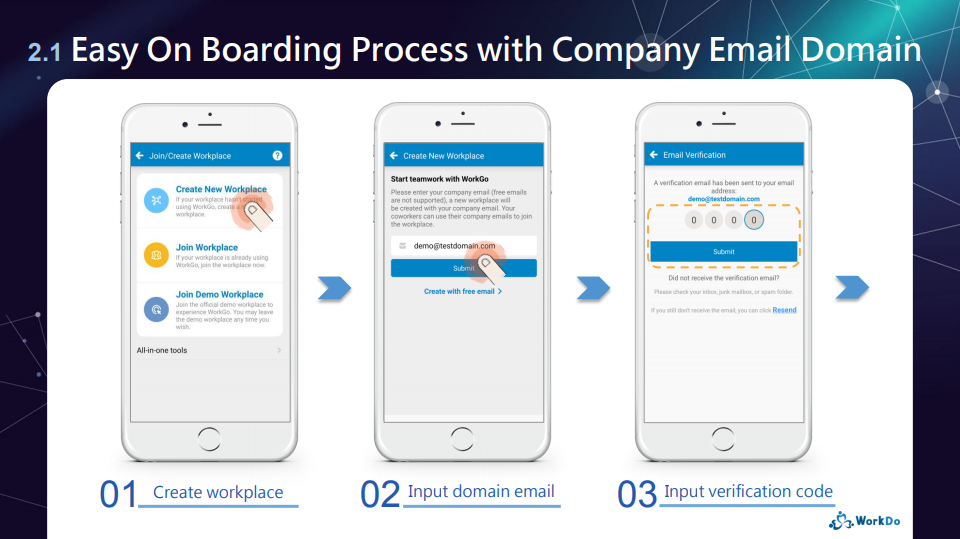
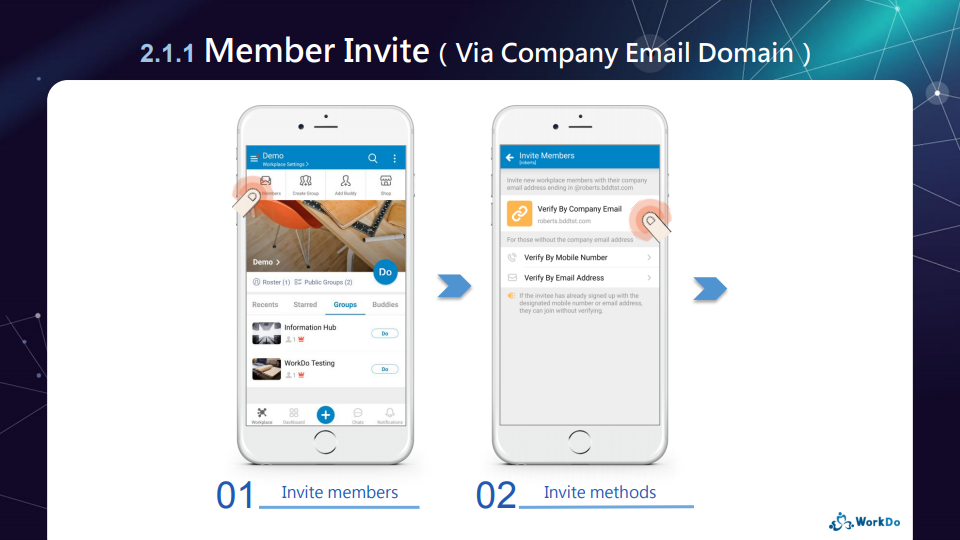
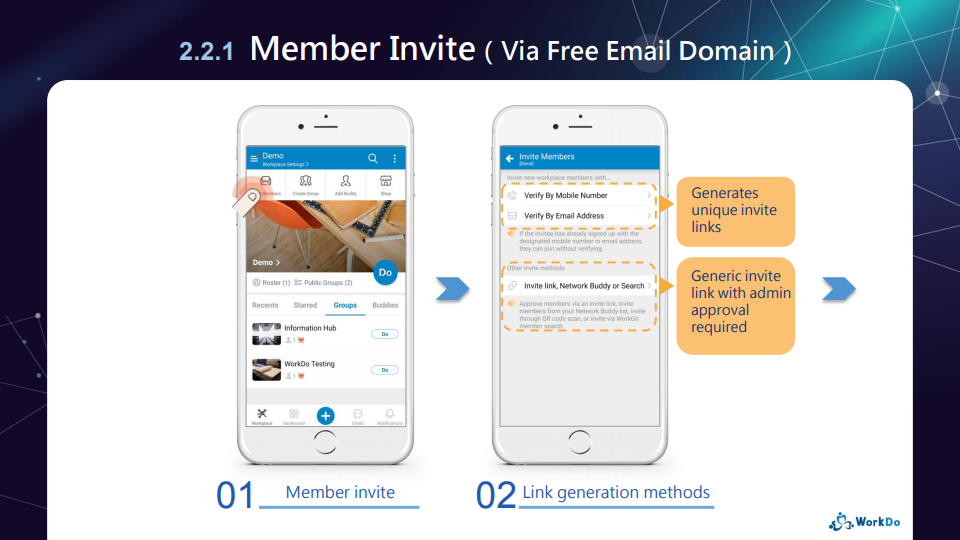
There are a number of ways team members could join a workplace and we’ll explain more here.
You could invite team members to the workplace if you are a workplace admin or the Workplace Privacy setting is set to everyone is allowed to invite other members to the workplace.
Invite New Members to a Workplace
Steps:
- On the workplace page.
- Click the Invite Members button on the upper-left corner of the screen.
- Select verification method.
- Verify with company email address.
- Verify by mobile number.
- Verify by email address.
- Verify via invite link, invite Network buddies or member search.
- Send invite link.
- App │ Send the invite link via Facebook, LINE, Whatsapp, WeChat, or copy and paste invite link to external apps.
- Web │ Copy and paste an uniquely generated invite link to other external software.
Reminder
In Step 3, depending on the verification method selected, WorkDo will generate unique invite links for the unregistered users, this in term, will affect whether the users have to be approved by the workplace admins upon joining the workplaces.
Next, we’ll go through the 3 primary ways for members to join workplaces.
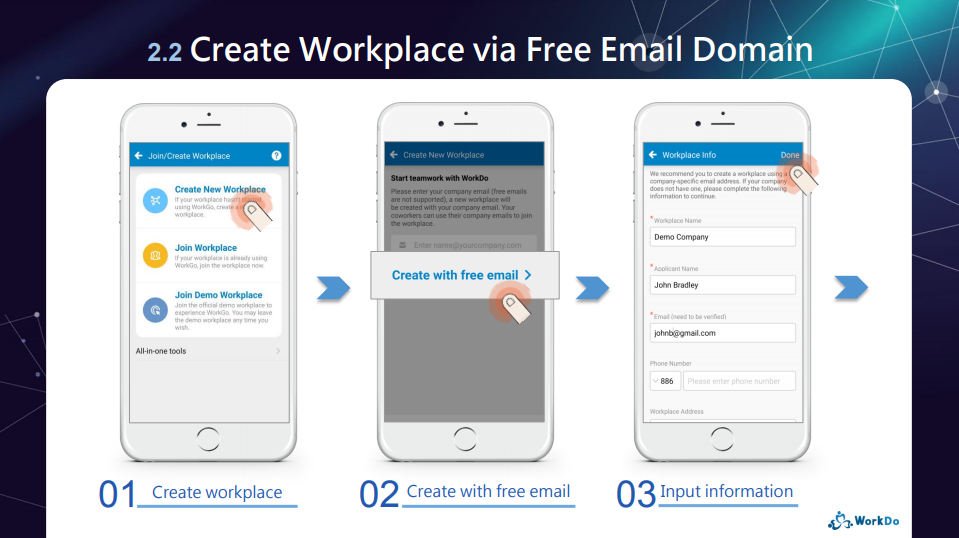
- Self-join a Workplace
Download and register WorkDo and the user will be guided to the Join/Create Workplace screen. Click Join Workplace and fill in the personal company domain email address to join the workplace.
- Invite Members to a Workplace
WorkDo will generate invite links based on the verification method selected and the invitees have to use the specified email address or mobile number to register before joining the workplace.- Verify with Company Email Address:Send The invite link can be sent to all the users who are using the same company email domain and will automatically join the workplace upon signing on.
- Verify by mobile number:Target invite users with specified mobile numbers who don’t use company email addresses to the workplace.
- Verify by Email Address:Target invite users with specified mobile numbers who don’t use company email addresses to the workplace.
- Invite Link, Network Buddy or Search:This method is suitable for companies that don’t have a company email domain. The invite link generated can be sent to all users, however, the workplace admins have to manually approve each individual before joining the workplace.
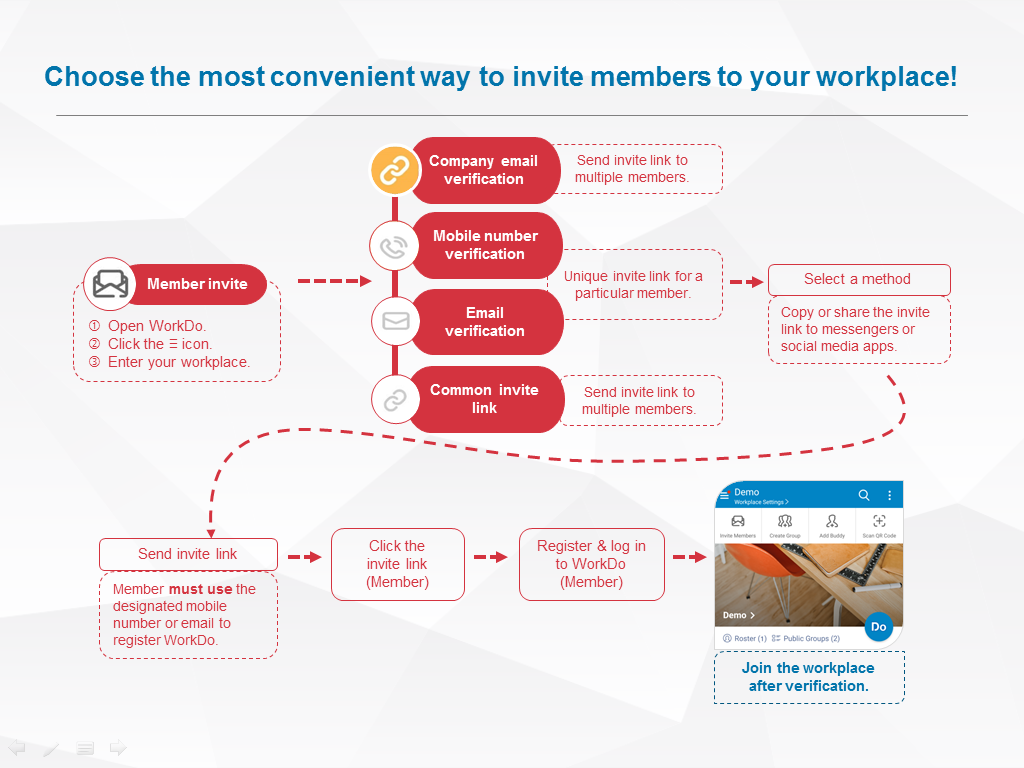
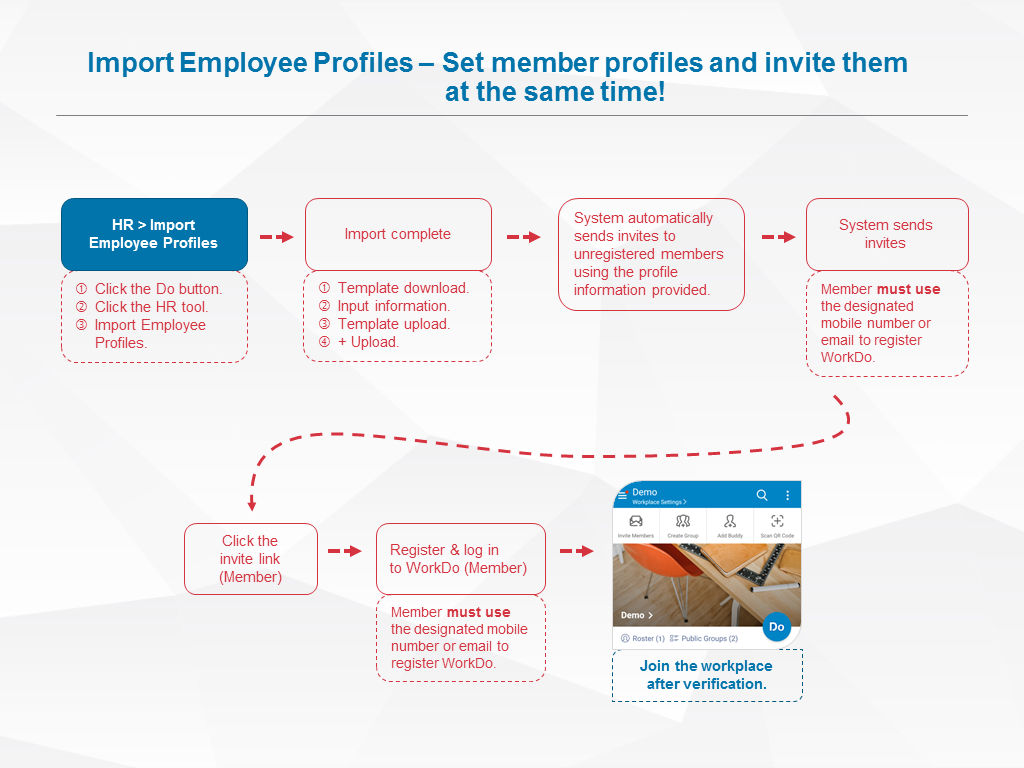
- Batch-import Employee Profiles
The workplace admins have to use the HR tool to batch-import employee profiles to WorkDo, in doing so, the system will send an invite link to everyone who has not signed on to WorkDo using either the email address or mobile number.
 Note!
Note!
- Please note that although the permission for member invite is marked for workplace members and admins, however, this is entirely dependent on the privacy settings of the workplace.
- When members are invited or join the workplace on their own, please use the HR tool to edit their employee profiles.
Relevant Questions
Set your workplace in 5 steps
Can I join the company workplace on my own?
What do I need to do for the new employees joining the workplace?
Get notifications when members join and leave.
Having problems importing employee profiles?
What to do when employees resign?
How do I sign up for WorkDo?
Can I interact with a member individually instead of with all members?
Can I bind the company email domain when I created the workplace using a free email domain?
FAQ-ID:1059
How do I use WorkDo to work with clients and customers?
WorkDo Network was created to alleviate the external communication and collaboration hurdles that many users face.
Now with one WorkDo account, both internal and external communications are enabled by WorkDo!
What can you do in the WorkDo Network?
-
Add clients, suppliers and partners as buddies.
Add your buddies is the best way for one on one communication!
-
Create a groups to collaborate.
You can add clients, customers and suppliers as buddies put them into groups for external communication and collaboration.
-
Use the basic tools as you please!
Once a group is created, you can freely use the available tools for collaboration. Of course, the Dashboard will remind you items that are due every day ensuring a smooth collaboration among partners.
-
Receive official WorkDo notifications.
You will be notified of WorkDo’s new tools, features and events periodically.
Now it’s time for you to invite external partners to WorkDo and collaborate effortlessly!
FAQ-ID:1092
When there’s an update related to the tools you use to interact with your team, you will receive a push notification on your mobile device when you are not actively using WorkDo. The Notification Center will display all the updates with a numeric value representing the number of new updates.
The notification methods include alert sound, vibration and daily reminder count. You could also opt to receive notification alerts, email alerts, event alarms and chat alerts of the selected groups and workplaces. Please follow the steps below to personalize your notification settings.
Change App Notification Settings
Steps:
Click the ![]() icon > App Settings > Notification Settings to change the settings.
icon > App Settings > Notification Settings to change the settings.
- Alert Sound: Recieve notification sounds for updates when the app is running.
- Vibrate: Receive notification vibrations for updates when the app is running.
- Daily Reminder: Receive daily notification of items on your to-do list once enabled.
 Reminders
- For devices that are running on Android 8.0 or above, the devices’ sound profile will be applied to chat alerts and event alrms.
- Notifications include publishing posts, editing posts, getting likes, receiving comments and various tool actions that require interactions and attention.
Change Workplace Notification Settings
Steps:
Click the Workplace Settings > Personal settings > Notifications to change the settings.
- Notification Center: Controls the Workplace’s notification sound and vibration. When turned off, you will not receive notification sounds and vibrations unless you manually check the notification center.
- Email Alert: Receive email notifications in your email inbox. The default email is set to your email listed in the HR tool, the email you used to register the account or the email used to link your account.
- Event Alarm: Receive event alarms in advance when you reply Going/Maybe to events. Set your reminder time, default is set to 15 minutes prior to the event.
- Chat Alert: Receive chat notifications. The top button determines the overall chat notifications are enabled or disabled, or you could individually turn the notification on/off for selected groups.
Reminder
- You will receive additional push notifications when WorkDo is not closed.
Relevant Questions
What is Chat Alert? And how do I change its settings?
How to set the Daily Reminder?
Receive email notifications.
Why is my Oppo smartphone is not receiving WorkDo’s notifications?
How do I know I’ve read a notification?
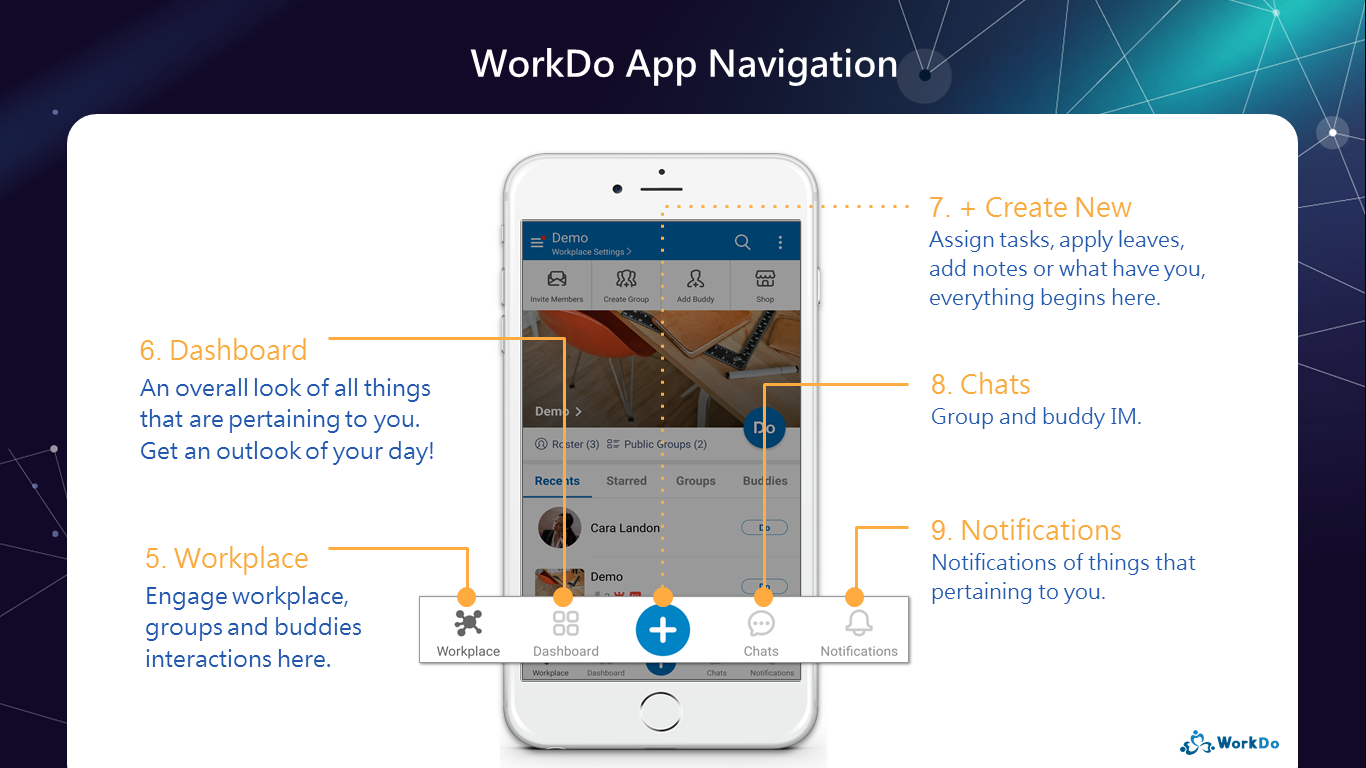
WorkDo web general navigation.
WorkDo app general navigation.
FAQ-ID:1151
The HR tool serves as the most integral part of WorkDo! Its settings are connected to employees’ daily clock-ins/outs, leave applications, overtime applications, and various eForm approval flows.
There are 6 important steps that you need to follow, so please follow the instructions below to properly set up HR.

│ HR is key to improving yor team’s workflow │
Please make sure that you have first followed basic setup done in Start WorkDo in 5 Steps to find the settings of the picrure below.
│ Read HR Tool Manual │
If you have the HR Staff tool role, then you may follow the steps below and use the web version of WorkDo to set up HR!
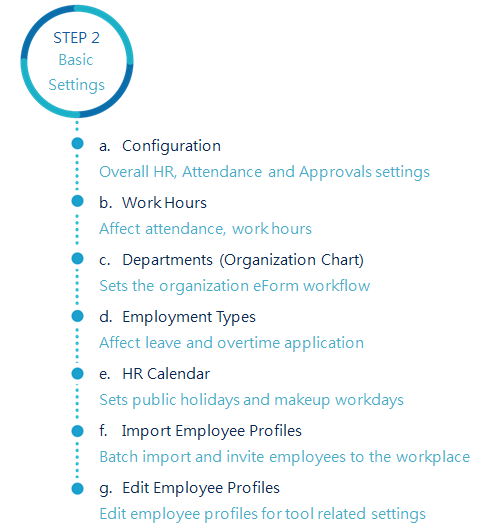
6 Important Settings in HR
STEP 1 │ Work Hours
Your workplace’s work hours directly influence the team’s workdays, clock in/out times, flexible work times, etc. You can use the default work hours or you can create multiple work hours for different teams. Your call!
If you need to use the Attendance tool for employee clock in/out, please activate it first to for the related clock time settings to be available here.
STEP 2 │ Departments
Departments settings dictate how eForms are passed and signed. Properly set up your organization’s hierarchy and the employee requests will follow the set flow and get to the right person to be signed.
- Trial Period: We recommend you invite 1 to 3 people to help you test out the request flow, each with a different role and title.
- Adoption: Invite the rest of the teammates to join the workplace and assign them with the right roles and titles.
STEP 3 │ Employment Type
By default, WorkDo has 3 employment types, you can create, deactivate, or change them as you see fit. The employment type will affect certain tool privileges, ie, who are allowed to apply for overtime and how many leave days they are entitled to have each month/year. So don’t forget!
STEP 4 │ HR Calendar Management
Non-working days such as the federal holidays, special company events are set with the HR Calendar. A workplace’s HR calendar will determine whether employees are able to apply for leaves, overtime, or clock in/out normally.
A workplace is allowed to use multiple HR calendars for different teams, so you don’t worry about managing remote teams in different countries!
STEP 5 │ System Settings
The most important setting in the System Settings is that you don’t have to manually set each new employee is required to clock in/out. However, this function is not retroactive, meaning it only applies to new employees after the setting has changed.
You can always go to the Attendance tool and individually change this setting if you want, but if your workplace doesn’t require employees to clock in/out, you can bypass this step.
STEP 6 │ Import Employee Profiles
The aforementioned 5 steps are for the HR personnel to manage each employee, and each employee’s profile can be updated anytime. But to make life simpler, you can also batch import employee profiles by using WorkDo’s template file. This can drastically reduce the amount of time spent on profile setting and it’s the quickest way to get your workplace up and running!
Reminders
- Only members with the HR Staff tool role are allowed manage the workplace and employee settings instead of the workplace admins. This is an added layer of security, and in most cases, company HRs are not always in charge of maintaining the entire workplace.
- These 6 important settings are crucial to connecting to advanced tools like Attendacen, Leave, Leave pro and Overtime, so be sure to complete them before using these tools.
- Wanna know more HR details, say no more! The most comprehensive HR Tool Manual is here!
Relevant Questions
HR Settings for New Employees
Problems importing employee profiles?
Why is there’s a member with two employee profiles?
What is the HR Calendar?
How do I create new departments in the organization?
Why do I have limited tool access?
What are the HR tool features?
Understand your tool role and what it does.
FAQ-ID:1168
The Attendance tool in WorkDo is fairly straightforward, it offers employees to clock in/out with their PCs/phones via Wi-Fi/GPS when they enter the preset ranges.
If you cannot clock in/out, it is typically one of these 4 reasons. 1. The Attendance tool settings are incomplete. 2. The device is not connected to the set Wi-Fi hotspot or in the set GPS range. 3. WorkDo hasn’t been given permission to access your device’s location. or 4. Unstable internet connection.
Please refer to the steps below to troubleshoot the problem if you cannot clock in/out with your device.
Troubleshooting Clock In/Out Issues
Steps:
- Have you completed the Attendance tool settings?
The settings include select employees who are required to clock, set the Wi-Fi hotspots and GPS locations, and whether remote teams and work from home employees are allowed to remote clock. - Make sure your device is connected to a set Wi-Fi hotspot.
- iPhone │ Must connect to the Wi-Fi hotspot to clock in/out.
- Android │ Some Android devices are allowed to clock in/out so long as the hotspot is discovered without having to connect to it.
- Make sure WorkDo is allowed to obtain your device’s location.
- App │ Enter the device settings and select Apps > WorkDo > Permissions > Location and allow access for WorkDo to obtain your device location to clock in/out.
- Web │ Click the padlock icon in front of the browser link and allow location access.
- Make sure the GPS service is not blocked.
The GPS service of your device can be blocked in certain buildings and structures. Please be sure that your device has GPS access before attempting to clock in/out. - GPS drift.
GPS drift, in the most practical sense, is the difference between your actual location and the location recorded by a GPS receiver. Consumer-grade GPS receivers are not 100% accurate, this will usually cause a difference between your actual location and your recorded location. If this happens, follow the below steps to fix the problem.- Enter the clock in/out screen.
- Click “Check clockable area” and your current GPS location to see if you are within range.
- Click “Revise Location” when your GPS location is undetected or drifting.
- If most employees are often out of the clockable range, please ask the HR Staff to extend the clockable range.
- Make sure you have a stable internet connection.
Be sure that your device has a stable connection to the set Wi-Fi hotspot before clocking in/out.
Reminders
- Post-Clock utilizes the same clocking method, so if the Post-Clock button does not appear when you are late for work, please refer to the same steps to troubleshoot the problem.
- Different brands of devices may name the settings and options differently, please refer to your device’s manual for proper names and functions.
FAQ-ID:1032
Typically, when the workplace admin has completed the Leave Pro settings, all members should have their leaves in the proper amount and start applying for leaves, but if this is not your case, you might have missed a setting or two.
Follow the instructions below to complete all the necessary settings and everything should be good to go!
You may configure the settings using the web version of WorkDo if you are the HR Staff of the Leave Pro tool.
Unable to Apply for Leaves Troubleshooting
1 │ Leave Pro is not in the toolbox.
If some of your team members can’t find Leave Pro in their toolbox and the tool has been enabled, chances are that their role is set to No Role. Please adjust their roles to Employee or higher to fix it.
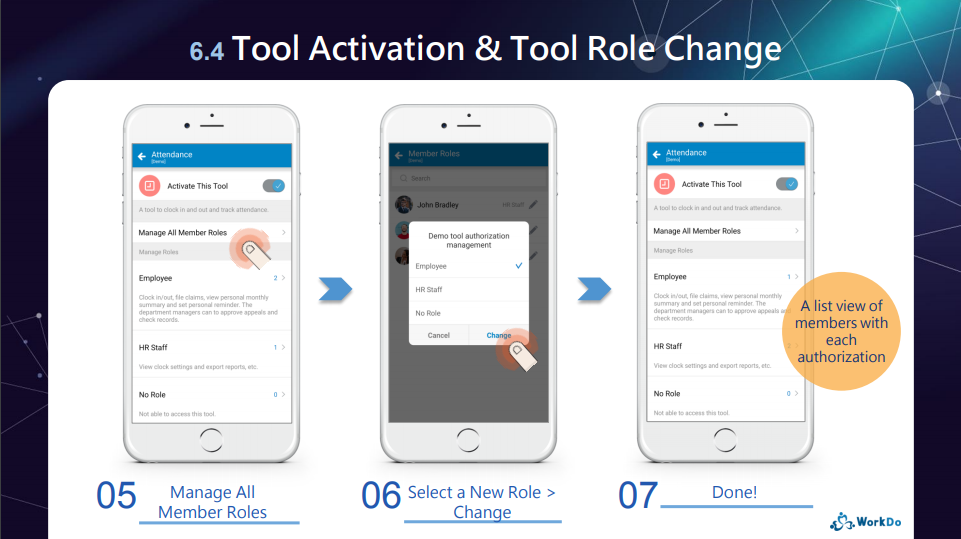
How to change team members’ tool role?
2 │ Members are seeing an error message when entering Leave Pro or they are missing certain type of leaves
Remember, the system will automatically dole out leaves base on rules and eligibility. If some employees are receiving their leaves, please check whether they have been set eligible to receive the leaves.
-
- Eligibility
In most workplaces, some leaves are given based on seniority, positions, or gender-specific, in STEP 2 of the Leave Pro tool setup FAQ, eligibility plays a big role in who gets what types of leaves. Please make sure that you have properly selected the right type of employees for each leave type for them to receive their leaves.
- Eligibility
What are the necessary settings of Leave Pro?
-
- Employee Profiles
As mentioned, some leaves are doled out based on different factors, and the employee profiles are where you can find these settings for each employee. When everything is properly set, then everyone should be getting the correct leaves.
- Employee Profiles
What are the necessary settings for each employee?
- Employee Balance
Steps 1 and 2 should handle most cases of employees who aren’t receiving their leaves. If all else fails and you have no idea why some employees are getting their leaves, you can use the Employee Balance function to grant leaves individually. But consider this as the last resort, so long the root cause is not found, you always have to manually grant leaves to these employees.
What are the necessary settings for Leave Pro?
3 │ HR Calendar
Don’t forget that the HR Calendar is connected to Leave Pro as well!
- Setting federal holidays and workdays throughout the calendar year will determine when employees can apply for leaves and how leaves are deducted.
So if employees’ leaves are incorrectly deducted, it probably has something to do with the company’s HR Calendar.
Reminder
- Wanna know more about the Leave Pro tool? Check out the Leave Pro Tool Manual!
Relevant Questions
The Leave Pro tool setup.
Why are employees’ leaves don’t add up? How do I fix them?
Why do I have limited tool access?
About Apple ID verification.
The HR tool setup.
What settings in HR are required for new employees?
What’s the difference between “Leave” and “Leave Pro”?
What is the HR Calendar?
Sign up/Log in
FAQ-ID:1010
You could create your WorkDo account using a valid email address or a mobile number.
In addition, to avoid the wrong person from joining your workplace, certain invite actions do require a designated email or mobile number upon signing up.
Plan:![]() All plans
All plans
Permission:![]() All users
All users
Interface:![]() App
App ![]() Web
Web
│ Email Sign Up
- Install and launch WorkDo
- App │ Launch WorkDo and select “Sign Up”.
- Web │ Click “Log In” on the official website and select “Sign Up”.
- “Email” is the default sign up option. Enter your email and password.
- Click “Sign Up” and a verification email containing a pin number will be sent to the email address provided.
- Enter the pin number on WorkDo.
- Set up your WorkDo profile and picture and you are good to go!
│ Mobile Number Sign Up
- Install and launch WorkDo
- App │ Launch WorkDo and select “Sign Up” and click “Sign up with a mobile number”.
- Web │ Click “Log In” on the official website and select “Sign Up”, then select “Mobile Number”.
- Input the “Country/Region Code” followed by your mobile number.
- Click “Sign Up” and you will receive a verification SMS containing a pin number.
- Enter the pin number on WorkDo.
- Set up your WorkDo profile and picture and you are good to go!
Reminder
- Federated login is also another method that users could utilize for a faster and smoother log in process. WorkDo offers federated login via Google, Facebook, Apple ID and WeChat.
FAQ-ID:1011
If you don’t have a WorkDo account yet, you can sign up for one in a couple of minutes. Please refer to the topic “How do I sign up for WorkDo” for more information. If you already have a WorkDo account, you can log into your account by entering your mobile number/email and password then tap Log In.(Extended reading: My WorkDo Account)
If you already signed up using your email, mobile number, or has bound your account to a Google, Facebook, Apple ID and WeChat account, please follow the steps below to log into your WorkDo account.
Plan:![]() All plans
All plans
Permission:![]() All users
All users
Interface:![]() App
App ![]() Web
Web
1 │ Email Log In
- Sign up your WorkDo account with your email.
- Open WorkDo.
- App │ Open WorkDo and click Log In.
- Web│ Click Log In on the Official Web Site.
- The default is set to email log in, enter the email and password you used to sign up for WorkDo.
- Click the Log In button.
2 │ Mobile Number Log In
- Sign up your WorkDo account with your mobile number.
- Open WorkDo.
- App │ Open WorkDo and click Log In.
- Web│ Click Log In on the Official Web Site.
- Select Mobile Number.
- Enter the mobile number you used to sign up for WorkDo.
- Click the Log In button.
3 │ Google / Facebook / Apple ID / WeChat Log In
You must complete the account binding process to a Google, Facebook or WeChat account.
- Open WorkDo
- App │ Open WorkDo and click Log In.
- Web│ Click Log In on the Official Web Site.
- Click the Other tab.
- Select the corresponding Google, Facebook, WeChat icon to log in.
Reminders
Upon log in, your destination screen is determined depending on the situations below.
- The workplace you previously logged out of.
- If you have not joined any workplace, the Join/Create Workplace page will be shown.
FAQ-ID:1013
Did you know apart from email and mobile number, you could use your Google account to log in to WorkDo?
Simply set up your Google account as a federated account and bind it to your WorkDo account for quicker log-ins!
Sign Up Your WorkDo Account Using Google
Steps:
- Set up Google as a federated account.
- Open WorkDo.
- App │Open WorkDo and click Log In.
- Web│ Click Log In on the Official Web Site.
- Click the Others tab.
- Select Continue with Google.
- Enter your Google account information for verification.
- Set up your WorkDo profile and off you go!
Reminders
- If you have multiple Google accounts, make sure you choose the right account and enter the correct password to pass the verification process.
- If you used a Google account to sign up for WorkDo, the system will use the gmail as your primary email, you may set up another email for the email log in method.
- Click here to view your Google authorization to WorkDo.
FAQ-ID:1012
Did you know apart from email and mobile number, you could use your Facebook account to log in to WorkDo?
Simply set up your Facebook account as a federated account and bind it to your WorkDo account for quicker log-ins!
Sign Up Your WorkDo Account Using Facebook
Instructions:
- Set up Facebook as a federated account.
- Open WorkDo.
- App │Open WorkDo and click Log In.
- Web│ Click Log In on the Official Web Site.
- Click the Others tab.
- Select Continue with Facebook.
- Enter your Facebook account information for verification.
- Set up your WorkDo profile and off you go!
Reminders
- If you have multiple Facebook accounts, make sure you choose the right account and enter the correct password to pass the verification process.
- If you used a Facebook account to sign up for WorkDo, the system will use the email as your primary email, you may set up another email for the email log in method.
- If Facebook is not authorized to provide your email to WorkDo, you must set up an email log in method and create a federated account. Only then the HR personnel are able to set up your employee profile and settings for tool usage.
- Click here to view your Facebook authorization to WorkDo, click “View and edit” to change the data access if needed.
FAQ-ID:1025
Did you know apart from email and mobile number, you could use your Apple ID to log in to WorkDo?
One thing to note is that because Apple ID uses a private email relay service to generate a random, unique email address that forwards to your personal email, which means the HR tool is unable to bind your account, preventing you from accessing many advanced tools.
Therefore, please bind a valid email address to your account once you have completed the registration process and have the HR Staff bind your account to your employee profile in the HR tool.
Signn Up Your WorkDo Account Using Apple ID
Steps:
- Open WorkDo
- iPhone │ Open WorkDo and click Log In.
- Web │ Click Log In on the Official Web Site.
- Click the Others tab.
- Select Continue with Apple ID.
- Enter your Apple ID information for verification.
If your device is not logged in to Apple, you will first be asked to log into your Apple account. - Set up your WorkDo profile and off you go!
- How to access advanced tools?
- Bind an email address.
- Ask the HR Staff to link the email address to your employee profile.
Reminders
- If you have multiple Apple accounts, be sure to choose the right account to sign up and log in to WorkDo.
- Click here for privacy and security information on sign in with Apple.
FAQ-ID:1014
Did you know apart from email and mobile number, you could use your WeChat account to log in to WorkDo?
Simply set up your WeChat account as a federated account and bind it to your WorkDo account for quicker log-ins!
Sign Up Your WorkDo Account Using WeChat
Steps:
- Set up WeChat as a federated account.
- Open WorkDo.
- App │Open WorkDo and click Log In.
- Web│ Click Log In on the Official Web Site.
- Click the Others tab.
- Select Continue with WeChat.
- Enter your WeChat account information for verification.
- Set up your WorkDo profile and off you go!
Reminders
- If you have multiple WeChat accounts, make sure you choose the right account for sign up and log in process.
- If you used a WeChat account to sign up for WorkDo, the system will ask you to set up an email for the email log in method.
- Click here to view your WeChat authorization to WorkDo.
FAQ-ID:1019
Not sure what to do after registration? Take it easy, now we’ll show how to get your workplace up and running in 5 simple steps!
With the correct settings and user-defined rules, a virtual workplace in WorkDo can perform real-life routine practices and operations of your workplace. Here’s how!
Start WorkDo in 5 Steps
STEP 1 │ Create a Workplace
The first thing you should do after registration is to create a virtual workplace, then you can follow the next step and bring your teammates and collaborate on board.
View file:WorkDo Quick Start Settings
STEP 2 │ Invite Teammates to Your Workplace
In this step you could either ask your teammates to join your workplace or have the workplace admin send join invites.
- Trial run:We recommend you invite at least 1 to 3 people assigned with different roles into the workplace to help try out all the tools and features in the trial run.
- Adoption:Invite the rest of the your team into the workplace and deligate their roles accordingly by repearting Step 3 and 4.
How to invite people to a workplace?
Can I join the company workplace on my own?
View file:WorkDo Quick Start Settings
STEP 3 │ Set Workplace Admins
You are assigned as the workplace owner by default upon creating the workplace. The ownership can be transferred if need be, you should also assign other members, typically HR and/or IT staff, as admins to help manage the workplace and various settings.
How to add admins to workplaces or groups?
View file:WorkDo Quick Start Settings
STEP 4 │ Set Tool Roles
Wanna enable payroll management, automated leave system, overtime calculation or Wi-Fi / GPS clock in / out? Whatever you need, they are in the tool box!
Just as a company has different people and managers to access different data and files, the tool roles in WorkDo ensure that members would use the tools and access the data with their permission for information compartmentalization.
How to activate / deactivate a tool?
Why do I have limited tool access?
View file:WorkDo Quick Start Settings
STEP 5 │ Customize Tool Settings
Taking into consideration that each workplace operates differently, the tools in WorkDo are just as flexible to cater to workplaces of various industries and team cultures. In this step, you will learn how to customize the tool settings that can best represent how your workplace truly operates.
View file:WorkDo Quick Start Advanced Tools
Reminders
- Although listed as admins only, all users are able to create workplaces, i.e. Step 1, however, from Step 2 forward, are only the admins are allowed.
- By now, your workplace should be up and running, but if you need more detailed explanation, please use the guides below.
Download Quick Start Settings (Step 1 to 4) Download User Guides (Step 5)
Relevant Questions
What do different roles do in a workplace/group?
How do I sign up for WorkDo?
How to create a workplace?
Can I join the company workplace on my own?
How to invite people to a workplace?
How to add admins to workplace or groups?
What are tools?
How to activate / deactivate a tool?
Why do I have limited tool access?
What’s the difference between “Leave” and “Leave Pro”?
FAQ-ID:1015
In most cases, if your device cannot receive verification SMS are likely due to:
- You are using a tablet that only has Wi-Fi connectivity.
- Your device doesn’t have a SIM card, or the SIM card is invalid.
- Your device is set to block business SMS.
If your device is unable to receive SMS, you could opt to log in via your Facebook, Google or WeChat account.
FAQ-ID:1016
Typically, when you sign up for WorkDo using a mobile number, email, via federated accounts or bind your account to the company email domain, the system will automatically send a verification SMS to your device. If you did not receive the verification SMS for any reason, please follow the instructions below for troubleshooting.
Fail to receive verification SMS
Instructions:
- Please check if the mobile number is entered correctly then press “Resend” button to receive the verification SMS.
- You can go back to the previous page to reenter the mobile number if it is incorrectly entered.
- Verification method:
- Verification SMS: Please contact your mobile service provider for your business SMS settings if you are still unable to receive the verification SMS after resending it.
- Verification Email: Please check your spam or junk folder first if you did not receive the verification email in your inbox.
- Use other methods to sign up for WorkDo or Contact Us for assistance.
FAQ-ID:1018
Forget your password?
If you can’t log in your account, please make sure your login account and password are both correct entered. If you forgot your password, you could tap Forgot Password and follow the instructions to reset your password and log in again.
Troubleshooting
Methods:
- If you are in a workplace.
Members with the HR Staff tool role can look up your log in information in the HR tool by clicking HR > Employee Profiles > Member select > Login Email / Mobile Number. - Check your email / SMS inbox.
- If you didn’t delete your account verification email or SMS, you may still be able to find your log in email or log in mobile number in your email / SMS inbox.
- Federated account │ It is possible that you might have used a federated account to sign up for WorkDo, so you could try logging in via Facebook, Google, Apple ID or WeChat.
- Make sure your log in information is entered correctly.
- Forgot password.
Reset password then log in.
Reminders
- It is recommended that you bind a federated account after successfully logged in for quicker access.
- Federated login doesn’t require a password and you may use Facebook, Google, Apple ID or WeChat as a federated account to log in to WorkDo.
- In the unfortunate event that you failed to retrieve your login information, please read the relevant questions below to register a new WorkDo account.
FAQ-ID:1022
You don’t have to log out of WorkDo, because WorkDo supports multi-device login, if you use a new device to log in to your WorkDo account, everything will be synced up and up-to-date. But if you really intend to log out, please follow the steps below.
Log Out of WorkDo
Steps │ App
- On the workplace screen.
- Select the
 icon on the upper-right hand corner.
 - Click Accounts.
- Select Log Out highlighted in red.
- Select Yes on the log Out Prompt.
- Web
Steps │ Web
- Click the
 icon.
icon. - Click Log Out.
- Click the Confirm button on the prompt to log out.
Relevent Question
FAQ-ID:1020
Certainly, WorkDo supports multi-device login!
WorkDo is designed to allow users to collaborate with their teams and access workplace anytime, anywhere! You can log into your WorkDo account on multiple devices and all data will be automatically synced up so you never miss a thing!
FAQ-ID:1021
Only users who register or bound their WorkDo account using an email or mobile number will obtain a password. If you used Google, Facebook, Apple ID or WeChat to sign up for WorkDo, please use the federated account to log in to WorkDo or refer to this FAQ to troubleshoot the problem. If you forgot your password, please follow the steps below to reset it.
Viewing your payslip with the Payroll tool requires a password, if you are uncertain whether you have set a password, please refer to this FAQ to verify it, and should you have forgotten your account password, then please reset it.
Reset Password
Step:
- Open WorkDo
- App │ Click Log In.
- Web │ Click Log In on the official Website.
- Click “Forgot Password?”
- Enter account email address or mobile number used to register WorkDo.
- Email │ An email with verification code will be sent to the inbox.
- Mobile │ An SMS with verification code will be sent to the mobile device.
- Enter the verification code on WorkDo.
- Enter your new password to complete the process.
Reminders
- The verification code will expire if the password reset process is not completed within the allotted time.
- Email and mobile number sign up will be asked to create a password. This password is also used when you bind other federated accounts to your WorkDo account, too.
- If you used a Facebook, Google, Apple ID or WeChat account to sign up for WorkDo, you will not be asked for login password. A password is only required when you bind an email or a mobile number to your account.
Account
FAQ-ID:1033
Trouble remembering your login information?
Don’t sweat it! Instead of setting up another set of login account and password, by taking advantage of the federated login, you too, can swiftly log in to WorkDo using your existing Google, Apple ID, Facebook or WeChat account.
Account Constraints
1 │ WorkDo Account
At the moment, WorkDo requires either an email address or a mobile phone number sign up.
- Mobile Phone Number:Users are allowed to bind one phone number to their accounts.
- Email:Users are allowed to bind multiple email addresses to their accounts. Different account verification email addresses of different workplaces are automatically bound.
2 │ Federated Login
Currently, Facebook, Google, Apple ID and WeChat are the supported external accounts. Users are allowed to bind one of each external account.
Federated Account Linking
- Enter the Accounts Menu.
- App │ Click the icon on the upper-right-hand corner > Accounts.
- Web │ Click the icon > click App Settings.
- App │ Click the
- Bind federated accounts.
- One mobile number, Facebook, Google, Apple ID and WeChat account are allowed to be bound to your WorkDO account.
- Multiple email addresses are allowed to bound to your WorkDo account.
- Account Verification
- WorkDo Account │ Enter a mobile phone number or an eamil address then enter the verification code sent via SMS or email.
- Federated Account │ Log in via linked Google, Apple ID, Facebook or WeChat account.
- Once the accounts are linked, you can use them to log in to WorkDo.
Reminders
- Use an email or a mobile phone number to sign up WorkDo and set a dedicated password. This password is paired with all federated accounts that are linked.
- If you used Google, Apple ID, Facebook or WeChat upon sign up, password set up is not required. It is only when you link an email or mobile phone number will you be asked to set a password.
- If you used different company emails to join different workplaces, the company emails will be automatically linked as your federated accounts.
FAQ-ID:1028
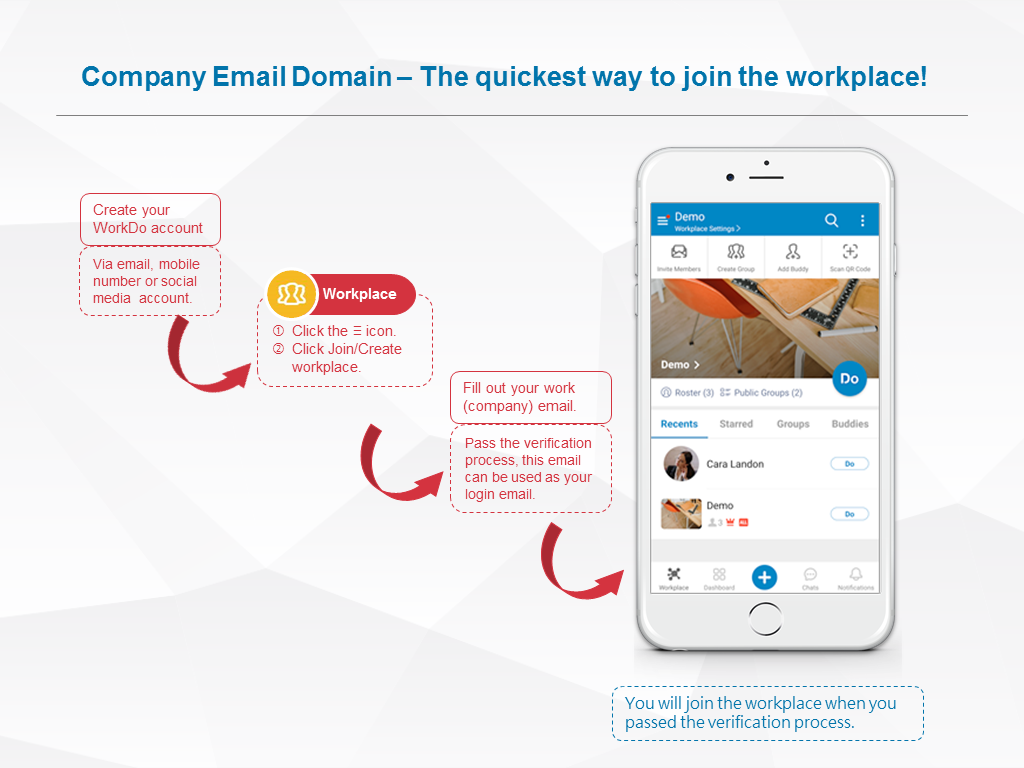
The answer is “No. You can use your original account for work.” Here’s how it’s done!
- If you have a company domain email address…
Chances are most users registered their WorkDo accounts using their company email addresses, however, if you prefer to use your personal email address, mobile number, Facebook account, Google account, WeChat account, or Apple ID upon registration is also okay. You just need to use your company email address for the workplace verification process, then the system will automatically combine them as your login in accounts. From this point on, you may use any of the accounts as your preferred login method. Simple, right? - If you do not have a company domain email address…
Then you need to use your mobile number or personal email address the workplace HR Staff chose as an invite method. You will then receive an email or SMS containing the invite link to join the workplace.
Let’s take a look of a few things that you need to keep in mind when doing this.
01 │ WorkDo Account Registration
The good thing about using your email address, mobile number, Facebook account, Google account, or WeChat account to register your WorkDo account is that if you change careers, you may keep your account and simply use the company domain email address to join the workplace without having to register a new WorkDo account.
02 │ Workplace Verification Account
Workplace Verification Account is the account you use to verify your identity and join the workplace. You may use your company email address, personal email address, or mobile number to receive the verification email or SMS, and you will join the workplace once approved.
- When your WorkDo account and Workplace Verification Account is the same…
You will not receive the workplace verification email or SMS, and you will join the workplace immediately.
Senario 1 │ When you receive the workpalce invite, click the link and use the Workplace Verification Account to register your WorkDo account to join the workplace and you are done!
Senario 2 │ You used your company email to register your WorkDo account then the system will automatically match your company email domain with your workplace. One thing to keep in mind is that if you switch career path and would like to keep this account, please have the workplace admin Block & Remove this account to avoid joining the workplace again. - When your WorkDo account and Workplace Verification Account is the different…
If you had registered your WorkDo account prior to joining the workplace, you will need to pass another authentication process to join the workplace. Once approved, both accounts will your federated accounts.
Which account do I ned to use upon registration?
-
- If you have a company domain email address:
- You may use a personal email address to regiter WorkDo then use the company email to join the workplace.
- Use the company email to register WorkDo and complete the verification process and join the workplace.
- Upon receiving the workplace invite:
- If your company email is specified, please click the invite link and follow Step 1 to complete the registration and workplace verification processes to join the workplace.
- If your personal email address or mobile number is specified, please click the invite link and use the specified account for registration and workplace verification processes to join the workplace.
- If you have a company domain email address:
Reminders
- The company email address is the paid enterprise email mailbox. In most cases, the easiest way to tell whether you are using a company domain email address is to see that your company’s name should follow the @ sign. However, there are exceptions to this, so please check with your IT technicians first.
- If you used different company email addresses to join different workplaces, all email addresses will be combined as your federated accounts.
FAQ-ID:1074
The calendar on your WorkDo dashboard gives you an overview of all your workplace’s upcoming events and tasks. It is a personalized calendar that is for you only. However, if you prefer to use an external calendar, feel free to integrate your WorkDo events into an external calendar!
Just enable the Calendar Subscription function in your Workplace Settings and copy the link then paste into your external calendar to subscribe, simple as that!
Subcribe / Cancel Calendar Subscription
STEPS │ App
- Click the Workplace Settings on the workplace page.
- Click your profile.
- Select Calendar Subscription.
- Enable the function.
- Subscribe │ A blue checkmark will indicate it is enabled and a subscription link is shown. Copy the link and paste it into your external calendar to receive updates from your workpalce.
- Cancel Subscription │ Toggle the button to disble it.
STEPS │ Web
- Click the Workplace Settings on the workplace page.
- Select Calendar Subscription.
- Enable the function.
- Subscribe │ A blue checkmark will indicate it is enabled and a subscription link is shown. Copy the link and paste it into your external calendar to receive updates from your workpalce.
- Cancel Subscription │ Toggle the button to disble it.
Reminders
- For iPhone users, just click subscribe and the link will be automatically copied to your calendar.
- If you are in multiple workplaces, please switch workplaces and follow te steps described in this FAQ to obtain the calendar subscription links.
- Not every external calendar shares the same subscription method, please check with your calendar on how the subscription service works.
- Most external calendars do not provide real-time updates and synchronization. Please check your calendar’s information to ascertain the update times and frequency.
- You will no longer receive updates once you cancelled the calendar subscription or updated the link.
Relevant Questions
A personalized Dashboard Calendar just for you.
What are federated accounts?
Multi-Language Support.
What is user Do-ID, and how to set one?
Receive email notifications.
How to set the Daily Reminder?
What are the benefits of using the Dashboard?
What is WorkDo Network?
What kind of third-party software integration does WorkDo offer?
FAQ-ID:1027
Do-ID is your ID number in WorkDo. Giving people your Do-ID is the quickest way for them to add you as a buddy or to add you into groups. There is a few thing that you need to take note of when setting up your Do-ID.
- It must be a combination of 6 to 20 alphanumeric characters and it cannot begin with “doid”.
- Each Do-ID is unique.
- Once set, it cannot be changed or deleted.
Set / View my Do-ID
Step:
- Enter Accounts setting.
- App │ Click the icon on the upper-right-hand corner on the dashboard page then click Accounts.
- Web │ Click the icon then select App Settings.
- App │ Click the
- My Do-ID
- View │ Your Do-ID is displayed here. Everyone is given a random Do-ID upon signing up for their WorkDo account; you can change it anytime you wish.
- Set │ Click the field to set your Do-ID, click Done to finish.
Reminders
- The setup rules for Do-ID is in the setting description.
- Each Do-ID is unique, so if the system doesn’t allow you to set the ID that you want, it means that it is taken by someone else.
FAQ-ID:1026
Every WorkDo user has a unique QR code upon sign up. Share your QR code with other users and they can quickly and easily add you as a buddy (friend) or add you into groups.
There are numerous ways to share user QR code depending on the situation or user preference. Users can also refresh and update thie QR code when needed.
Join groups or add buddies via QR code
Step:
- My QR Code
- App │ Click the icon on the upper-right-hand corner and select My QR Code.
- Web │ Click the icon on the upper-right-hand corner and click App Settings and you can find My QR Code option on the side menu.
- App │ Click the
- Sharing Methods
- Display QR Code
Display your WorkDo QR code for other users to scan and add you as a buddy. Users can also add members via QR code in the group settings to add you into groups. - Save QR Code
Save the QR code to your device and share it with other users. The web version users can right-click the QR code and save it to your PC. - Copy Link
Acting the same as the QR code, you can share your link to other users to add you as a buddy. - Scan QR Code
Available to the app version only, use this option to scan other users’ QR codes to add them as buddies or add them into groups. - Refresh QR Code
A user QR code QR code will not expire, should situation arise that you no longer want your QR code to stay active, simply refresh your QR code to update it.
- Display QR Code
Reminders
- Other users will always add you as a buddy when clicking your link.
- Click Group Settings > Add Members > QR Code to scan user QR code or select a user QR code that is saved on your device to add this member into the group.
FAQ-ID:1023
When you use an email address or a mobile number to sign up for WorkDo, you will be asked to create a password. For security and privacy reasons, this password is also used in the Payroll tool when viewing your payslips.
Please refer to this FAQ to reset your password if you forgot it.
If you used a federated account such as Google, Facebook, Apple ID or WeChat to sign up for WorkDo, you must log in to WorkDo via your preferred federated account. Those who like additional security could then bind an email or a mobile number and set a personal password.
Please follow the instructions below to update your password.
Password Change
- Enter Accounts
- App │ Click the icon on the main screen then click Accounts then select Change Password.
- Web │ Click the icon and select Change Password.
- App │ Click the
- Change Password
- App │ Enter a new password and click Done.
- Web │ Enter Current Password, New Password and Confirm Password and click Save Changes to complete.
Reminders
- You are required to create a password when you use an email address or mobile number upon sign up and you may use this password for login even when you bind other federated acconts.
- If you used a federated account upon sign up, you will not be asked to create a password. You may set a password later on by email or mobile number binding.
FAQ-ID:1021
Only users who register or bound their WorkDo account using an email or mobile number will obtain a password. If you used Google, Facebook, Apple ID or WeChat to sign up for WorkDo, please use the federated account to log in to WorkDo or refer to this FAQ to troubleshoot the problem. If you forgot your password, please follow the steps below to reset it.
Viewing your payslip with the Payroll tool requires a password, if you are uncertain whether you have set a password, please refer to this FAQ to verify it, and should you have forgotten your account password, then please reset it.
Reset Password
Step:
- Open WorkDo
- App │ Click Log In.
- Web │ Click Log In on the official Website.
- Click “Forgot Password?”
- Enter account email address or mobile number used to register WorkDo.
- Email │ An email with verification code will be sent to the inbox.
- Mobile │ An SMS with verification code will be sent to the mobile device.
- Enter the verification code on WorkDo.
- Enter your new password to complete the process.
Reminders
- The verification code will expire if the password reset process is not completed within the allotted time.
- Email and mobile number sign up will be asked to create a password. This password is also used when you bind other federated accounts to your WorkDo account, too.
- If you used a Facebook, Google, Apple ID or WeChat account to sign up for WorkDo, you will not be asked for login password. A password is only required when you bind an email or a mobile number to your account.
FAQ-ID:1083
By default, the split-view chat window is activated in the web version of WorkDo, but you can disable it if you so desire.
Enable / Disable Split View Mode
Steps:
- Click the icon in the upper-right-hand corner.
- Click App Settings.
- Click Chat Settings.
- Eneble / Disable Split View Mode.
- Enable │ Allows split view of chat windows.
- Disable │ Disallow split view of chat windows.
Reminder
- The Split View Mode setting is applied to all chatrooms.
Relevant Questions
What is Chat Alert? And how do I change its settings?
Can I use the workplace-level chatroom for admins only?
Can I upload stickers?
Chat message options explained.
How do I make a group call?
Should I create a chatroom or group?
Message recall or delete? What’s the difference?
What does the “Read” mark indicate?
How to delete a chatroom?
FAQ-ID:1029
WorkDo’s joint account feature allows users to link their mobile numbers and other email addresses to their existing WorkDo account. In doing so, they can use any one of the linked accounts to log in to WorkDo.
When an account is unlinked, users can no longer log in to WorkDo using the said account, so we recommend you unlink an account only when one of the two below scenarios happens.
- When you have a new mobile number.
- When linked email addresses, Facebook account, Google account, Apple ID, or WeChat account has been deleted.
Joint Account Limitations
1 │ WorkDo Login Accounts
Mobile number or email only.
- Mobile Number: Only one mobile number is allowed to be linked to a WorkDo account.
- Email: Multiple email addresses are allowed to link to a WorkDo account.
2 │ Federated Accounts
One Facebook, Google, Apple ID and WeChat account each can be used to link to WorkDo.
Unlink Login Accounts
- Enter Accounts
- App │ Click the icon on the upper-right-hand corner of the main function screen followed Accounts.
- Web │ Click the icon on the upper-right-hand corner, then click App Settings to go to the Accounts Screen.
- App │ Click the
- Linked accounts are shown in either WorkDo Account section or Federated Account section.
- Select an account to unlink.
- Click Unlink.
- Confirm the unlink action in the pop-up window.
- Unlink login account complete. This account can no longer be used to log in to WokDo.
Reminders
- You must have at least two binding accounts to unlink an account.
- You can unlink the workplace verification account so long you haven’t left the workplace and have linked other login accounts to your workplace.
FAQ-ID:1005
WorkDo is designed for multicultural teams to communicate and collaborate, with that in mind, the user interface supports English, Traditional Chinese, and Simplified Chinese.
Users could download WorkDo from Google Play and App Store, or simply use the web version by opening up a web browser and logging in to WorkDo.
One thing to note is that the language setting in the app versions is based on the device’s language setting. The web version, however, can be changed with a few clicks of your mouse.
Language Change
App
- Enter the device settings.
- Search for the language setting and change to your preferred language.
- WorkDo’s user interface will reflect the language change when it is done.
Web
- Enter the Accounts Screen│ Click the icon on the upper-right-hand corner > select App Settings > Accounts.
- Click the Edit button next to My Info.
- Scroll down to Language and change your preferred language.
- Click Save to finish.
Reminders
- The user interface language change does not affect the input language.
- Each device’s language setting may differ, please consult the device manual for detailed information.
Relevant Questions
Receive email notifications.
How do I subscribe to an external calendar?
How do I disable the split view chat windows in WorkDo web version?
What is Do-ID? How do I set one?
How to set the Daily Reminder?
What happens if my WorkDo registration account differs from my Workplace Verification Account?
What are federated accounts?
WorkDo web general navigation.
FAQ-ID:1024
Can I change my login email or mobile number?
The mobile number I used to register WorkDo is no longer in use, can I change it?
The workplace HR Staff asked me to change my registered email/mobile number to join the workplace. How do I do that?
If you need to change or update your log in account, choose any one of the below methods to do so!
Change Registered Account
1 │ Change registered account? Why not bind another account instead?
WorkDo allows account binding, so you can create a joint account by simply adding another account you want to use for login.
Use federated account for faster log in.
2 │ Can’t join the workplace? Please bind the account that was designated by the workplace HR Staff.
When the HR Staff invited you to join the workplace via a designated email or mobile number, your account must bind that email or mobile number in order to accept the invitation and join the workplace.
What happens if my WorkDo registration account differs from my Workplace Verification Account?
3 │ Make sure you have bound the new account before deleting the old ones.
The system will send the account verification code to your registered email/mobile number, so be sure that you have successfully added your new login email/mobile number before deleting the old emails or mobile number.
How do I unlink login accounts?
4 │ How do I receive system notification emails when I registered using a mobile number?
If the HR tool is disabled in your workplace, you can add an email as your login account to receive system notification emails; if the HR tool is enabled in your workplace, simply ask the HR Staff to update your login emails to receive the system notification emails.
FAQ-ID:1001
Of course! You may use a different nickname and profile picture for different workplaces for different kinds of collaborations for different scenarios.
- Public Profile
The information in this profile can be seen by your clients, customers and partners in the WorkDo Network. (If the workplace admins have allowed members to use their nicknames.) - Workplace Profile
The information in this profile can only be seen by members of the same workplace. If the workplace admins have allowed members to use their nicknames, you may update your workplace profile in each workplace.
Public Profile Update
Steps:
- Accounts > My Public Profile in Network.
- App │ Click the icon on the upper-right-hand corner in the main function page > Accounts > My Public Profile in Network.
- Web │ Click the icon > App Settings > You will enter the Accounts page by default > Click the Edit button next to My Info to start editing your profile information.
- App │ Click the
- Fill out the information.
- Profile Picture
- Display Name
- Exit to save.
Workplace Profile Update
Steps:
- Workplace Settings > My Info.
- App │ Enter the Workplace Settings page > Click your name and profile picture under Personal Settings.
- Web │ Same sa the app version.
- Fill out the information
- Profile Picture
- Display Name │ Editable only when workplace admins allow workplace members to use their nicknames.
- Exit to save.
Reminder
- The workplace admins control whether to allow members to go by their real name set in the HR tool or their preferred nicknames.
- If you have followed the steps described in the above FAQ and could not make any profile updates, it means that your workplace admins decide to have everyone go by their real names.
FAQ-ID:1140
How do I delete my WorkDo Account?
Even when you have left your company, you can keep your WorkDo account to work with other clients and freelancers in the WorkDo Network. But if you don’t need it, you can delete your account.
You can delete your WorkDo Account at any time. Please note that this process is irreversible, and all your personal information will be deleted.
Preparation:
- Before you delete your WorkDo account, be sure you have left all workplaces and delete workplaces that you own.
- All your contacts in the WorkDo Network and BuddyDo Network will be removed and unfriended, so if there’s anything you need, please be sure to save those files before deleting your account.
- Because WorkDo and BuddyDo share the same account, you cannot access either of them when your account is deleted unless you register a new account.
 Caution
The account deletion process is irreversible. So please backup all the data and contents that you need before proceeding.
Account Deletion
Steps:
- Please leave all workplaces and delete all workplaces that you own.
- Enter Accounts Settings.
- App │ Click the icon in the upper-right-hand corner > click Accounts.
- Desktop │ Click the icon in the upper-right-hand corner > click App Settings > you’ll enter the Accounts Settings by default.
- App │ Click the
- Scroll down to the bottom and click Delete My Account.
- Input your password and click Delete My Account.
- Confirm your action and it will bring you back to the Sign Up screen.
Reminder
- You cannot perform account deletion unless you have left and deleted all workplaces, and the system will notify you if you have not done so.
Main Settings
FAQ-ID:1064
Just like a real company, everybody all plays a different role to work and grow together, this concept is the same in WorkDo.
There are 3 key roles in a WorkDo workplace, and they are member, admin and owner, each with a different purpose and role to play to facilitate the running of the company.
Furthermore, with each tool, there are team members that are responsible for maintaining the settings and records other than using it, so each tool also has a tool role that limits team members’ permissions on what they can do with each tool.(Know more!)
Now let have a closer look at each of the 3 roles in WorkDo!
1 │ Member
- Employees │
- Join, leave workplaces, groups: Join workplaces, create groups, join public groups, leave groups, add buddies, join WorkDo network and use private space.
- Feature shortcuts: View all posts on the wall, personal dashboard.
- Use collaboration tools: Post announcements, create events, track task progresses, share files, vote, chat and use group calls.
- Activate advanced tools: Eform application, track eform progresses.
- Account and notification settings: Change notification setting, use federated login, subscribe to an external calendar, set user DO-ID and change user password.
- Managers │ When members are assigned as managers with the HR tool, they hold the responsibility of signing off on various approvals and eforms and are allowed to view certain team and workplace data.
2 │ Admin
An admin is responsible for managing the settings of the workplace, group or between buddies. Each level could have more than one admins and they can do everything a member can on top of…
- Deleting or editing posts.
- Deleting comments.
- Managing members, including inviting, approving, removing members from workplaces and groups, whether to allow members to invite other people , block members, as well as employee termination settings.
- Level Management
- Workplace Settings – Maintain company information, admin management, set wall post permission, set special notifications, manage employee profile information, group creation permission, payment information(send payment, set billing information and credit card information), set company email domain, insert APIs (available in the web version), etc. It is recommended to have your HR staff and/or IT staff to take on the admin roles.
- Group Settings – Add admins set group privacy, invite members, remove members and set notifications.
- Buddy Settings – Set buddy information (for personal reference only).
- Activate or deactivate advanced tools and set tool roles
3 │ Owner
The owner of the workplace or group, the owner has the higheat authorization. The owner can also…
Who is the owner or admin?
- On the workplace page.
- Select a workplace, group or buddy level.
- Workplace – Click the workplace settings (Click the gear icon for the web version).
- Group – Click the Groups tab on the workplace page and hold the desired group and swipe right, click the settings (Click the gear icon for the web version).
- Buddy – Click the Buddies tab on the workplace page and hold the desired buddy and swipe right, click the settings (Click the gear icon for the web version).
- Select the Manage Admin option. The red crown is assigned to the owner, the blue crown is assigned the admin.
Reminders
- The owner and admin have almost the same authority. In a way of speaking, they are both “admins”, so unless otherwise specified, in all the WorkDo documents either one can be referred to as an admin.
- Since the buddy level only has two members, both parties are admins.
Relevant Questions
WorkDo web general navigation.
WorkDo app general navigation.
How to add admins to the workplaces or groups I own?
How to transfer my workplace/group ownership to others?
How to activate / deactivate a tool?
What is a tool box?
What are the differences between tool admins and workplace admins?
FAQ-ID:1065
The admins is present in workplaces, groups or between buddies, the function of their role is to maintain the settings and permissions of each level.
The “Manage Admin” option is an important setting when onboarding WorkDo, please select the persons responsible for maintaining the workplace settings.
Plan:![]() All palns
All palns
Permission:![]() Member
Member ![]() Admin
Admin ![]() Owner
Owner
Interface:![]() App
App ![]() Web
Web
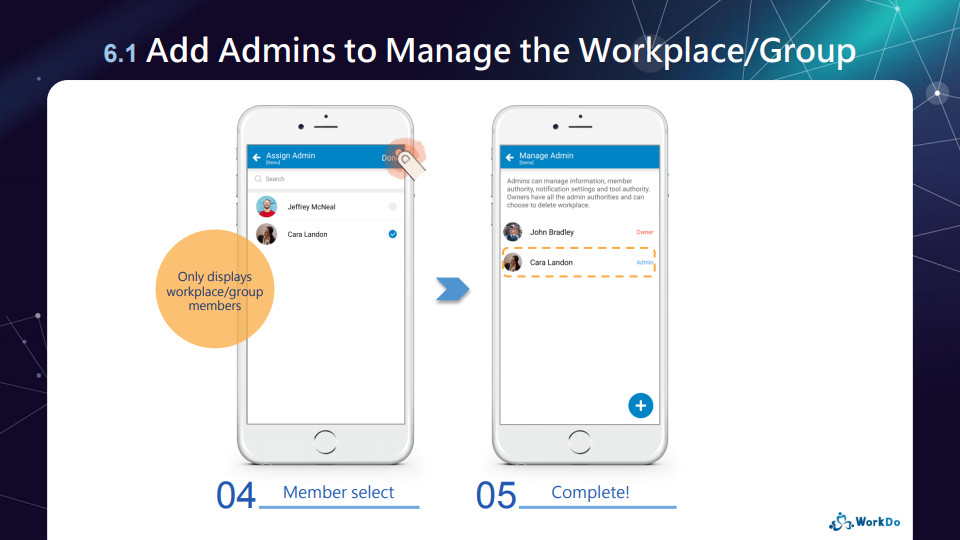
STEPS │ Assign Workplace / Group Admins
- Select workplace / group / buddy level.
- Workplace │ Tap on the workplace settings (Tap on the gear icon for the Web version).
- Group │ From the workplace page tap on the groups tab, then swipe righ and click on the gear icon.
- Select Manage Admin.
- Add admin.
- App │ Click the + icon.
- Web │ Click Add Admin.
- Select the applicable members.
- Click Done.
STEPS │ Remove Admin
- Select workplace / group / buddy level.
- Workplace │ Tap on the workplace settings (Tap on the gear icon for the Web version).
- Group │ From the workplace page tap on the groups tab, then swipe righ and click on the gear icon.
- Select Manage Admin.
- Remove Admin
- App │ Swipe left on the admin tap on the Remove button then confirm the action.
- Web │ Click on Remove next to the admin then confirm the action.
Reminder
- The buddy level consists of two people, but both are admins by default.
FAQ-ID:1066
You can transfer the ownership to others if you are the workplace or group owner.
(Topic of interest – How to add admins to the workplaces or groups I own?)
Transfer ownership to another admin
Instructions:
- Select the workplace or group for change of ownership.
- Workplace │ Tap on the workplace settings (Tap on the gear icon for the Web version).
- Group │ From the workplace page tap on the groups tab, then swipe right and click on the gear icon.
- Click Advanced.
- Click on Change Owner and select a member from the list.
- App │ Click Change and confirm the action.
- Web │ Click Change and confirm the action.
Reminder
- The ownership concept is not applicable on the buddy level.
- The workplace owner must transfer the ownership first before leaving the workplace.
FAQ-ID:1063
There is a setting for admins which controls whether to go by members’ real names or the nicknames they created. By using their real names could avoids members having difficulty telling who’s who.
HR Names or Workplace Names
Steps:
- On the workplace page.
- Click Workplace Settings then Workplace Privacy.
- Scroll down to find the Member Names Display to choose whether to go by their HR names or the names they set for themselves.
Reminder
- When the HR Names are selected, members can only go to the buddy settings view their nicknames.
FAQ-ID:1062
Do you know who are allowed to invite other people to join your workplace or groups?
By default, only the workplace admins and group admins are able to invite people. However, this setting can be changed to allow any member to invite others into the workplace or groups.
And here’s how!
Who can Invite Members
Steps:
- Enter the workplace or group.
- Click Workplace Settings / Group Settings, followed by Workplace Privacy / Group Privacy.
- Who can Invite Members option.
- Owner and Admin
- Everyone
Setting Recommendation
- Inviting new members into the workplace could involve other settings such as their HR profiles, therefore, it is recommended that only the Workplace Admins are allowed to invite new members. Whereas, group collaboration may often bring in other members, so it is recommended that everyone is allowed to invite new members into the groups.
Relevant Questions
Can I set only admins are allowed to post at the workplace level?
Can I control members from creating public or private groups?
Allow members to use their nickname?
What do different roles do in a workplace or group?
How to add admins to workplaces or groups?
How do I join other public groups in the workplace?
FAQ-ID:1007
WorkDo supports multi-device login, allowing users to collaborate across different devices seamlessly. As such, the interfaces on the web browser, app and laptop will be somewhat different to accommodate the devices. But worry not, our FAQ section will cover different interfaces and explain each function in detail.
This FAQ is focused on the app interface, it is the streamlined version designed for collaboration when you are on the run or working remotely. But for the most feature-complete and comprehensive version, we recommend the web interface.
│ For the complete WorkDo app interface tutorial, please refer to the WorkDo Quick Start Settings │
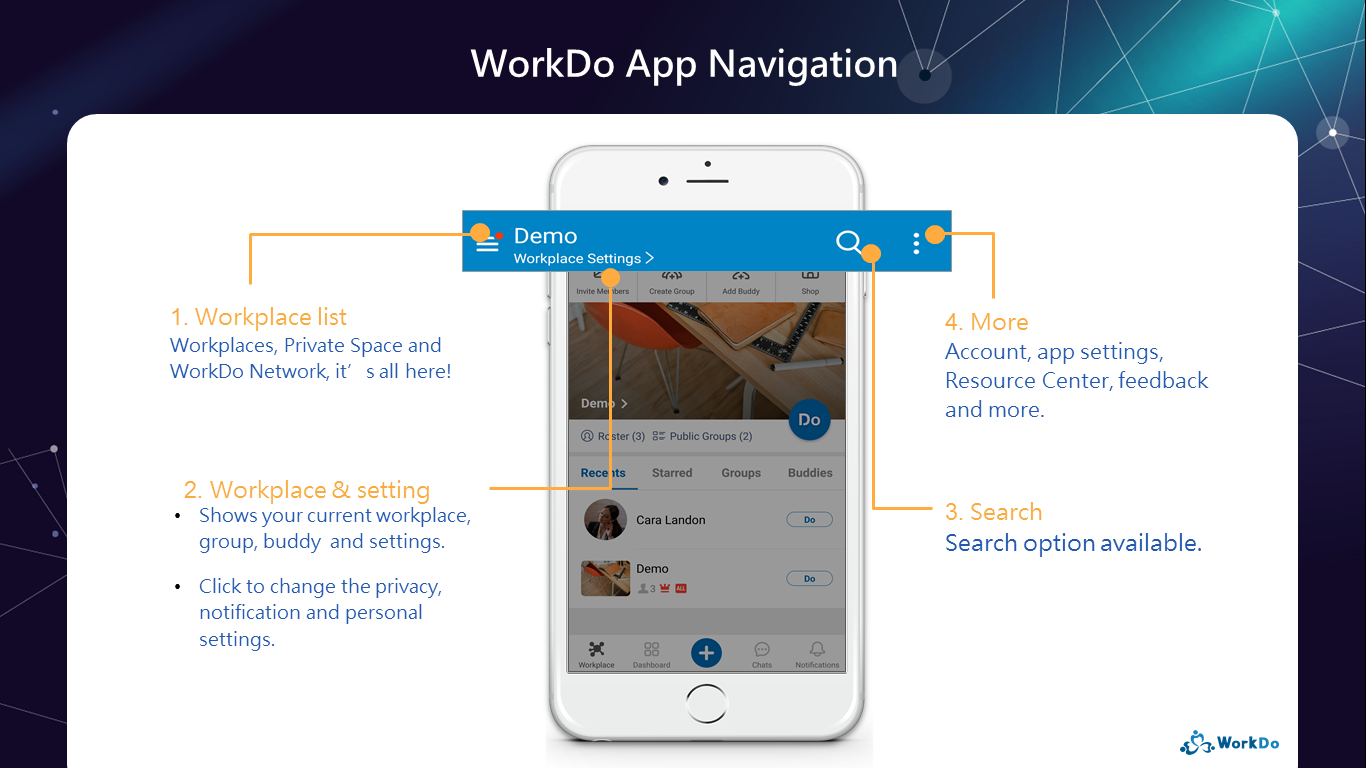
App Interface Navigation
1 │ Workplace List
Switch between workplaces, WorkDo Network, My Upcoming, My Shelf and Join/Create Workplaces.
2 │ Current Level & Settings
- Displays your current workplace, group or buddy level.
- Click for the level-related settings.
3 │ Search Bar
Enter keywords to search for relevant posts.
4 │ More
Account settings, personalized app settings, resources and issue reporting are all here.
5 │ Workplace
- a. Main screen │ functions such as invite members, create groups, add buddies, view team roster and find pblic groups are all here.
- b. Groups & buddies | Displays the groups you are in and buddies you have befriended.
- c. Do button │ Use the Do button to instantly switch tools and engage in different activities ans tasks.
6 │ Dashboard
The Dashboard summarizes all the activities and tasks you need to respond to. You may use it as a to-do list or see it as your personal secretary.
7 │ + Button
The + button is the most efficient way to quickly create tasks and posts for assignees.
8 │ Chats
Displays all your chats. You may also begin new chats with buddies and groups here.
9 │ Notification Center
The Notification Center alerts you of new activities concerning you.
Reminder
- This is the app interface navigation of WorkDo, for the complete WorkDo app interface tutorial, please refer to the WorkDo Quick Start Settings!
Relevant Questions
WorkDo web general navigation.
What do different roles do in a workplace or group?
What do different roles do in a workplace or group?Workplace, Group, Buddy Settings.
Workplaces, groups, buddies? Use each level to your advantage.
Join multiple workplaces with one account?
The “Do” button or the “+” button, which one do I use?
How do I send feedback or report an error?
FAQ-ID:1068
You may keep the workplace level for admins only. By doing so, admins could use the workplace level to post company-wide announcements and important policies.
This setting only applies to the workplace level, team members can still chat, collaborate and use the tools at the group level and buddy level.
Set Admins-Only Workplace Level
Steps:
- Click the Workplace Settings.
- Select Workplace Privacy.
- Select an option in Who Can Post.
- Owner and Admin.
- Everyone.
Reminder
- There are three levels in WorkDo design for different types of collaboration. If you intend to use the workplace level for company announcements, then the team members can still freely use the group level and buddy level to collaborate.
Relevant Questions
Allow members to use their nickname?
Can I control members from creating public or private groups?
Can I use the workplace-level chatroom for admins only?
Who is allowed to invite new members into workplaces or groups?
What do different roles do in a workplace or group?
How to add admins to workplaces or groups?
Can I bind the company email domain when I created the workplace using a free email domain?
Share a post or forward a post?
FAQ-ID:1067
As a workplace admin, you can choose not to allow members to create groups, public or private. And because this limitation does not apply to workplace admins, only workplace members, so workplace admins can still create groups whenever they need to.
- Public Groups │ Searchable by anyone in the workplace and are open to all members.
- Private Groups │ Unsearchable by anyone in the workplace and must be invited to join the groups.
Enable or Disable Group Creation
Steps:
- Click Workplace Settings.
- Select Workplace Privacy.
- Check appropriate options in the Members Can Create Groups section.
- Public Groups │ Allow members to create public groups.
- Private Groups │ Allow members to create private groups.
- Both Turned On │ Members can freely create public or private groups.
- Both Turned Off │ Members are not allowed to create groups.
Reminder
- WorkDo designed workplace, group and buddy levels for different types of collaboration, so generally speaking, we do not recommend that you disallow members from creating both public and private groups. However, if you are concerned about certain sensitive information, you may opt to disable members from creating private groups.
Relavent Questions
Who is allowed to invite new members into workplaces or groups?
Allow members to use their nickname?
Can I use the workplace level for admins only?
Can I bind the company email domain when I created the workplace using a free email domain?
What do different roles do in a workplace or group?
How to add admins to workplaces or groups?
How do I join other public groups in the workplace?
Why can’t I find groups to join?
FAQ-ID:1000
If you are a workplace admin, you may edit the company information including company name, workplace image, description, operating hours, address, contact number, website, even the welcome message, etc.
You may use this function to keep the your workplace information up to date.
Edit Workplace Information
Steps:
- Click the Workplace Settings.
- Scroll down to Workplace Profile.
- App │ Select Workplace Info then click the Edit button.
- Web │ Click the Edit button next to the company name.
- Fill out or update all the necessary information.
- Click Done / Save to finish.
Reminders
- When the workplace name or image is changed, a message will be sent to the chatrooms notifying members of the change made instead of a notification, since this does not affect members’ daily workflow.
- Workplace Address in the Workplace info does not have to be the same address listed in the billing information.
Relevant Questions
Who is allowed to invite new members into workplaces or groups?
Can I use the workplace level for admins only?
Should I allow members to use their nicknames?
Can I control members from creating public or private groups?
Billing information update.
Credit card information update.
What do different roles do in a workplace or group?
How to add admins to workplaces or groups?
FAQ-ID:1052
No problem, you can bind the company email domain even if you originally used a free email domain to create a workplace in WorkDo!
Whether you use Google’s Gmail, Apple’s iCould Mail, Yahoo! Mail, AOL Mail or whatever free email service to create a workplace, whenever you decide to bring your team on board, you can bind the company email domain to quick have everyone joined to your workplace.
If you are a workplace admin, you can follow to instrunctions below to bind your company email domain.
Company Email Domain Binding
Steps:
- Enter the Workplace Settings.
- Scroll down and click Workplace Binding.
- Click Add Binding email.
- Input your company email address.
- Click Submit and verify the correctness of the email address.
- Press Cancel to go back.
- Press Confirm to proceed email verification process.
- Check your company email inbox for the verification code and input it back to the screen.
- Click Submit to complete the company email domain binding process.
FAQ-ID:1030
If you want to keep the workplace-level chatroom free from employee chatter and use it only for company-wide announcements, there is an option for that!
When the setting is on, only workplace admins are allowed to use the workplace-level chatroom. But please note that, although employees are not allowed to send texts, photos, videos, locations, and stickers in the workplace-level chatroom, they are still free to create group chatrooms to communicate and collaborate as normal.
Set Admins-Only Workplace-Level Chatroom
Steps:
- Enter the Workplace Settings.
- Click Workplace Privacy.
- Set the Who Can Chat option.
- Owner and Admin │ Only the workplace owner and admins are allowed to send chat messages in the workplace-level chatroom.
- Everyone │ All members are allowed to send chat messages in the workplace-level chatroom.
Reminder
- WorkDo has designed three levels (workplace, group & buddy) for different kinds of workplace communication and collaboration. It is intentional that settings that control communication and collaboration are separated. As such, Who Can Chat controls who is allowed to chat in the workplace-level chatroom, and Who Can Post controls who is allowed to create tool posts at the workplace level.
Relevant Questions
Sending messages.
Can I use the workplace level for admins only?
Allow members to use their nicknames?
Can I control members from creating public or private groups?
Who is allowed to invite new members into workplaces or groups?
What do different roles do in a workplace or group?
How to add admins to workplaces or groups?
FAQ-ID:1073
Can WorkDo connect to our existing software?
Well, as an all-in-one team communication and collaboration platform, WorkDo is designed to replace and eliminate the use of unintegrated software and platforms to improve team productivity. But still, we do offer the integration of software robots.
Here’s a look at some of the frequently asked questions on system integration.
1 │ Time clock software, fingerprint access control systems
WorkDo’s Attendance tool allows employees to clock in/out using designated Wi-fi hotspots and GPS via their mobile devices. And a comprehensive attendance report and logs are available for perusal. The Attendance tool is sure to replace any time clock system you are using (Attendance tool features).
2 │ Google and Outlook calendars
The notifications from the 8 basic tools in WorkDo will remind you of any upcoming work-related events, meetings and due tasks. But you can also subscribe to an external calendar and keep using your favorite calendar.
3 │ Other HRS, attendance and payroll management system
Each system’s logics and settings are different, so WorkDo does not offer integration to these systems. However, WorkDo does have corresponding tools that can get the job done just as well, if not better! We recommend that you keep using your existing systems and WorkDo in unison, then gradually shift to WorkDo when you are certain that WorkDo can completely replace them.
Here’s a look at the kind of reports and data import functions WorkDo offers!
- Import │ The HR tool and the Leave Pro tool both allow batch importing employee profiles and leaves. This is the quickest way to bring everyone into the workplace and begin working and collaborating.
- Report │ Attendance, Check In, Leave, Leave Pro, Overtime, Expenses, Payroll and We Buy tools all offer their corresponding Excel, CVS and PDF reports for download.
- Payroll Calculation │ You may use Payroll to input the variables and equations into the system to calculate employees’ pays. For companies with complex pay calculation methods, you take advantage of the system to help you calculate partially and then take over manually.
4 │ Robot APIs
WorkDo offers robot APIs that you can program and use to notify service statuses of WorkDo via chats (/chat) or notes (/note). If your workplace has engineers who can make use of the APIs, please set them as workplace admins to access the robot APIs.
Robot APIs
Steps:
- Enter Workplace Settings or Group Settings.
- Click Robot.
- Follow the instructions to complete the settings.
:
Set Up Notes
- Robot APIs are a workplace level setting, however, once set, it can be assigned to any groups.
- The robot still complies with the Who Can Chat or Post options in the Privacy section of the workplace or group, if it is set to only owner and admins are allowed to chat or post, the robot must be assigned as an admin.
- Use the feedback function to contact us for further assistance if required.
Relevant Questions
How do I subscribe to an external calendar?
Can I set only admins are allowed to post at the workplace level?
Can I use the workplace-level chatroom for admins only?
Can I control members from creating public or private groups?
Allow members to use their nicknames?
What do different roles do in a workplace or group?
How to add admins to workplaces or groups?
FAQ-ID:1131
Shouldn’t you give your new team members a warm welcome when they are on board?
And it’s important to know when team members leave so you can allocate your resources and prioritize team tasks.
Did you know there is a setting that sends notifications when members join and leave your team? Well, now is a good time to take advantage of it!
Set Workplace / Group Notifications
Steps:
- Enter the Workplace Settings.
- Scroll down to the Manage Workplace / Group section and select Workplace / Group Notifications.
- Turn on the notification settings.
- Alert When Members Join/Leave │ Turn this on to alert the owner and admins when members join or leave.
- Show Chat Message When Members Leave │
Turn this on to show a chat message in the chatroom when members leave.
Reminders
- Member join and leave messages do not count towards the badge count.
- The member join /leave notifications is shown in the personal notification certer of the owner and admins.
Relevant Questions
What is Chat Alert? And how do I change its settings?
How do I change the notification settings?
Notification delay.
Who is allowed to invite new members into workplaces or groups?
Can I set only admins are allowed to post at the workplace level?
Can I control members from creating public or private groups?
What do different roles do in a workplace or group?
Payment
FAQ-ID:1072
WorkDo charges by the workplace’s headcount, and it is quite easy to calculate the total cost! Simply pick a preferred plan for your workplace, then multiply by the number of people who will be using WorkDo. Easy, peasy!
What do I do if an employee has resigned? What’s the total cost?
Well, if your team has new employees on board before the next billing date, they will take the place of those who have left. And if the additional employees exceed the original headcount, the extra cost will be added to the next billing statement.
Here are some examples!
1 │ Monthly Payment
WorkDo will do a headcount every month then bill the workplace accordingly. If the workforce in your workplace fluctuates regularly, then monthly payment may be your preferred method.
Monthly Payment Plan Example
- First Payment │ Subscribed Premium Plan on May 15th, 2020. The billing date is the 15th of each month.
Users Count│10 members in the workplace.
10 members in the workplace.
Fee │ 10 members x $3 USD Premium Plan per user = $30 USD. - Second Payment │ Billed on June 15th, 2020.
Users Count │5 new employees joined the workplace on May 20th, 2020.
Fee │ 15 members x $3 USD Premium Plan per user = $45 USD. - Third Payment │ Billed on July 15th, 2020.
User Count │3 employees left on June 25th, 2020.
Fee │ 12 members x $3 USD Premium Plan per user = $36 USD. - Fourth Payment │ Billed on August 15th, 2020.
User Count │ 8 new employees joined the workplace on July 16th, 2020 then 3 employees left on July 19th, 2020.
Fee │ 17 members x $3 USD Premium Plan per user = $51 USD.
2 │ Yearly Payment
WorkDo will do a headcount every year, if new employees join the workplace, the additional fee will be reflected the following month in proportion to the remaining months of the plan. Therefore, for workplaces with their workforce steadily increases, the yearly payment plan can save more money in the long run!
To sum up:
- Save big and get 33% off by choosing the yearly payment!!!
- New employees could fill in the headcount of resigned employees, no additional and hidden costs!
- Only when the workplace’s purchased headcount is full will the cost of new employees will be charged to the workplace on the next billing date.
Yearly Payment Plan Example
- First Payment │ Subscribed Premium Plan on May 15th, 2020. The billing date is set to the 15th of each month when there is a difference to be paid, else the billing date is May 15th, 2021.
User Count │ 10 members in the workplace.
Fee │ 10 members x $2 USD Premium Plan per user per month x 12 months = $240 USD. - Second Payment (Difference pay off) │ Billed on October 15th, 2020.
User Count │ 5 new employees joined the workplace on October 16th, 2020.
Fee │ Pay off the difference of 5 members starting from October 15th, 2020 to May 14th, 2021.
5 members x $2 USD Premium Plan per user per month x 7 months = $70 USD. - Third Payment │ Billed on January 15th, 2021.
User Count │2 employees resigned on December 31st, 2020 then 4 new employees joined the workplace on January 12th, 2021.
Fee │ 2 members will count towards to originally purchased headcount, making the difference to be 2 new additional members from January 15th, 2021 to May 14th, 2021.
2 members x $2 USD Premium Plan per user per month x 4 months = $16 USD. - fourth Payment │ Billed on May 15th, 2021.
User Count │ 1 new employee joined the workplace on April 14th, 2021 then 2 employees resigned on May 1st, 2021.
Fee │ The total of 16 users will be billed for the second year starting from May 15th, 2021 to May 14th, 2022.
16 membersx$2 Premium Plan per user per month x 12 months = $384 USD.
Reminders
- There are different paid plans with different features, please refer to the to choose the best plan for your workplace.
- The scenarios provided in this FAQ serve as examples only, please choose the preferred plan based on your actual needs.
- WorkDo offers enterprise discounts to companies with more than 100 employees, please contact us for details.
Relevant Questions
Is WorkDo free of charge?
How do I change the subscription plan and payment plan?
What payment currencies does WorkDo accept?
What are the differences between Free Plan and Premium Plan?
Credit card information update.
Billing information update.
The payment failed, how do I resolve it?
FAQ-ID:1004
If the basic tools and functions are good enough for your team, then WorkDo is completely free of charge, and you may use it for as long as you like! However, if you require the use of the advanced tool, then you need to subscribe to one of the paid plans.
Luckily, WorkDo offers all new users a 30-day trial period to try out all the tools and features. You can decide whether your team needs the advanced tools or just the basic tools. The decision is yours!
Here’s some additional information you might wanna know during your trial period.
- Differences between the Free Plan and the Paid Plans.
- Start WorkDo in 5 Steps.
- Quick Start & User Guides.
- What’s the difference between “Leave” and “Leave Pro”?
If your team decides to go for one of the paid plans, here’s how the payment prcess go!
Plans & Payment
Steps:
- Enter the Workplace Settings.
- Enter the Current Plan page.
- Android │ Click on Workplace Subscription under Payment.
- Web │ Click the Payment button under Advanced.
- Click Purchase
- Members │ Enter the number of members who will be using WorkDo. The dafault number is set to the current workplace members.
- Plan │ Select a plan for your team.
- Payment Interval │ Select monthly or yearly payment plan.
- Click Next.
- Fill out the billing information ( * Must be filled out) and click Next.
- Fill out the credit card information ( * Must be filled out) and click Next.
- Verify all information and click Check Out to complete the payment process.
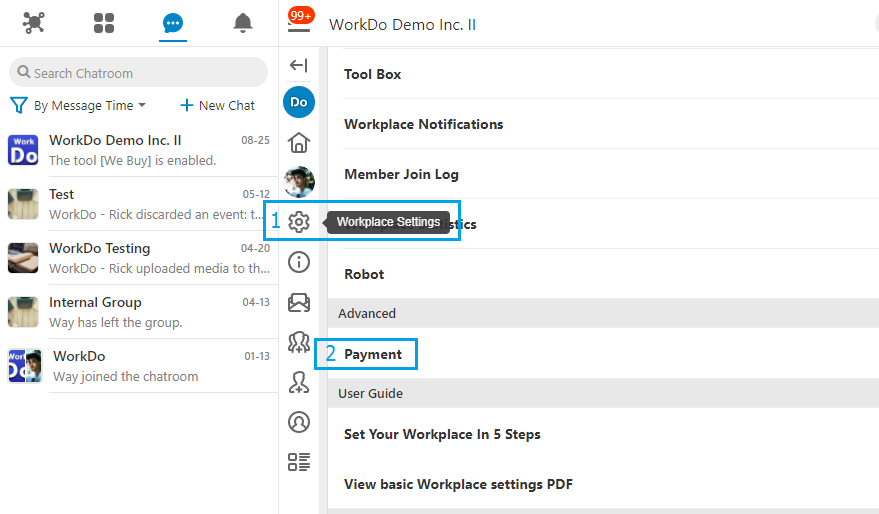
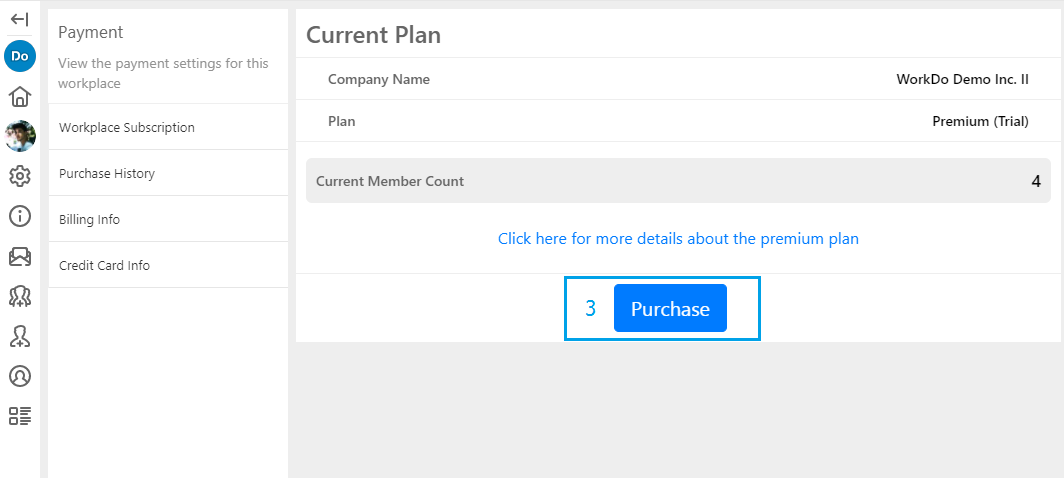
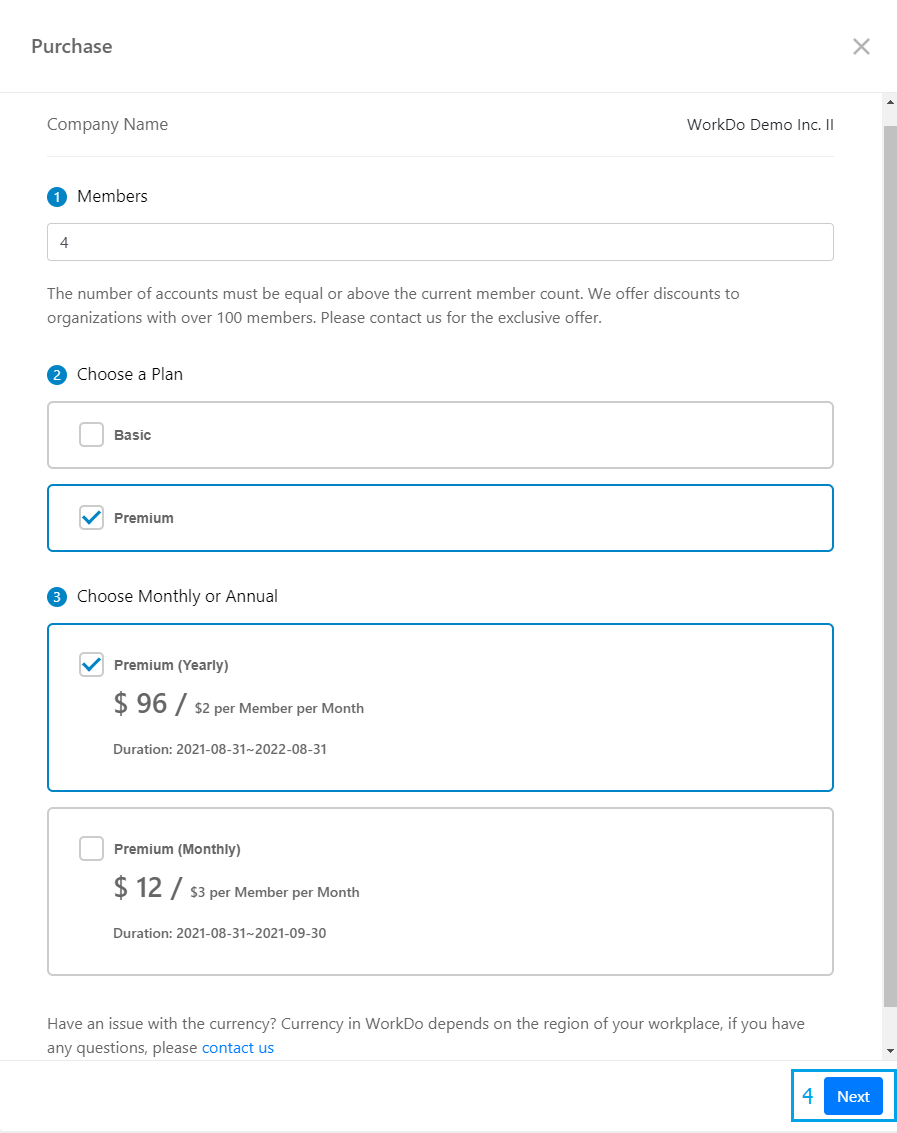
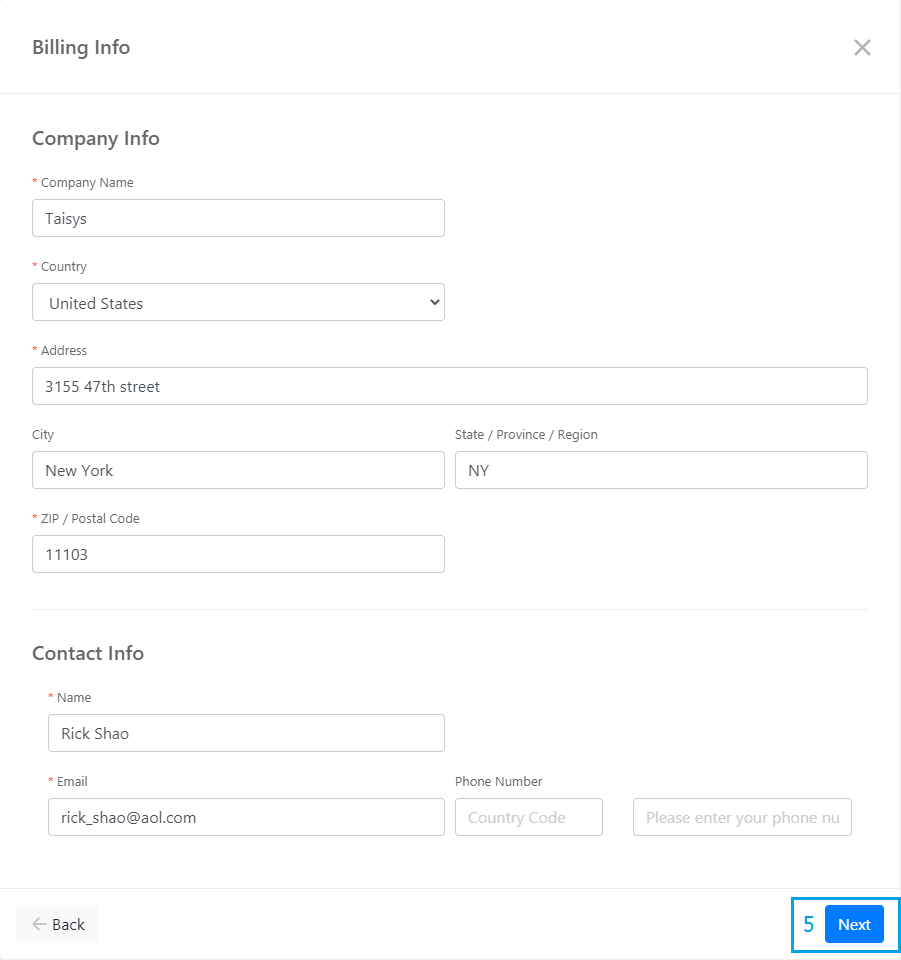
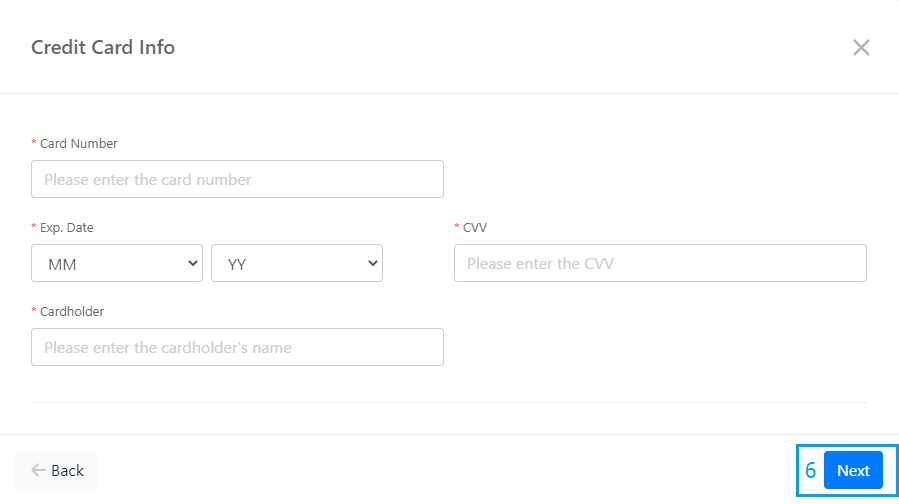
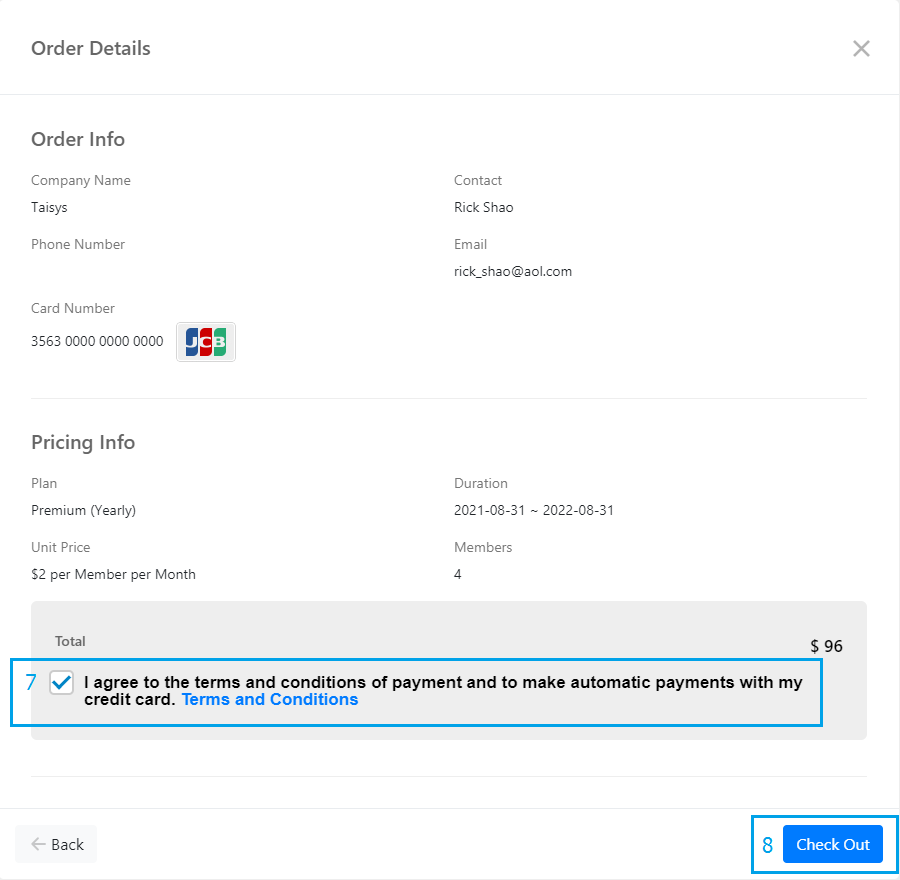
Reminder
- Plan purchase is only avilable to Android and Web versions of WorkDo at the moment.
- During the trial period, the Premium plan is offered to all new users, once the trial period ends, it will be changed to the Free plan. At which point, only the basic tools will be avilable for use.
- The currency is determined by workplace’s region setting, please refer to this FAQ if you have any issues.
- Purchase history can be viewed in Workplace Settings > Payment > Purchase Histroy.
Relevant Questions
What’s WorkDo’s billing policy?
How do I change the subscription plan and payment plan?
Billing information update.
Credit card information update.
Payment failed, how do I resolve it?
What payment currencies does WorkDo accept?
Differences between the Free Plan and the Paid Plans.
FAQ-ID:1108
Liking what you see so far? Would you like to subscribe WorkDo for your team?
As of now, the only acceptable currencies are New Taiwan Dollar and United States Dollar, and the payment currency is determined by the region of your workplace in WorkDo upon creation. All workplaces created outside of Taiwan will pay in USD when they wish to subscribe to one of the paid plans.
Follow the steps below to verify your workplace region. If you require a location or region change, please use the feedback function to send us a request.
Verify Workplace Region
Steps:
- Enter the Workplace Settings.
- Scroll down to Workplace Profile.
- App │ Click Workplace Info to view the workplace regional information.
- Web │ Click the Edit button next to the workplace name to view regional information.
- Please use the feedback function to send a request if your workplace requires a region change.
Reminder
- The Currency option listed on the bottom of Workplace Info is not the payment currency but rather the currency used by the Expenses and Cashbook tools.
Relevant Questions
Monthly or yearly payment plan? What’s WorkDo’s billing policy?
Billing information update.
Credit card information update.
Is WorkDo free of charge?
What is the difference between the free plan and one of the paid plans?
The payment failed, how do I resolve it?
Want you change your plan or payent currency?
FAQ-ID:1071
You may update the credit card so long you are the workplace admin. Simply go to the Credit Card Info to add, change or remove the credit card information.
Plan:![]() All plans
All plans
Permission:![]() Member
Member ![]() Workplace admin
Workplace admin
Interface:![]() Android App
Android App ![]() Web
Web
Update Credit Card Information
- Enter the Workplace Settings.
- Click Credit Card Info.
- Android App │ Scroll down to the Payment section and click the Credit Card Info.
- Web │ Click Payment in the Advanced section and select Credit Card Info.
- Click Add a Credit Card or Change Credit Cards if you already had one on file (* Must be filled).
- Card Number
- Expiration Date
- Card Security Code (CVV)
- Cardholder
- Click Confirm to finish.
Remove a Credit Card on File
- Enter the Workplace Settings.
- Click Credit Card Info.
- Android App │ Scroll down to the Payment section and click the Credit Card Info.
- Web │ Click Payment in the Advanced section and select Credit Card Info.
- Click the unlink icon next to the credit card to remove this card.
- Confirm the action to remove.
Reminders
- The billing information cannot be updated using iPhone, if you are an iPhone user, please use the web version to update it.
- Any changes made to the billing information will be reflected on the next payment date.
- If you are using a paid plan and there is no credit card on file for automatic subscription renewal, your workplace will be downgraded to the free plan 14 days after the renewal date.
FAQ-ID:1069
The workplace storage is for your team to upload and share files, photos, videos among the team, and the storage space provided should be more than sufficient for every workplace.
But in case you would like to know how much storage space is used for your workplace, please follow the steps below to ascertain your workplace’s storage space.
View Workplace Storage
Steps:
- Enter the Workplace Settings.
- Scroll down and select Workplace Statistics.
- Verify the workplace statistics.
- Workplace Statistics │ The numbers of public and private groups created.
- Tool Statistics │ The numbers of tool posts created.
- Workflow Statistics │ The numbers of leave, expense, approval post clock and appeal requests applied.
- Attachment Statistics │ The numbers of file attachments.
- Usage Statistics │ The total storage space used.
Reminders
- Please note that the statistics are not presented in real-time.
- Check out some of the tips on how to save workplace storage space.
- If you’d like to purchase additional storage space, please contact us via feedback or here.
FAQ-ID:1132
How do I upgrade / downgrade my workplace’s plan?
How do I change the monthly / yearly payment plan (billing cycle)?
WorkDo offers three different plans and two payment plans that you can freely change to provide maximum flexibility to all our users!
- Plans │ Free, Basic or Premium
- Payment Plans │ Monthly payment or yearly payment
Please refer to the instructions below to update your workplace’s plan and payment plan.
The changes you make to your plan will take effect immediately or at the start of your next billing cycle, depending on whether you are upgrading or downgrading from your current plan.
- Plan Upgrade │ Takes effect immediately. You will be billed for the new plan. We will then deduct any days that you didn’t use your old plan in the previous billing cycle from the new plan’s total.
- Plan Downgrade │ Your plan will be switch the day before your next payment date.
Update Workplace Plan & Payment Plan
Steps:
-
-
- Enter the Workplace Settings.
- Enter the Workplace Subscription.
- Android │ Click Payment > Workplace Subscription.
- Web │ Click Advanced > Payment.
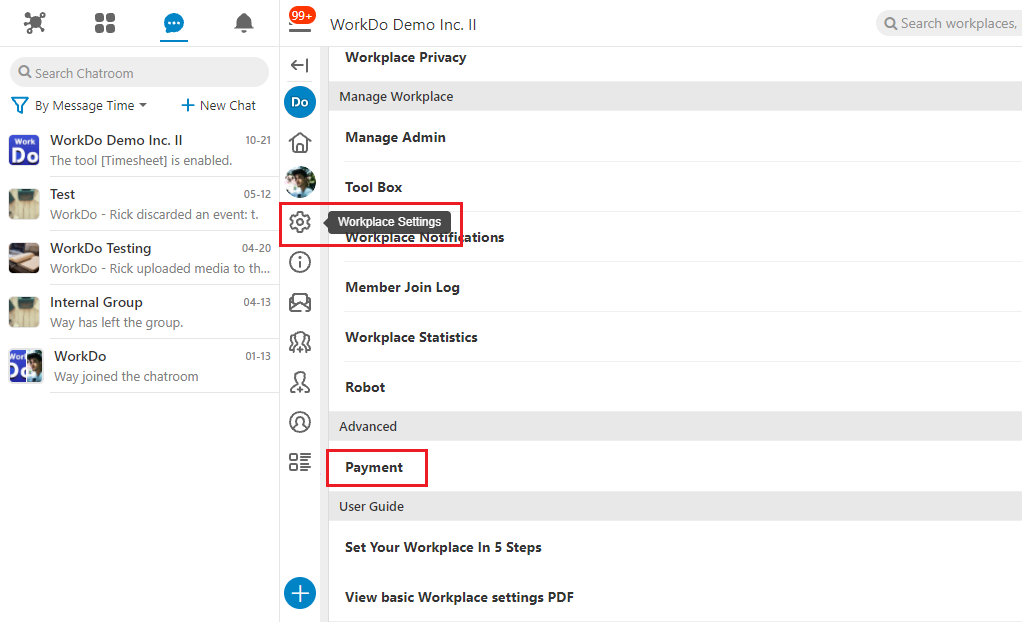
- Click Purchase and select your plan and payment plan.
- Verify the billing information and credit card information.
Verify all information and agree to the terms and conditions.
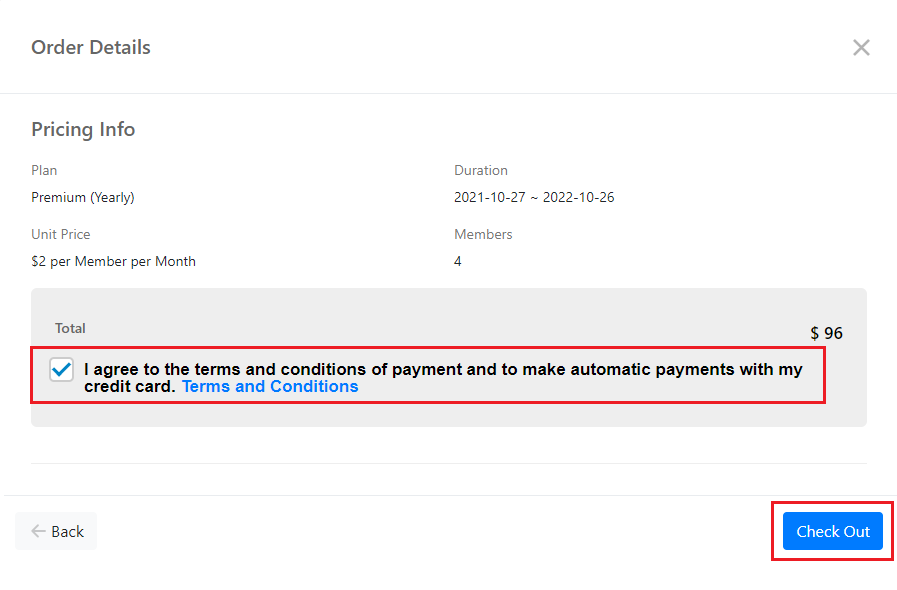
- Confirm your workplace’s new plan.
Confirm your workplace’s new plan and click Check Out to finalize the process.
-
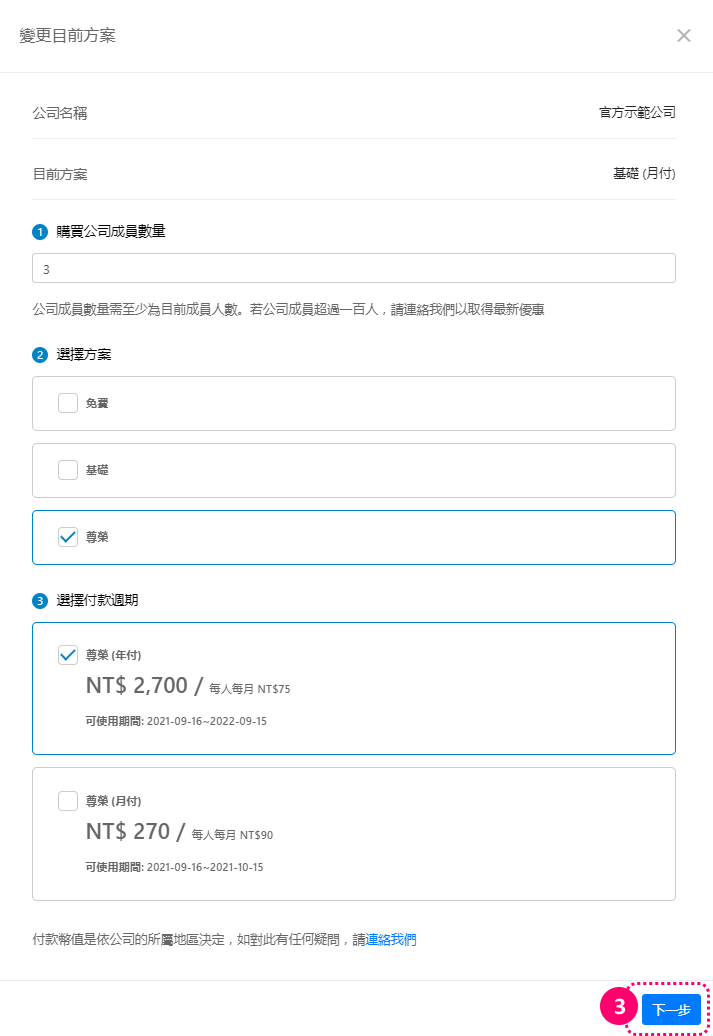
Reminders
- The subscription plan change is not available to iPhone users; please use the web version to make the plan change.
- Please refer to the same steps described above for upgrading or downgrading your workplace’s subscription plan.
- Please refer to the billing policy FAQ to calculate the amount due for your workplace’s plan.
- The payment currency is determined based on your workplace’s region upon creation.
- Your workplace’s purchase history can be viewed by clicking Workplace Settings > Advanced > Payment > Purchase History.
FAQ-ID:1133
What should I do when there is a payment error?
The system will charge your credit card on file when additional members are added to the workplace or your workplace plan subscription is up. If the system fails to collect the payment, you will see the payment reminder when you log in to WorkDo, as well as receive the payment reminder email.
Please verify the following:
- Is the credit card on file activated or expired? │ Please change the credit card information on file.
- Insufficient funds? │ The credit card on file may have reached its limit, please contact your card issuer to resolve this.
If you are within 14 days of payment renewal, you may follow the steps below to submit the payment, else the you’ll need to make a new plan purchase.
Please follow the steps below to send the payment if your credit card has none of these problems.
Send Payment
Steps:
- Enter the Workplace Settings.
- Click Payment.
- Android │ Click Workplace Subscription.
- Web │ Click Workplace Subscription.
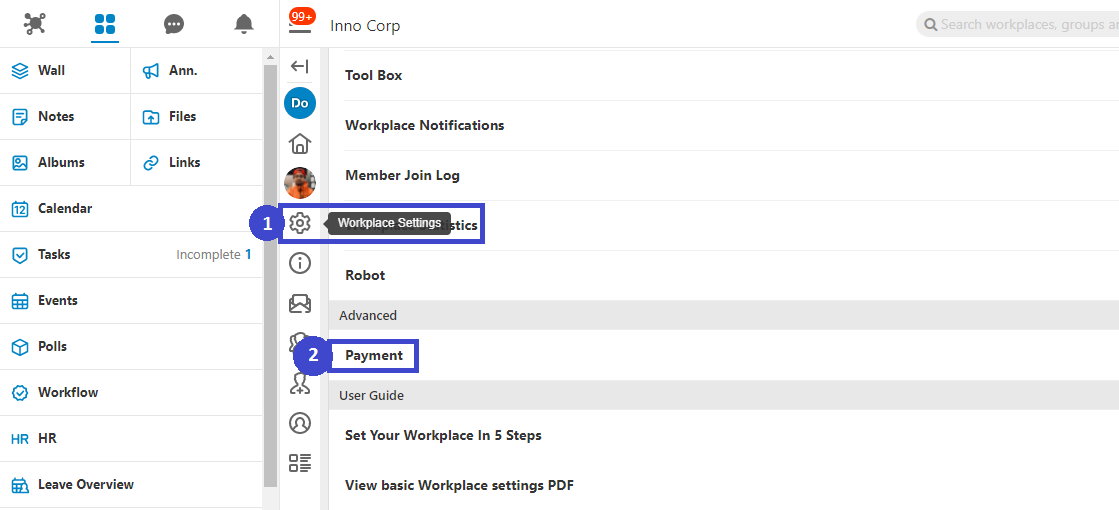
- Then select a method from below to send the payment.
- a. Click Purchase from the Workplace Subscription page.
- b. On the Purchase History page, click on the latest failed payment record and click Purchase.
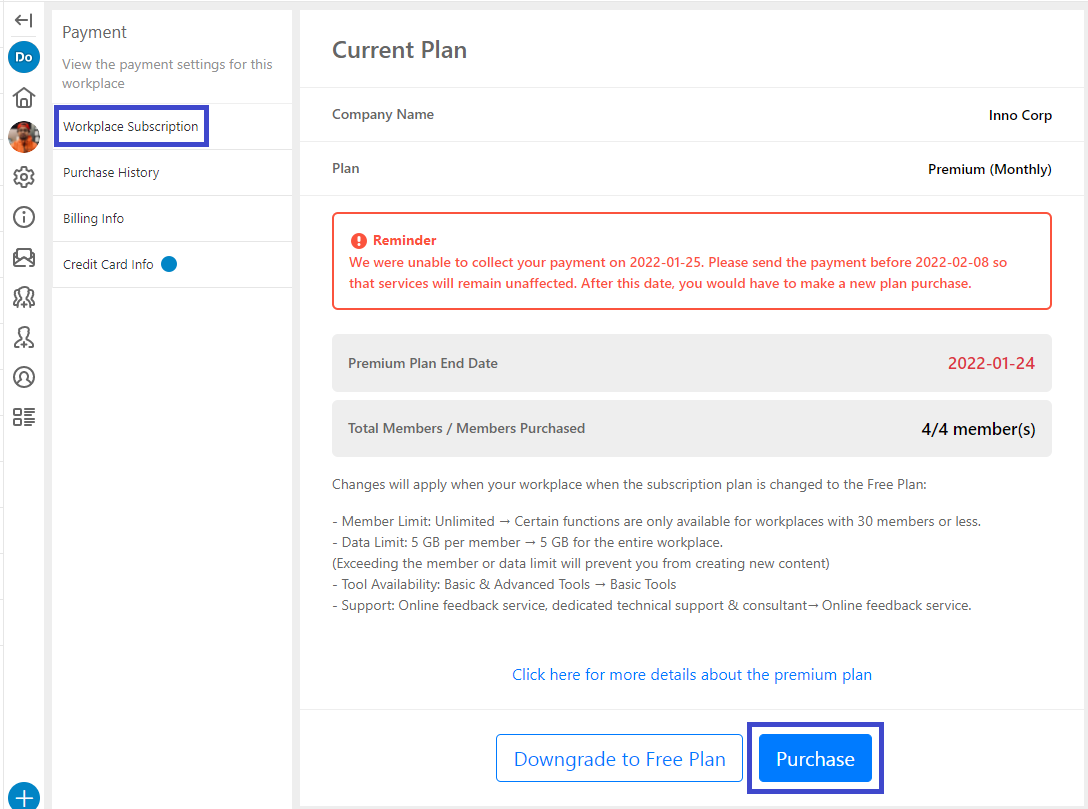
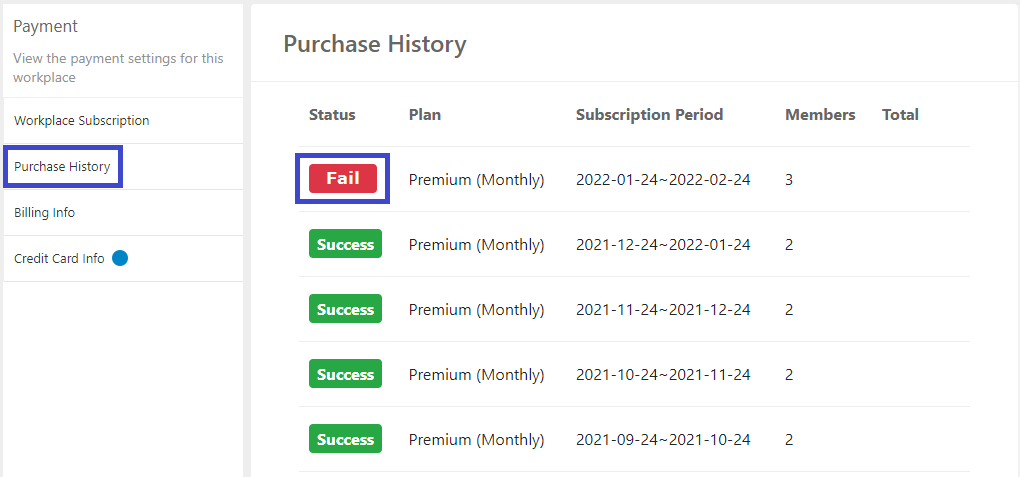
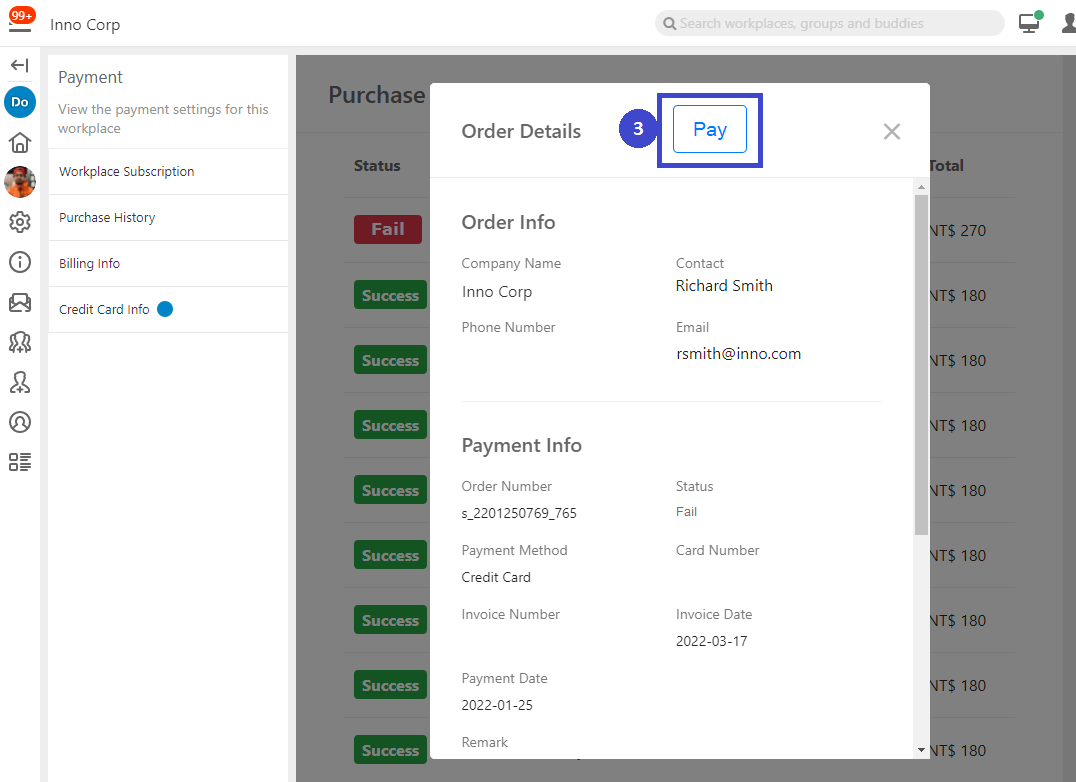
- Verify Credit Card Information
Click Next if the credit card information is up-to-date, else click the Use Another Card on the upper-right-hand corner to use another card for this payment.
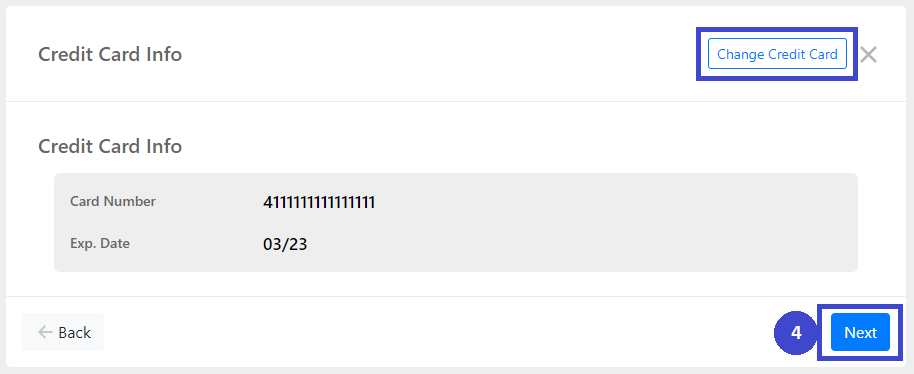
- Verify the Pricing Information
Verify the pricing information, check the agreement box and click Check Out to finalize the payment. The credit card used for this payment will be used for future payments.
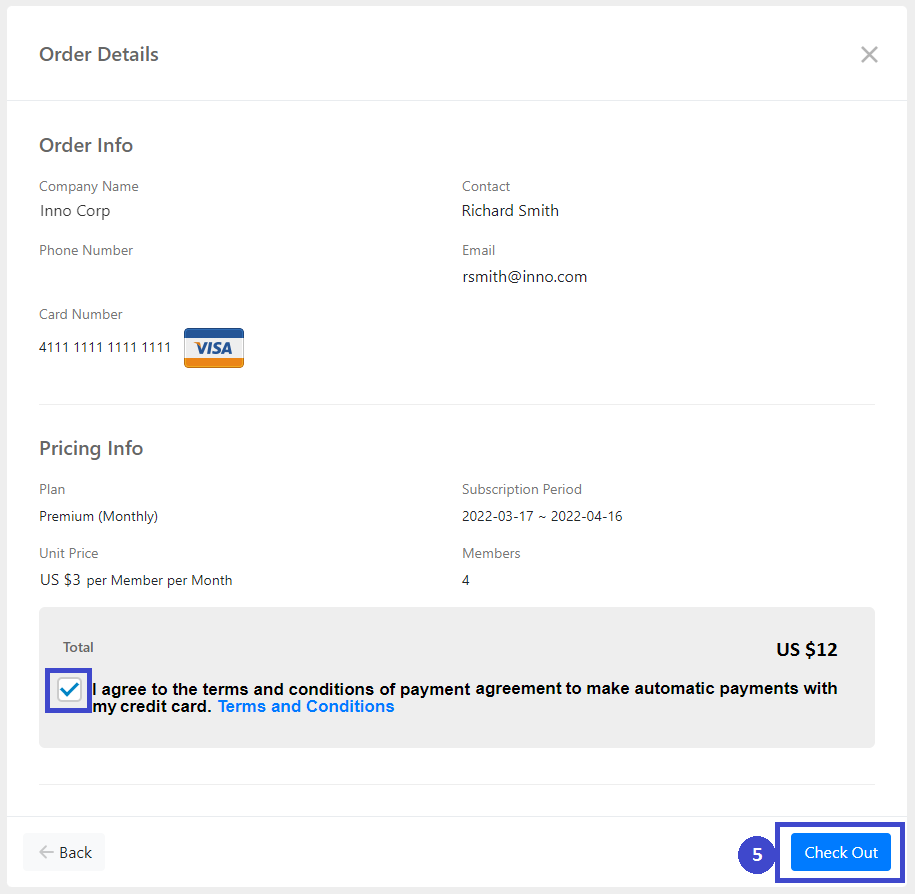
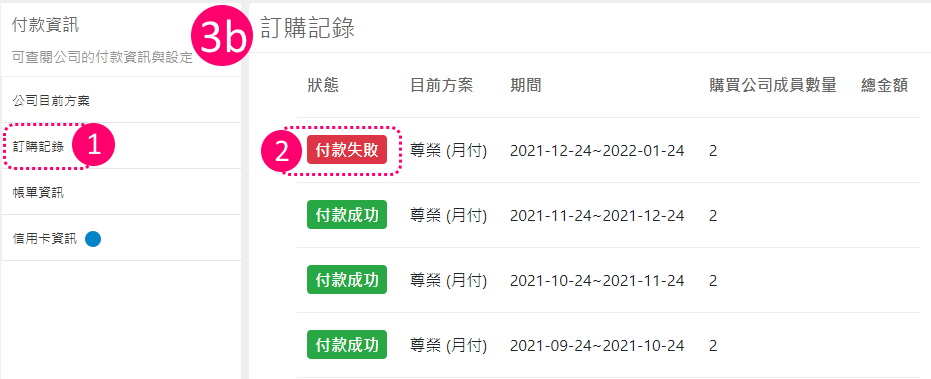
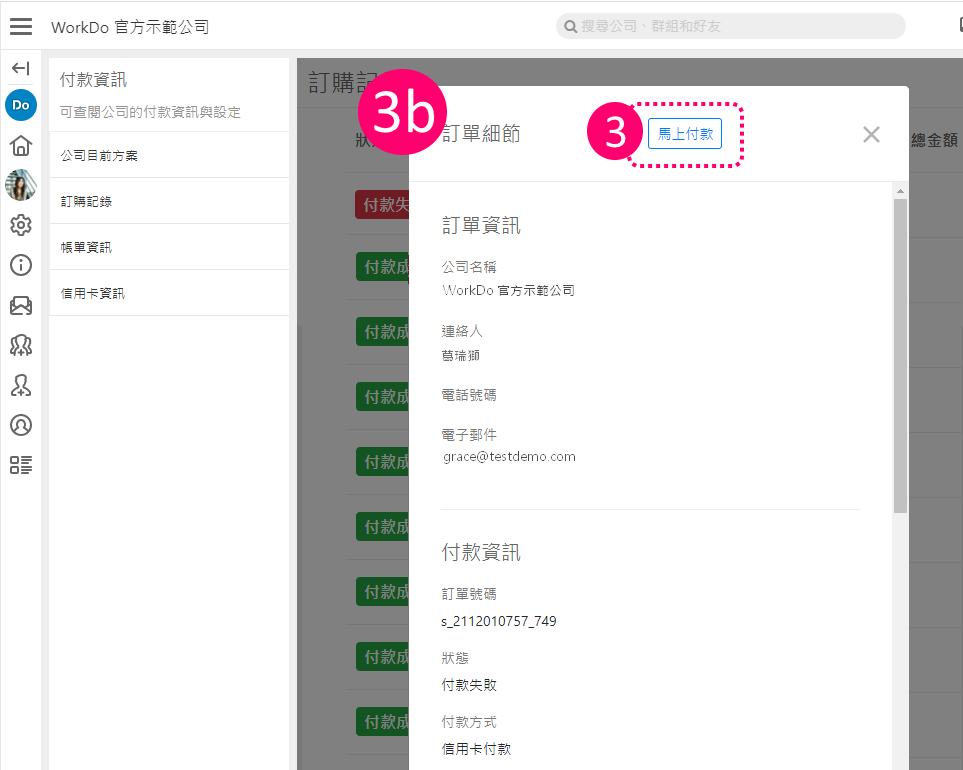
Reminders
- Only Android devices and the web version of WorkDo are able to handle the payment-related processes, if you are an iPhone user, please use the web version to do so.
- Please refer to this FAQ to calculate the total cost of your team.
- The payment currency is determined by the region of your workplace in WorkDo upon creation.
Workplace
FAQ-ID:1035
A workplace is a place for you, your company and all your coworkers to communicate and collaborate together. The workplace is designed to be secure and safe for your company with multiple levels of privacy settings. You can also create groups within the company for different departments, projects, or topics.
Within a workplace, you can chat, create tasks, view events, upload files and even make a poll with your colleagues. Also, you can use the HR, Leave, Expense, Conf. Rm. and CRM tools to better manage your company.
The 7 benefits of having a workplace in WorkDo
-
All-in-One
WorkDo is a true all-in-one collaboration platform that integrates all to tools you need to communicate, collaborate and operate. WorkDo effectively reduces your company’s costs of having to maintain multiple servers and IT equipment on your own.
-
Secure Access Control
WorkDo only allows your colleagues to join your secure workplace. There are various ways that you could use to invite the right people to join your workplace, leave it to us to block out the unwanted individuals.
-
The Perfect Virtual Workplace
WorkDo is excellent if your workplace requires multiple discussion groups for different tasks, teams, purposes, etc. The abundant amount of tools guarantee that there’s always the right tool for the job!
-
Flexible Permissions
Each employee could have different permissions in WorkDo, and different tool permissions allow different employees to use the tools in different ways. Changing permissions is as easy as a few clicks by the workplace admins.
-
Report Export
WorkDo keeps track of all the data and records for you, may it be attendance, vacations, approvals and employee information. Download the report you need and customize it the way you want it, it’s all here!
-
Swiftly Remove Former Employees
When an employee part ways with the company, that person could no longer access the workplace data, and everything will be kept for reference, including files and chats.
-
Reduce IT Costs
No servers, no IT staff, no maintenance fees. We’ll handle the security, upgrade and maintenance, so you can focus reaching your goals, together!
Relevant Questions
How to create a workplace?
What should I do on the Start WorkDo page?
How to invite people to a workplace?
How do I edit the company information?
Can I join multiple workplaces with my account?
What are the two default groups for? How Do I use them?
Can I have sub-groups in my workplace? How to create a new group?
What do different roles do in a workplace/group?
What do different roles do in a workplace/group?
WorkDo Network notifications.
Pricing Plans
FAQ-ID:1036
Creating a workplace in WorkDo is easy! All it requires is a valid email address for account verification purposes.
When creating a workplace, you are given the choice of either using a company email address or a free email address. The differences are explained below.
Plan:![]() All plans
All plans
Permission:![]() All users
All users
Interface:![]() App
App ![]() Web
Web
Company Email Address
Applicable: For teams that use company email addresses.
Pro: Employees that have the same company email addresses will be automatically invited to join the workplace instead of manually inviting, saving precious time.
Features
- A single company email domain can only be used to create one workplace and only members with the same company email domain will auto-join the workplace.
- Any company email address is unique and for one individual. Avoid mistaken identity!
- By following the steps in creating a workplace, the first person to use the company email address and complete the account verification will be assigned as the owner of the workplace (The ownership can be transferred to other members later on).
- The rest of the team members can auto-join the workplace using the company email.
Steps
- On the Join/Create Workplace page.
- Complete the workplace registration.
- Click the Menu button (
 ) and select Join/Create Workplace.
- Click Create New Workplace.
- Enter your company email address.
- Click Submit.
- Verification process
- If you used the company email for your personal account registration, please go to step 6.
- If you used an email address that is different from your company email address, please retrieve the verification code from your company email inbox and input it on the screen.
- Enter the company information On the workplace home screen to complete.
Free Email Address
Applicable: For teams that use free email addresses(@gmail, @yahoo…etc.)
Pro: Everyone has to be manually invited and verified first before joinning the workplace.
Features
- Unique email address, no mistake of identity!
- By following the steps in creating a workplace,you will be assigned as the owner of the workplace (The ownership can be transferred to other members later on).
- Target invite members to join the workplace, verification process is no longer required.
Steps
- On the Join/Create Workplace page.
- Complete the workplace registration and you will be led to the workplace home screen.
- Click the Menu button ( ) and select Join/Create Workplace.
- Click Create New Workplace
- Click Create with free email
- Fill out the necessary information
- Click Done
- The workplace home screen will be shown indicating the registration completion.
Reminders
- A company email domain is recognized by the company name followed by the @ sign in the email address (ex. johndoe@company.com). Most company email domains are paid services, however, there are exceptions that even Google’s @gmail.com is used as a company email domain. So please check with your IT staff before registration.
- If your company is a multinational conglomerate or has branch offices, you could simply use the same account and create a new workplace and manage multiple workplaces with the same account.
- If a former employee created a workplace using the company email that is no longer needed, please ask them to delete the workplace or contact us for assistance.
Relevant Questions
What is a workplace?
What should I do on the Start WorkDo page?
How to invite people to a workplace?
How do I edit the company information?
What do different roles do in a workplace/group?
Can I join multiple workplaces with my account?
Workplaces, groups, buddies? Use each level to your advantage.
What are WorkDo’s pricing and plans?
Monthly or yearly payment plan? What’s WorkDo’s billing policy?
Can I bind the company email domain when I created the workplace using a free email domain?
Can I delete a workplace? Can deleted workplace be recovered?
FAQ-ID:1038
There are a number of ways team members could join a workplace and we’ll explain more here.
You could invite team members to the workplace if you are a workplace admin or the Workplace Privacy setting is set to everyone is allowed to invite other members to the workplace.
Invite New Members to a Workplace
Steps:
- On the workplace page.
- Click the Invite Members button on the upper-left corner of the screen.
- Select verification method.
- Verify with company email address.
- Verify by mobile number.
- Verify by email address.
- Verify via invite link, invite Network buddies or member search.
- Send invite link.
- App │ Send the invite link via Facebook, LINE, Whatsapp, WeChat, or copy and paste invite link to external apps.
- Web │ Copy and paste an uniquely generated invite link to other external software.
Reminder
In Step 3, depending on the verification method selected, WorkDo will generate unique invite links for the unregistered users, this in term, will affect whether the users have to be approved by the workplace admins upon joining the workplaces.
Next, we’ll go through the 3 primary ways for members to join workplaces.
- Self-join a Workplace
Download and register WorkDo and the user will be guided to the Join/Create Workplace screen. Click Join Workplace and fill in the personal company domain email address to join the workplace.
- Invite Members to a Workplace
WorkDo will generate invite links based on the verification method selected and the invitees have to use the specified email address or mobile number to register before joining the workplace.- Verify with Company Email Address:Send The invite link can be sent to all the users who are using the same company email domain and will automatically join the workplace upon signing on.
- Verify by mobile number:Target invite users with specified mobile numbers who don’t use company email addresses to the workplace.
- Verify by Email Address:Target invite users with specified mobile numbers who don’t use company email addresses to the workplace.
- Invite Link, Network Buddy or Search:This method is suitable for companies that don’t have a company email domain. The invite link generated can be sent to all users, however, the workplace admins have to manually approve each individual before joining the workplace.
- Batch-import Employee Profiles
The workplace admins have to use the HR tool to batch-import employee profiles to WorkDo, in doing so, the system will send an invite link to everyone who has not signed on to WorkDo using either the email address or mobile number.
Note!
- Please note that although the permission for member invite is marked for workplace members and admins, however, this is entirely dependent on the privacy settings of the workplace.
- When members are invited or join the workplace on their own, please use the HR tool to edit their employee profiles.
Relevant Questions
Set your workplace in 5 steps
Can I join the company workplace on my own?
What do I need to do for the new employees joining the workplace?
Get notifications when members join and leave.
Having problems importing employee profiles?
What to do when employees resign?
How do I sign up for WorkDo?
Can I interact with a member individually instead of with all members?
Can I bind the company email domain when I created the workplace using a free email domain?
FAQ-ID:1064
Just like a real company, everybody all plays a different role to work and grow together, this concept is the same in WorkDo.
There are 3 key roles in a WorkDo workplace, and they are member, admin and owner, each with a different purpose and role to play to facilitate the running of the company.
Furthermore, with each tool, there are team members that are responsible for maintaining the settings and records other than using it, so each tool also has a tool role that limits team members’ permissions on what they can do with each tool.(Know more!)
Now let have a closer look at each of the 3 roles in WorkDo!
1 │ Member
- Employees │
- Join, leave workplaces, groups: Join workplaces, create groups, join public groups, leave groups, add buddies, join WorkDo network and use private space.
- Feature shortcuts: View all posts on the wall, personal dashboard.
- Use collaboration tools: Post announcements, create events, track task progresses, share files, vote, chat and use group calls.
- Activate advanced tools: Eform application, track eform progresses.
- Account and notification settings: Change notification setting, use federated login, subscribe to an external calendar, set user DO-ID and change user password.
- Managers │ When members are assigned as managers with the HR tool, they hold the responsibility of signing off on various approvals and eforms and are allowed to view certain team and workplace data.
2 │ Admin
An admin is responsible for managing the settings of the workplace, group or between buddies. Each level could have more than one admins and they can do everything a member can on top of…
- Deleting or editing posts.
- Deleting comments.
- Managing members, including inviting, approving, removing members from workplaces and groups, whether to allow members to invite other people , block members, as well as employee termination settings.
- Level Management
- Workplace Settings – Maintain company information, admin management, set wall post permission, set special notifications, manage employee profile information, group creation permission, payment information(send payment, set billing information and credit card information), set company email domain, insert APIs (available in the web version), etc. It is recommended to have your HR staff and/or IT staff to take on the admin roles.
- Group Settings – Add admins set group privacy, invite members, remove members and set notifications.
- Buddy Settings – Set buddy information (for personal reference only).
- Activate or deactivate advanced tools and set tool roles
3 │ Owner
The owner of the workplace or group, the owner has the higheat authorization. The owner can also…
Who is the owner or admin?
- On the workplace page.
- Select a workplace, group or buddy level.
- Workplace – Click the workplace settings (Click the gear icon for the web version).
- Group – Click the Groups tab on the workplace page and hold the desired group and swipe right, click the settings (Click the gear icon for the web version).
- Buddy – Click the Buddies tab on the workplace page and hold the desired buddy and swipe right, click the settings (Click the gear icon for the web version).
- Select the Manage Admin option. The red crown is assigned to the owner, the blue crown is assigned the admin.
Reminders
- The owner and admin have almost the same authority. In a way of speaking, they are both “admins”, so unless otherwise specified, in all the WorkDo documents either one can be referred to as an admin.
- Since the buddy level only has two members, both parties are admins.
Relevant Questions
WorkDo web general navigation.
WorkDo app general navigation.
How to add admins to the workplaces or groups I own?
How to transfer my workplace/group ownership to others?
How to activate / deactivate a tool?
What is a tool box?
What are the differences between tool admins and workplace admins?
FAQ-ID:1065
The admins is present in workplaces, groups or between buddies, the function of their role is to maintain the settings and permissions of each level.
The “Manage Admin” option is an important setting when onboarding WorkDo, please select the persons responsible for maintaining the workplace settings.
Plan:![]() All palns
All palns
Permission:![]() Member
Member ![]() Admin
Admin ![]() Owner
Owner
Interface:![]() App
App ![]() Web
Web
STEPS │ Assign Workplace / Group Admins
- Select workplace / group / buddy level.
- Workplace │ Tap on the workplace settings (Tap on the gear icon for the Web version).
- Group │ From the workplace page tap on the groups tab, then swipe righ and click on the gear icon.
- Select Manage Admin.
- Add admin.
- App │ Click the + icon.
- Web │ Click Add Admin.
- Select the applicable members.
- Click Done.
STEPS │ Remove Admin
- Select workplace / group / buddy level.
- Workplace │ Tap on the workplace settings (Tap on the gear icon for the Web version).
- Group │ From the workplace page tap on the groups tab, then swipe righ and click on the gear icon.
- Select Manage Admin.
- Remove Admin
- App │ Swipe left on the admin tap on the Remove button then confirm the action.
- Web │ Click on Remove next to the admin then confirm the action.
Reminder
- The buddy level consists of two people, but both are admins by default.
FAQ-ID:1116
The biggest difference between a level admin and a tool admin is that one has control over the entire level’s settings and the other only has control over the settings and data of a particular tool. Let’s put it this way…
- Scenario 1 │ Mike is the IT Technician who is responsible for maintaining the overall settings of the workplace in WorkDo, but he should have access to employees’ profiles. What’s his role?
- Scenario 2 │ Richard is the head of the company and is the workplace admin in WorkDo, so how come he can’t view the employee profiles and their leave records?
The two scenarios represent a common misconception of authority and access control. Which is why WorkDo intend to separate the administrators and managers to satisfy different types of data management.
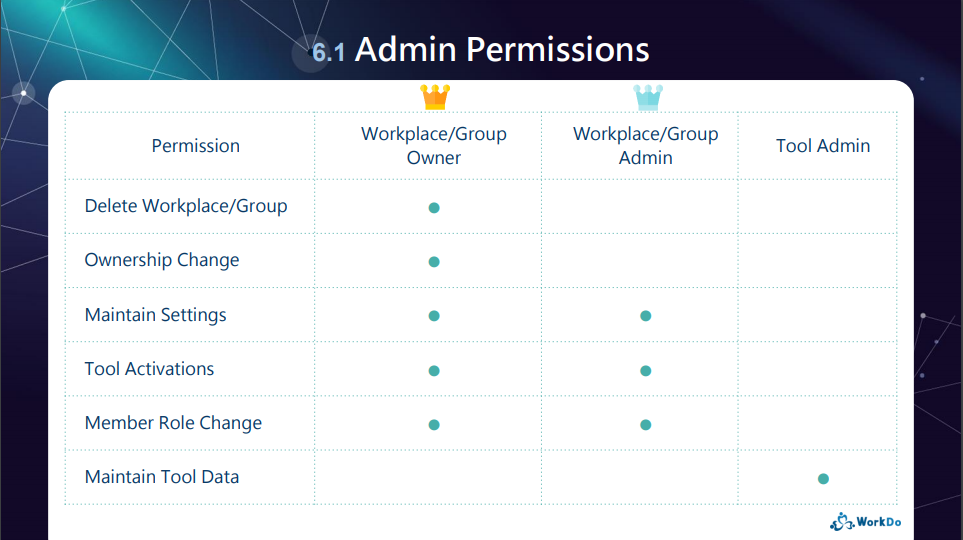
│ Admin Permissions(WorkDo Quick Start Settings) │
1 │ Level Admins
Much like a real company is run by executives, managers and employees, WorkDo reflect these roles as members, admins and owners. (Click to learn more)
2 │ Tool Admins
Of course, there is a lot to running a company, different departments are in charge of different data and files. For example, the HR, Accounting and Marketing departments don’t exchange information. And it is with this mindset, WorkDo also designed different roles for different tools, and each role is only privy to what is allowed for that role. (Click to learn more)
Scenario Sulutions
- Scenario 1 │ Set Mike as the workplace admin to maintain the workplace settings, but for tools like HR, Attendance, Leave and Payroll, set the appropreiate personnel as the managers instead.
- Scenario 2 │ Richard, the head of the company should also be set as the tool admin to gain access to detailed information.
Reminder
- Only the advanced tools have different tool roles for access control, and these tools are only for paid plan. Upon creating your first workplace, users have a 30-day trial period to try out all the tools and features of WorkDo. It is high recommended that all users take the opportunity and get an in-depth experience of WorkDo!
FAQ-ID:1066
You can transfer the ownership to others if you are the workplace or group owner.
(Topic of interest – How to add admins to the workplaces or groups I own?)
Transfer ownership to another admin
Instructions:
- Select the workplace or group for change of ownership.
- Workplace │ Tap on the workplace settings (Tap on the gear icon for the Web version).
- Group │ From the workplace page tap on the groups tab, then swipe right and click on the gear icon.
- Click Advanced.
- Click on Change Owner and select a member from the list.
- App │ Click Change and confirm the action.
- Web │ Click Change and confirm the action.
Reminder
- The ownership concept is not applicable on the buddy level.
- The workplace owner must transfer the ownership first before leaving the workplace.
FAQ-ID:1040
Certainly. We understand that subsidiaries of global corporates and conglomerates collaborate on a different scale, so in WorkDo you could use one account to join different workplaces.
Simply put, once you register an account, you could create and join multiple workplaces, the workplace data and configuration are unique, independent and secure, perfect for operating remote teams!
- Create, Join Workplaces
You can create multiple workplaces and/or join other workplaces with different profiles, each workplace’s data is independent to reflect how your real-world workplace operates. - Collaboration in WorkDo Network
WorkDo Network is created for you to collaborate with people from other companies. You could collaborate and create groups just like you would in the regular workplace. - Private Space
The Private Space is for you to use any way you see fit. You could use it to save important notes, make a to-do list or create reminders, any way you want, and it’s entirely for you only!
Switching workplaces
Steps:
- Click the workplace menu on the upper-left corner and a list of workplaces you are in will be displayed.
- Click on desire the workplace to switch workplace domain.
Reminder
Your WorkDo account is your own, in the event that you no longer work for the former company, you may use your account to join the new company.
Relevant Question
WorkDo web general navigation.
WorkDo app general navigation.
How to create a workplace?
Can I join the company workplace on my own?
How to invite people to a workplace?
What is WorkDo Network?
WorkDo Network, Workplace, Private Space, what are they?
What is All Upcoming on the bottom of the workplace list?
Sending messages.
FAQ-ID:1041
How do I know who is in the group or workplace? Is there a way to know team members’ contact information?
You can view the participants of the groups and workplaces you are in, and if the workplace HR Staff had filled out all the employee contact information fields, then team members are able to view one another’s contact information, such as emails and extension numbers.
View Workplace, Group Members and Their Contact Information.
STEP 1 │ View Workplace, Group Members
The methods described below show how to view the workplace and group members you are in, you may also view their contact information in the workplace level.
STEP 2 │ View Members’ Contact Information
- The quickest way to get a hold of a member is to add them as your buddy and use the audio, video call.
- View Member Contact Information in the HR tool
You can also view members’ contact information using the HR tool as described below.- App │ Click the Do button to select the HR tool then Company then select Colleagues to view their contact information, tap the mobile number to make a call directly. The search function is avilable to quickly find the person you are looking for.
- Web │ Click the Do button to select the HR tool, click Colleagues to view their contact information. The search function is avilablet to quickly find the person you are looking for.
Reminders
- The cost of phone calls is determined by your plan with your cell phone company.
- The HR Staff has the authority to hide employee emails and phone numbers in the HR tool’s System Settings.
FAQ-ID:1042
Buddy is a one-to-one level in WorkDo, and you can add anyone in your workplace as a buddy! When you add your team members as buddies, you can engage in one-to-one chatting, note posting, task assigning, file sharing and etc.
Add Buddies
Steps:
Choose one of the following methods below to add buddies.
- Add buddies from workplace or groups
Click Add Buddy from the Workplace page, select from the workplace roster or groups, choose a member then hit Add Buddy to complete. Repeat the process to add other buddies. - Add buddies using a QR code (App only).
Click Add Buddy from the Workplace page, select QR code to scan a member’s QR code to add a buddy. Repeat the process to add other buddies. - Buddy Icon
Click anytime when you see a buddy icon then hit the Add Buddy button to add a buddy. - Add buddies with Do-ID
Click Add Buddy from the Workplace page, select Search, then enter a member’s Do-ID to add a buddy. - Add buddies using email or mobile number
Click Add Buddy from the Workplace page, select Email or Mobile, then enter a member’s respective information to add a buddy.
Reminder
As a team collaboration app, WorkDo focuses on team communication and collaboration to maximize team efforts, therefore, adding buddies doesn’t require the approvals from the other members.
FAQ-ID:1037
There are three ways you can join your company workplace: being invited via a team member, being invited when the company HR imported the employee profiles, or join the workplace on your own.
If your workplace has bound a company email domain, then you may join the workplace with your company email.
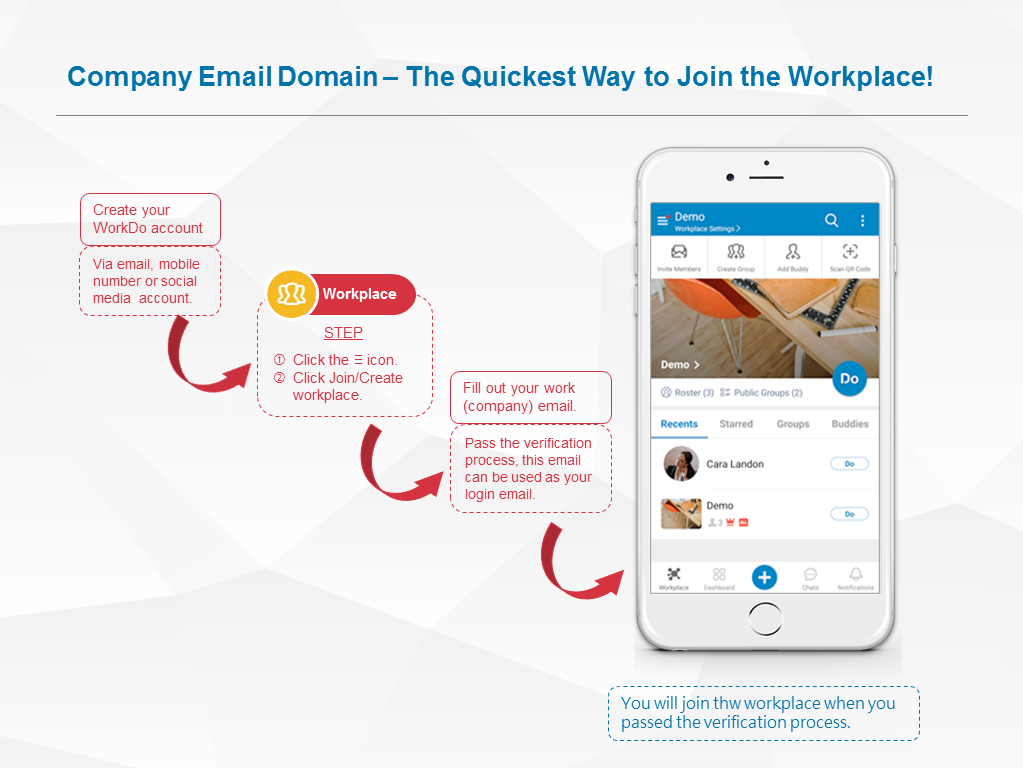
│ Steps for employees join the workplace(Click to enlarge) │
Onboard Workplace – Employees
STEP 1 │ Upon WorkDo Account Sign Up
- Donwload WorkDo then sign up and you will be directed to the Join/Create Workplace screen.
- Click Join Workplace.
- Enter your company email.
- Email verification
- Unverified │ A verification code will send to this email address, submit the code to complete the email confirmation to join the workplace.
- Verified │ Joins the company workplace immediately.
STEP 2 │ Join Multiple Workplaces
- Click the icon on the upper-left-hand corner..
- Click Join/Create Workplace.
- Click Join Workplace.
- Enter your company email.
- Emailverification
- Unverified │ A verification code will send to this email address, submit the code to complete the email confirmation to join the workplace.
- Verified │ Joins the company workplace immediately.
Reminders
- If the workplace is created with free email domain or you do not have a company email, the workplace admin will need to send you an invite to join the workplace.
- An employee profile will be automatically created in the HR tool upon joining a workplace. Only by completing the rest of the settings in the employee profile will the employee be able to clock in/out, send overtime, approvals, expenses requests, apply for leaves, and receive pay slips, etc.
FAQ-ID:1007
WorkDo supports multi-device login, allowing users to collaborate across different devices seamlessly. As such, the interfaces on the web browser, app and laptop will be somewhat different to accommodate the devices. But worry not, our FAQ section will cover different interfaces and explain each function in detail.
This FAQ is focused on the app interface, it is the streamlined version designed for collaboration when you are on the run or working remotely. But for the most feature-complete and comprehensive version, we recommend the web interface.
│ For the complete WorkDo app interface tutorial, please refer to the WorkDo Quick Start Settings │
App Interface Navigation
1 │ Workplace List
Switch between workplaces, WorkDo Network, My Upcoming, My Shelf and Join/Create Workplaces.
2 │ Current Level & Settings
- Displays your current workplace, group or buddy level.
- Click for the level-related settings.
3 │ Search Bar
Enter keywords to search for relevant posts.
4 │ More
Account settings, personalized app settings, resources and issue reporting are all here.
5 │ Workplace
- a. Main screen │ functions such as invite members, create groups, add buddies, view team roster and find pblic groups are all here.
- b. Groups & buddies | Displays the groups you are in and buddies you have befriended.
- c. Do button │ Use the Do button to instantly switch tools and engage in different activities ans tasks.
6 │ Dashboard
The Dashboard summarizes all the activities and tasks you need to respond to. You may use it as a to-do list or see it as your personal secretary.
7 │ + Button
The + button is the most efficient way to quickly create tasks and posts for assignees.
8 │ Chats
Displays all your chats. You may also begin new chats with buddies and groups here.
9 │ Notification Center
The Notification Center alerts you of new activities concerning you.
Reminder
- This is the app interface navigation of WorkDo, for the complete WorkDo app interface tutorial, please refer to the WorkDo Quick Start Settings!
Relevant Questions
WorkDo web general navigation.
What do different roles do in a workplace or group?
What do different roles do in a workplace or group?Workplace, Group, Buddy Settings.
Workplaces, groups, buddies? Use each level to your advantage.
Join multiple workplaces with one account?
The “Do” button or the “+” button, which one do I use?
How do I send feedback or report an error?
FAQ-ID:1039
“Can I leave the demo workplace if I had tried out all the features?”
“I joined the wrong workplace by mistake, how do I leave?”
Of course, you came to the right place!
However, if you are resigning, be sure to work out all the details with your managers and the HR Staff as mentioned here.
Caution
- When you leave a workplace, you are not allowed to join it again without permission.
- When employees leave the workplace, all buddy-level contents, including chat histories and posts are erased as well, so be sure to ask other members to backup necessary contents before then.
- If the member rejoins the workplace using the same account within one year, all buddy-level contents will be restored when you befriend your colleagues again.
Leave the Workplace
STEPS │ App & Web
- Enter the Workplace Settings.
- Scroll down to the buttom and click Leave This Workplace.
- Confirm and follow the on screen procedure to leave the workplace and you will be moved to the WorkDo Network.
Reminders
- If you are the only member in the workplace, your workplace will be deleted once you leave.
- If you are the workplace owner, you will be asked to transfer the ownership before leaving the workplace.
FAQ-ID:1124
Would you like to delete your trial workplace and start anew?
Can I recover a deleted workplace?
These are the two common questions users ask about deleting workplaces. Well, typically, if you created a workplace, you become the owner of the workplace by default, and unless the ownership is transferred, you can delete the workplace if you want.
Caution!
Once you delete a workplace, all the files and data pertained within will be gone for good, and the process is irreversible. Therefore, we strongly recommend you back up all necessary files before performing this move.
Workplace Deletion
- Enter the workplace you’d like to delete.
- Enter the Workplace Settings.
- Select Delete Workplace.
- Enter the confirmation code.
- Delete.
- Upon workplace deletion, all members are removed from the workplace and entering the WorkDo Network.
- You can create a new workplace or join other workplaces as you see fit.
Reminders
- A company email domain is recognized by the company name followed by the @ sign in the email address (ex. johndoe@company.com). Most company email domains are paid services, however, there are exceptions that even Google’s @gmail.com is used as a company email domain. So please check with your IT staff before registration.
- You can only create one workplace using the same company email domain.
- If the workplace owner did not transfer the ownership to another user before leaving the workplace, then you have no way of deleting the workplace on your own. You may contact us for assistance should this be your case.
Groups
FAQ-ID:1048
If you think WorkDo is another run-of-the-mill messenger app, it can’t be further from the truth! WorkDo is far more powerful than that! We’ll explain further.
- What’s the difference in terms of workplace and groups in WorkDo? How is WorkDo better than conventional messengers?
- When should I create groups?
- How do I create groups?
1 │ Workplace or groups?
Workplace is the highest level in WorkDo, and it comprises every member in the workplace, so if there are company-wide tasks or discussions, we recommend you stick to the workplace, otherwise, you could create groups based on departments, projects, topics for dedicated purposes.
With the kind of flexibility WorkDo provides, focused conversations and information compartmentalization are sure to follow.
Pros in Group :
-
- Engaged Conversation
Unlike other messengers, you could create groups for topic-oriented discussions, keep everyone in the loop, and most importantly, cut down your decision-making time. - Reduced Interferences & Focused Effort
Think of it this way, in principle, anything posted in the workplace is viewable by everyone, thus, a group becomes an independent workspace and only group members are notified when things happening are pertaining to the group. This effectively reduces workplace interferences and allows members to stay focused on the tasks at hand.ExampleIn a team of 30 members, Group A has 7 people. You will only receive notifications from Group A if you are part of the group. You will not be notified about anything in this group even if you are the workplace creator or admin.
- Engaged Conversation
- Collaboration Tools for Improved Efficiency
Tools such as Tasks, Events, Notes, Polls, etc. are designed to help your team track project progress, focus effort and improve communication with different groups and channels.
2 │ Can I Create Groups?
If the workplace admins allow members to create groups, memebr are able to freely create groups upon joining the workplace.
Group Creation Permission Check
Steps:
- At the workplace page.
- Click the Workplace Settings (Click the gear icon for the web version).
- Select Workplace Privacy.
- View the option of Members Can Create Groups for permission.
3 │ Create Groups
If permission allows, you are free to create groups based on teams, departments, projects or any topics you wish to enhance your team communication.
Create Groups
Steps:
- At the workplace page.
- Click Create Group.
- Fill out the group name, description and image. At this step, the web version is allowed to set the group privacy.
- Click Done to finish. (If you are using the App version, you will continue the following steps).
- A pop-up window asking to set the group privacy, auto accept join requests and who are allowed to send invitations.
- Click Next to select group members.
- And there, you are done!
Reminders
- All members are free to view all the public information at the workplace level, unless
- The items are designated to specific members upon posting.
- Tools that are only available to specific members.
- Group Privacy can be changed at a later date using the Group Settings.
Relevant Questions
Can I join multiple workplaces with my account?
How do I join other public groups in the workplace?
Can I control members from creating public or private groups?
How to add admins to the workplaces or groups I own?
How to activate / deactivate a tool?
How do I chat and use audio calls?
How do I delete a group?
FAQ-ID:1050
Joining the right groups not only improves your collaboration effort but also helps you assimilate into the company culture. Wanna know what public groups in the workplace you can join? Find out now!
Click the Public Groups on the Workplace page and you will find all the public groups available to join.
Join Public Groups
STEPS │ App
- Click the Workplace tab. (See WorkDo app general navigation)
- Click the Public Groups next to the Do button.
- Select groups and click Join.
STEPS │ Web
- Click the
 icon. (See WorkDo web general navigation)
 - Click Public Groups.
- Select groups and click Join.
- Alternatively, you can click the public groups icon on the side menu to join groups.
Reminders
- Public Groups (N): The N represents the avilable public groups you can join.
- If the Auto Accept option is turned off, your join request needs to be approved by the group admin before joining the groups
- If the Auto Accept option is turned on, you will join the groups immediately.
FAQ-ID:1064
Just like a real company, everybody all plays a different role to work and grow together, this concept is the same in WorkDo.
There are 3 key roles in a WorkDo workplace, and they are member, admin and owner, each with a different purpose and role to play to facilitate the running of the company.
Furthermore, with each tool, there are team members that are responsible for maintaining the settings and records other than using it, so each tool also has a tool role that limits team members’ permissions on what they can do with each tool.(Know more!)
Now let have a closer look at each of the 3 roles in WorkDo!
1 │ Member
- Employees │
- Join, leave workplaces, groups: Join workplaces, create groups, join public groups, leave groups, add buddies, join WorkDo network and use private space.
- Feature shortcuts: View all posts on the wall, personal dashboard.
- Use collaboration tools: Post announcements, create events, track task progresses, share files, vote, chat and use group calls.
- Activate advanced tools: Eform application, track eform progresses.
- Account and notification settings: Change notification setting, use federated login, subscribe to an external calendar, set user DO-ID and change user password.
- Managers │ When members are assigned as managers with the HR tool, they hold the responsibility of signing off on various approvals and eforms and are allowed to view certain team and workplace data.
2 │ Admin
An admin is responsible for managing the settings of the workplace, group or between buddies. Each level could have more than one admins and they can do everything a member can on top of…
- Deleting or editing posts.
- Deleting comments.
- Managing members, including inviting, approving, removing members from workplaces and groups, whether to allow members to invite other people , block members, as well as employee termination settings.
- Level Management
- Workplace Settings – Maintain company information, admin management, set wall post permission, set special notifications, manage employee profile information, group creation permission, payment information(send payment, set billing information and credit card information), set company email domain, insert APIs (available in the web version), etc. It is recommended to have your HR staff and/or IT staff to take on the admin roles.
- Group Settings – Add admins set group privacy, invite members, remove members and set notifications.
- Buddy Settings – Set buddy information (for personal reference only).
- Activate or deactivate advanced tools and set tool roles
3 │ Owner
The owner of the workplace or group, the owner has the higheat authorization. The owner can also…
Who is the owner or admin?
- On the workplace page.
- Select a workplace, group or buddy level.
- Workplace – Click the workplace settings (Click the gear icon for the web version).
- Group – Click the Groups tab on the workplace page and hold the desired group and swipe right, click the settings (Click the gear icon for the web version).
- Buddy – Click the Buddies tab on the workplace page and hold the desired buddy and swipe right, click the settings (Click the gear icon for the web version).
- Select the Manage Admin option. The red crown is assigned to the owner, the blue crown is assigned the admin.
Reminders
- The owner and admin have almost the same authority. In a way of speaking, they are both “admins”, so unless otherwise specified, in all the WorkDo documents either one can be referred to as an admin.
- Since the buddy level only has two members, both parties are admins.
Relevant Questions
WorkDo web general navigation.
WorkDo app general navigation.
How to add admins to the workplaces or groups I own?
How to transfer my workplace/group ownership to others?
How to activate / deactivate a tool?
What is a tool box?
What are the differences between tool admins and workplace admins?
FAQ-ID:1065
The admins is present in workplaces, groups or between buddies, the function of their role is to maintain the settings and permissions of each level.
The “Manage Admin” option is an important setting when onboarding WorkDo, please select the persons responsible for maintaining the workplace settings.
Plan:![]() All palns
All palns
Permission:![]() Member
Member ![]() Admin
Admin ![]() Owner
Owner
Interface:![]() App
App ![]() Web
Web
STEPS │ Assign Workplace / Group Admins
- Select workplace / group / buddy level.
- Workplace │ Tap on the workplace settings (Tap on the gear icon for the Web version).
- Group │ From the workplace page tap on the groups tab, then swipe righ and click on the gear icon.
- Select Manage Admin.
- Add admin.
- App │ Click the + icon.
- Web │ Click Add Admin.
- Select the applicable members.
- Click Done.
STEPS │ Remove Admin
- Select workplace / group / buddy level.
- Workplace │ Tap on the workplace settings (Tap on the gear icon for the Web version).
- Group │ From the workplace page tap on the groups tab, then swipe righ and click on the gear icon.
- Select Manage Admin.
- Remove Admin
- App │ Swipe left on the admin tap on the Remove button then confirm the action.
- Web │ Click on Remove next to the admin then confirm the action.
Reminder
- The buddy level consists of two people, but both are admins by default.
FAQ-ID:1116
The biggest difference between a level admin and a tool admin is that one has control over the entire level’s settings and the other only has control over the settings and data of a particular tool. Let’s put it this way…
- Scenario 1 │ Mike is the IT Technician who is responsible for maintaining the overall settings of the workplace in WorkDo, but he should have access to employees’ profiles. What’s his role?
- Scenario 2 │ Richard is the head of the company and is the workplace admin in WorkDo, so how come he can’t view the employee profiles and their leave records?
The two scenarios represent a common misconception of authority and access control. Which is why WorkDo intend to separate the administrators and managers to satisfy different types of data management.
│ Admin Permissions(WorkDo Quick Start Settings) │
1 │ Level Admins
Much like a real company is run by executives, managers and employees, WorkDo reflect these roles as members, admins and owners. (Click to learn more)
2 │ Tool Admins
Of course, there is a lot to running a company, different departments are in charge of different data and files. For example, the HR, Accounting and Marketing departments don’t exchange information. And it is with this mindset, WorkDo also designed different roles for different tools, and each role is only privy to what is allowed for that role. (Click to learn more)
Scenario Sulutions
- Scenario 1 │ Set Mike as the workplace admin to maintain the workplace settings, but for tools like HR, Attendance, Leave and Payroll, set the appropreiate personnel as the managers instead.
- Scenario 2 │ Richard, the head of the company should also be set as the tool admin to gain access to detailed information.
Reminder
- Only the advanced tools have different tool roles for access control, and these tools are only for paid plan. Upon creating your first workplace, users have a 30-day trial period to try out all the tools and features of WorkDo. It is high recommended that all users take the opportunity and get an in-depth experience of WorkDo!
FAQ-ID:1066
You can transfer the ownership to others if you are the workplace or group owner.
(Topic of interest – How to add admins to the workplaces or groups I own?)
Transfer ownership to another admin
Instructions:
- Select the workplace or group for change of ownership.
- Workplace │ Tap on the workplace settings (Tap on the gear icon for the Web version).
- Group │ From the workplace page tap on the groups tab, then swipe right and click on the gear icon.
- Click Advanced.
- Click on Change Owner and select a member from the list.
- App │ Click Change and confirm the action.
- Web │ Click Change and confirm the action.
Reminder
- The ownership concept is not applicable on the buddy level.
- The workplace owner must transfer the ownership first before leaving the workplace.
FAQ-ID:1047
The Information Hub and WorkDo Testing are two default groups that come with your new workplace when it is created. All members will automatically join these groups as they onboard WorkDo. These groups are designed for members who are unfamiliar with WorkDo to have a place to discuss features and how to use WorkDo.
Of course, you could rename the groups and change any of the group settings to suit your team purpose any way you see fit, or you could delete them if you so desire.
FAQ-ID:1049
Whether is team collaboration or group discussion, you need to be able to instantly bring the right people into the group to reduce the decision-making time and avoid the golden opportunity passing by.
WorkDo offers multiple ways to invite team members into the groups, including invites via QR code, from workplace roster, buddy list, or Do-ID, etc, just go with what works for you!
Plan:![]() All plans
All plans
Permission:![]() Group members
Group members ![]() Group admins
Group admins
Interface:![]() App
App ![]() Web
Web
Invite New Members into Groups via Group QR Code, Link
- Enter the Group Settings.
- Click Group QR Code.
- Select a sharing method.
- Display QR Code
Display the group QR code for members to scan and join the group. - Save QR Code
Download the QR code and share it however you wish. Right click then svae the file for the web version. - Copy Link
Share the group QR code as a link and share it as you would normally. - Refresh QR Code
The group QR code doesn’t expire, however, in certain situations, you might want to refresh it. Simply click the icon on the QR code screen and select Refresh to update the QR code.
- Display QR Code
Invite New Members into Groups via Add Members Method
- Enter the Group Settings.
- Click Add Members.
- Select an invite method.
- Workplace Roster │ Select members from the entire workplace roster.
- Groups │ Add members from your other groups into the current group.
- Buddies │ Select from your buddy list into the current group.
- Scan QR Code │ Scan a QR code to join the group.
This is an app-only function. Click the QR Code tab to turn on your QR code scanner and scan the QR code to join the group. - Search Do-ID │ Use the Do-ID to search a member to add to the group, and this method will work for members who have set their Do-IDs.
Click the Do-ID tab and input a member’s Do-ID to send a group invite.
Reminder
- The workplace admins have the authority to decide whether members are allowed to create groups in the workplace.
- If the Add Members option is not available to you, it means that this group only allows admins to invite new members.
- The invitees must be members of the workplace.
- WorkDo is a collaboration focused application, therefore, adding new members into the groups doesn’t require their permission.
Relevant Questions
What is my WorkDo QR code used for?
Who is allowed to invite new members into workplaces or groups?
Get notifications when members join and leave.
Workplace or groups? How to create groups?
Why can’t I find a group?
Workplace, Group, Buddy Settings.
What do different roles do in a workplace or group?
FAQ-ID:1051
There are a few possible reasons why you can’t find groups to join, such as workplace is not allowed to create groups, all groups are private or you are blocked by the groups.
Unable to Find Groups Troubleshoot
STEP 1 │ View Public Groups
All groups with privacy set to public will you be able to find them in the public groups and join.
Learn how to find public groups here!
STEP 2 │ Workplace Does Not Allow Creating Groups
See if your workplace allows group creation.
STEP 3 │ Check if Groups are Private
If your workplace allows creating groups and you are unable to find groups to join, it’s most likely that they are set to private or there aren’t any. Should this happen, you will need to ask workplace admins or team members to verify.
- No groups have been created │ Please ask someone for verify.
- Groups are private
01. Ask the group admins to check the privacy settings │ Go to Group Settings > Group Privacy > See whether the group has been set to private.
02. Ask a group member or admin to invite you to the group.
STEP 4 │ Blocked by Group Admins
When a member has been blocked by the group they are also unable to find it unless the group admin unblock them using the Group Settings..
FAQ-ID:1053
At last, the project is finished and the group is no longer needed, you may ask “how do I leave the group?”
In WorkDo, group members can leave the group whenever they wish, the group admins also have the authority to remove members from the group. The same goes for the groups in WorkDo Network.
For resigning employees, instead of leaving the groups could ask the workplace admins to remove them from the workplace and all the groups they are in with a few clicks of the button.
Remove Members
- Enter Group Settings.
- Click the Member List.
- Web: Click Remove. App: Click on a member then click Manage Member followed by Remove Member from the Group.
- Remove
Remove members from the group and they can no longer view the group posts and files unless they rejoin the group. - Block & Remove(Web only)
Blocked members can no longer rejoin the same groups with the same account. Use Block & Remove when you don’t want a member to access the group files.
- Remove
Leave Groups
- Enter Group Settings.
- Leave This Group.
- Hit Confirm to leave the group.
Reminders
- Once members are no longer in the groups, they cannot view the group data and files unless they rejoin the group.
- Only the group owner is allowed to remove admins from the group; the admins cannot kick each other out.
- Workplace owners and group owners must transfer their ownership to another admin before they are allowed to leave.
Relevant Questions
Can I leave a workplace?
How to Invite new members to a group?
How do I join other public groups in the workplace?
Why can’t I find groups to join?
Can I set only admins are allowed to post at the workplace level?
Get notifications when members join and leave.
How do I create groups in WorkDo Network?
How to transfer my workplace, group ownership?
How do I delete a group?
What to do when employees resign?
FAQ-ID:1054
You can delete a group so long as you are the group owner, however, once executed, this action is irreversible, so please make sure to save and backup all the necessary files and documents of a group before performing this move.
Group Deletion
- Enter Group Settings.
- App │ On the workplace page > click the Groups tab and swipe right on the group you wish to delete then click the Group Settings.
- Web │ Select a group on the workplace page then click the gear icon on top for the Group Settings.
- Click on Delete This Group.
- Fill out the verification code as seen on the screen then click
Delete This Group to confirm the action.
Caution!
The group deletion action is irreversible, please make sure you have backed up all the files you need before performing this action.
FAQ-ID:1007
WorkDo supports multi-device login, allowing users to collaborate across different devices seamlessly. As such, the interfaces on the web browser, app and laptop will be somewhat different to accommodate the devices. But worry not, our FAQ section will cover different interfaces and explain each function in detail.
This FAQ is focused on the app interface, it is the streamlined version designed for collaboration when you are on the run or working remotely. But for the most feature-complete and comprehensive version, we recommend the web interface.
│ For the complete WorkDo app interface tutorial, please refer to the WorkDo Quick Start Settings │
App Interface Navigation
1 │ Workplace List
Switch between workplaces, WorkDo Network, My Upcoming, My Shelf and Join/Create Workplaces.
2 │ Current Level & Settings
- Displays your current workplace, group or buddy level.
- Click for the level-related settings.
3 │ Search Bar
Enter keywords to search for relevant posts.
4 │ More
Account settings, personalized app settings, resources and issue reporting are all here.
5 │ Workplace
- a. Main screen │ functions such as invite members, create groups, add buddies, view team roster and find pblic groups are all here.
- b. Groups & buddies | Displays the groups you are in and buddies you have befriended.
- c. Do button │ Use the Do button to instantly switch tools and engage in different activities ans tasks.
6 │ Dashboard
The Dashboard summarizes all the activities and tasks you need to respond to. You may use it as a to-do list or see it as your personal secretary.
7 │ + Button
The + button is the most efficient way to quickly create tasks and posts for assignees.
8 │ Chats
Displays all your chats. You may also begin new chats with buddies and groups here.
9 │ Notification Center
The Notification Center alerts you of new activities concerning you.
Reminder
- This is the app interface navigation of WorkDo, for the complete WorkDo app interface tutorial, please refer to the WorkDo Quick Start Settings!
Relevant Questions
WorkDo web general navigation.
What do different roles do in a workplace or group?
What do different roles do in a workplace or group?Workplace, Group, Buddy Settings.
Workplaces, groups, buddies? Use each level to your advantage.
Join multiple workplaces with one account?
The “Do” button or the “+” button, which one do I use?
How do I send feedback or report an error?
Buddies
FAQ-ID:1042
Buddy is a one-to-one level in WorkDo, and you can add anyone in your workplace as a buddy! When you add your team members as buddies, you can engage in one-to-one chatting, note posting, task assigning, file sharing and etc.
Add Buddies
Steps:
Choose one of the following methods below to add buddies.
- Add buddies from workplace or groups
Click Add Buddy from the Workplace page, select from the workplace roster or groups, choose a member then hit Add Buddy to complete. Repeat the process to add other buddies. - Add buddies using a QR code (App only).
Click Add Buddy from the Workplace page, select QR code to scan a member’s QR code to add a buddy. Repeat the process to add other buddies. - Buddy Icon
Click anytime when you see a buddy icon then hit the Add Buddy button to add a buddy. - Add buddies with Do-ID
Click Add Buddy from the Workplace page, select Search, then enter a member’s Do-ID to add a buddy. - Add buddies using email or mobile number
Click Add Buddy from the Workplace page, select Email or Mobile, then enter a member’s respective information to add a buddy.
Reminder
As a team collaboration app, WorkDo focuses on team communication and collaboration to maximize team efforts, therefore, adding buddies doesn’t require the approvals from the other members.
FAQ-ID:1055
Although WorkDo encourages team collaboration and communication, there are still times when you need to engage in one-to-one conversations, this is when you need to add a buddy or two.
Toggle among workplaces, , buddies to make sure you are always informed on what’s happening!
Switch among Workplaces, Groups and Buddies
STEP │ App
- Switch Workplaces
- Level Select – Workplaces, groups, buddies.
- Workplace │ Click the Workplace Domain button on the upper-left-hand corner and select from your list of workplaces.
- Group │ Click the Groups tab on the workplace page and select from your list of groups in the workplace.
- Buddy │ Click the Buddies tab on the workplace page and select from you list of buddies in the workplace.
- You will be brought to the chatroom immediately.
- You can begin chatting or use the Do button on the upper-right-hand corner to use other collaboration tools.
STEP │ Web
- Switch workplaces with the Workplace icon.
- Click the phonebook icon .
- Select a tab.
- Groups │ Select a group from the list.
- Buddies │ Select a buddy from the list.
- You will be brought to the chatroom immediately.
- You can begin chatting, use a collaboration tool from the tool listed above the chatroom or select one with the Do button.
Reminders
There are two ways to enter a level.
- Search the chat history and enter from the chatroom.
- Select a post from the Dashboard Wall.
FAQ-ID:1056
Of course, when you befriend a buddy you could change his/her name! Use their middle name or nickname, and the name change is only reflected in your account.
Name Change
Steps:
- Enter member’s Buddy Setting.
- Click Edit Buddy Info and fill out the Buddy Alias.
- Click Done when finish.
Reminder
- Workplace members are allowed to set their names, however, there is an option for the workplace admins to revert this by displaying the employee names set in the HR tool.
FAQ-ID:1057
Due to personal privacy reasons, every user can select the different methods of how they would like to be found, including Do-ID, email or mobile number.
- Do-ID
Every Do-ID is unique, so using the Do-ID is the surefire way to search out and add buddies. - Email / Mobile Number
If your coworkers are using federated accounts, meaning that they have bound an email or mobile number to their accounts, you can use either information to search them out and add them as buddies.
So how come I still can’t find coworkers even when I have entered their information correctly?
This is probably due to they do not permit others to search them out using their Do-ID, email or mobile number in Methods of Finding Me settings. Once they have allowed being searched out by other users, you may try to add them as buddies again.
Methods of Finding Me
Steps:
- Methods of Finding Me
- App │ Click the icon on the main function screen > Click App Settings > Click Methods of Finding Me.
- Web │ Click the icon > Click App Settings > Click Methods of Finding Me on the side menu.
- App │ Click the
- Verify settings
- Do-ID, Email, Mobile Number and Display Name.
- Public Email and Mobile Number to allow others to view the information.
- Change Settings
- Toggle the button to allow or deny each option.
FAQ-ID:1058
Unbuddy removes your buddies from your buddy list. Your buddies will not be notified when taking the action. You will no longer see their shared contents and the chat histories will be erased as well.
Please be noted that if you have assigned tasks at the buddy level that are not finished just yet, be sure to back them up and post them in related groups before unbuddy them or in the event that they resign from their position!
Unbuddy
Steps:
- Click Buddy Settings.
- Click Unbuddy.
- Click Unbuddy to confirm the action (Click the Confirm button in the web version).
Reminders
- When a member leaves a workplace, all user contents are removed as well, including posts and chat histories. So upon removing any member, be sure to back up this member’s tasks and posts into relevant groups first.
- All the posts will be recovered if an unbuddied member is added as a buddy within 1 year. The chat history, however, will not.
FAQ-ID:1007
WorkDo supports multi-device login, allowing users to collaborate across different devices seamlessly. As such, the interfaces on the web browser, app and laptop will be somewhat different to accommodate the devices. But worry not, our FAQ section will cover different interfaces and explain each function in detail.
This FAQ is focused on the app interface, it is the streamlined version designed for collaboration when you are on the run or working remotely. But for the most feature-complete and comprehensive version, we recommend the web interface.
│ For the complete WorkDo app interface tutorial, please refer to the WorkDo Quick Start Settings │
App Interface Navigation
1 │ Workplace List
Switch between workplaces, WorkDo Network, My Upcoming, My Shelf and Join/Create Workplaces.
2 │ Current Level & Settings
- Displays your current workplace, group or buddy level.
- Click for the level-related settings.
3 │ Search Bar
Enter keywords to search for relevant posts.
4 │ More
Account settings, personalized app settings, resources and issue reporting are all here.
5 │ Workplace
- a. Main screen │ functions such as invite members, create groups, add buddies, view team roster and find pblic groups are all here.
- b. Groups & buddies | Displays the groups you are in and buddies you have befriended.
- c. Do button │ Use the Do button to instantly switch tools and engage in different activities ans tasks.
6 │ Dashboard
The Dashboard summarizes all the activities and tasks you need to respond to. You may use it as a to-do list or see it as your personal secretary.
7 │ + Button
The + button is the most efficient way to quickly create tasks and posts for assignees.
8 │ Chats
Displays all your chats. You may also begin new chats with buddies and groups here.
9 │ Notification Center
The Notification Center alerts you of new activities concerning you.
Reminder
- This is the app interface navigation of WorkDo, for the complete WorkDo app interface tutorial, please refer to the WorkDo Quick Start Settings!
Relevant Questions
WorkDo web general navigation.
What do different roles do in a workplace or group?
What do different roles do in a workplace or group?Workplace, Group, Buddy Settings.
Workplaces, groups, buddies? Use each level to your advantage.
Join multiple workplaces with one account?
The “Do” button or the “+” button, which one do I use?
How do I send feedback or report an error?
WorkDo Network
FAQ-ID:1059
How do I use WorkDo to work with clients and customers?
WorkDo Network was created to alleviate the external communication and collaboration hurdles that many users face.
Now with one WorkDo account, both internal and external communications are enabled by WorkDo!
What can you do in the WorkDo Network?
-
Add clients, suppliers and partners as buddies.
Add your buddies is the best way for one on one communication!
-
Create a groups to collaborate.
You can add clients, customers and suppliers as buddies put them into groups for external communication and collaboration.
-
Use the basic tools as you please!
Once a group is created, you can freely use the available tools for collaboration. Of course, the Dashboard will remind you items that are due every day ensuring a smooth collaboration among partners.
-
Receive official WorkDo notifications.
You will be notified of WorkDo’s new tools, features and events periodically.
Now it’s time for you to invite external partners to WorkDo and collaborate effortlessly!
FAQ-ID:1061
Is WorkDo for internal use only? What if I would like to use WorkDo with clients, customers and partners? But I can’t allow them to access company documents and data, so what do I do?
We understand your concern, a situation like this is exactly what WorkDo Network is for! Just add them as buddies in WorkDo Network and you can use WorkDo with your clients the same way you do internally!
This FAQ will answer 3 questions about WorkDo Network.
- Do groups in WorkDo Network work the same way as groups in the workplace?
- Can I create groups in WorkDo Network? How?
- How do I invite clients, customers and partners to the groups?
1 │ Do groups in WorkDo Network work the same way as groups in the workplace?
Much like you create groups to collaborate in a WorkDo internally, you too, can collaborate in groups using the WorkDo Network externally.
Tools like Tasks, Events, Announcements, Notes, Polls and other basic tools are available for you and your clients to communicate and collaborate. In WorkDo Network, your joint effort will be more productive and seamless.
2 │ Can I create groups in WorkDo Network? How?
Of course! You can create groups in WorkDo Network, simply switch between the workplace and WorkDo Network to collaborate internally and externally.
Group Creation in WorkDo Network
Steps:
- Switch to WorkDo Network.
- Click Create Group.
- Fill out all required information: Group Name, Group Description, Image.
- Click Done to finish.
- Web │ Once you are in the group wall page it means you have created a group successfully.
- App
- A prompt will pop up asking to set the group privacy and it is recommended that you do it now before bring people into the group.
- Click Next to invite members to your group.
- Once you are in the group wall page it means you have created a group successfully.
3 │ How do I invite clients, customers and partners to the groups?
Due to the sensitive nature, all groups in WorkDo Network are private. Users have to be invited by the group admins or members to join the groups.
Plan:![]() All plans
All plans
Permission:![]() Group members
Group members ![]() Group admins
Group admins
Device:![]() App
App ![]() Web
Web
Invite Group Members via QR Code or Invite Link
- Enter the Group Settings page.
- Click Group QR Code.
- Select sharing method.
- Display QR Code
Display the group QR code for scanning to join the group when your clients, customers or partners are right next to you. - Save QR Code
Save the group QR code to your device and share it with other people to join the group. Right-click the mouse and select save the image if you are using the web version. - Copy Link
A link corresponds to the QR code will be generated that can be copied and shared with the preferred people to join the group. - Update QR Code
In rare situations, you may want to get a new QR Code, simply click the icon and click the icon to update it.
- Display QR Code
Invite Group Members via Add Members Function
- Enter the Group Settings page.
- Click Add Members.
- Select an invite method.
- From groups │ Select members from other groups to join the current group.
- From buddies │ Select your buddies to join the current group.
- Scan the QR Code │ An App-only feature. Present the QR code for scanning to join the group.
- Search Do-ID │ Search a member via their Do-ID to join the group.
Reminders
- Upon joining a group in WorkDo Network, all public information is available to the members, unless otherwise mentioned by the post creators.
- The Auto Accept function in the Personal Settings determines whether a member would automatically accept invites or requires their approvals.
Relevant Questions
Why can’t I add buddies using their User ID, email or mobile number?
Workplaces, groups, buddies? Use each level to your advantage.
Send messages.
Switch between workplace and WorkDo Network.
Use WorkDo Network with your customers!
What is WorkDo Network?
How to add admins to workplaces or groups?
How do I delete a group?
FAQ-ID:1060
Add buddies is the most simple and direct way to connect with your clients and customers in the WorkDo Network. So whether it’s internal collaboration or external, all you need is a WorkDo account, and you are all set!
When two are added as buddies, they can use the available tools to communicate and collaborate in private. Follow the steps below to add your contacts as buddies.
Add clients, customers, suppliers as buddies
Instructions: There are multiple ways to add buddies, you can choose your preferred method and your business partners will receive your invite link to register and connect with you on WorkDo.
- Enter the WorkDo Network
- Click Add Buddy, then select a method to send the invite link.
- Invite
Share the invite link to your friends in messenger apps (Line, WeChat, Facebook Messenger), send the invite link via email, SMS, or copy the invite link and manually share it with your business partners. - Contact List
If your business partners are already in your mobile phone’s contact list, you can select the Contacts option to add them, if they are already using WorkDo, or invite them with email or SMS. - Suggestions
This option will list the members of the WorkDo Network groups you are in, you can add them as buddies immediately. - QR Code
You could scan each other’s QR code if your contacts are already using WorkDo. - Search via Do-ID, Mobile Number, Email
Click Search and use any listed options to search your contacts and add them as your buddies.
- Invite
- Add by Profile
If you spot any one in WorkDo whom you wish to add as buddies, you can simple click their profile icon and them them instantly.
Reminder
- Your personal settings in WorkDo Network will determine whether you will auto accept buddy invitations. You can click the Personal Settings on the upper-left-hand corner then select User Privacy and toggle the Auto Accept option to change the setting.
Relevant Questions
Workplaces, groups, buddies? Use each level to your advantage.
Why can’t I add someone by User ID as buddy?
Can I use different nicknames and profile pictures for different workplaces?
What is user Do-ID, and how to set one?
How do I start chatting?
How do I create groups in WorkDo Network?
How to unbuddy buddies?
What is WorkDo Network?
FAQ-ID:1057
Due to personal privacy reasons, every user can select the different methods of how they would like to be found, including Do-ID, email or mobile number.
- Do-ID
Every Do-ID is unique, so using the Do-ID is the surefire way to search out and add buddies. - Email / Mobile Number
If your coworkers are using federated accounts, meaning that they have bound an email or mobile number to their accounts, you can use either information to search them out and add them as buddies.
So how come I still can’t find coworkers even when I have entered their information correctly?
This is probably due to they do not permit others to search them out using their Do-ID, email or mobile number in Methods of Finding Me settings. Once they have allowed being searched out by other users, you may try to add them as buddies again.
Methods of Finding Me
Steps:
- Methods of Finding Me
- App │ Click the icon on the main function screen > Click App Settings > Click Methods of Finding Me.
- Web │ Click the icon > Click App Settings > Click Methods of Finding Me on the side menu.
- App │ Click the
- Verify settings
- Do-ID, Email, Mobile Number and Display Name.
- Public Email and Mobile Number to allow others to view the information.
- Change Settings
- Toggle the button to allow or deny each option.
FAQ-ID:1007
WorkDo supports multi-device login, allowing users to collaborate across different devices seamlessly. As such, the interfaces on the web browser, app and laptop will be somewhat different to accommodate the devices. But worry not, our FAQ section will cover different interfaces and explain each function in detail.
This FAQ is focused on the app interface, it is the streamlined version designed for collaboration when you are on the run or working remotely. But for the most feature-complete and comprehensive version, we recommend the web interface.
│ For the complete WorkDo app interface tutorial, please refer to the WorkDo Quick Start Settings │
App Interface Navigation
1 │ Workplace List
Switch between workplaces, WorkDo Network, My Upcoming, My Shelf and Join/Create Workplaces.
2 │ Current Level & Settings
- Displays your current workplace, group or buddy level.
- Click for the level-related settings.
3 │ Search Bar
Enter keywords to search for relevant posts.
4 │ More
Account settings, personalized app settings, resources and issue reporting are all here.
5 │ Workplace
- a. Main screen │ functions such as invite members, create groups, add buddies, view team roster and find pblic groups are all here.
- b. Groups & buddies | Displays the groups you are in and buddies you have befriended.
- c. Do button │ Use the Do button to instantly switch tools and engage in different activities ans tasks.
6 │ Dashboard
The Dashboard summarizes all the activities and tasks you need to respond to. You may use it as a to-do list or see it as your personal secretary.
7 │ + Button
The + button is the most efficient way to quickly create tasks and posts for assignees.
8 │ Chats
Displays all your chats. You may also begin new chats with buddies and groups here.
9 │ Notification Center
The Notification Center alerts you of new activities concerning you.
Reminder
- This is the app interface navigation of WorkDo, for the complete WorkDo app interface tutorial, please refer to the WorkDo Quick Start Settings!
Relevant Questions
WorkDo web general navigation.
What do different roles do in a workplace or group?
What do different roles do in a workplace or group?Workplace, Group, Buddy Settings.
Workplaces, groups, buddies? Use each level to your advantage.
Join multiple workplaces with one account?
The “Do” button or the “+” button, which one do I use?
How do I send feedback or report an error?
FAQ-ID:1006
There are two possibilities that you are getting notifications from the WorkDo Network, and they are:
- Group, buddy notifications
When you have befriended customers, clients, partners or collaborators in the WorkDo Network, you will get notified when they would like to collaborate with you using the tools. - WorkDo Team notifications
You will get notifications periodically from our official account WorkDo Team on the latest news, updates, events or tutorials.
3 Pros from Following WorkDo Team:
-
Tutorial Sessions
We offer tips and tricks, even detailed tutorials on how to utilize and adopt the tools into your digital workplace, so if the topics are of interest to you, be sure to hit that notification!
-
Get the Latest News
We will also send notifications to inform you the latest development and updates of WorkDo, so you can quickly take advantage of them!
-
Events and Special Offers
We will announce events and special offers through the notifications as well. Stay tuned! So you don’t miss out on any incredible discounts and savings.
Reminder
- WorkDo Team is the official account of WorkDo in the WorkDo Network that we use to send the latest news and information to all our users. Stay Tuned. So you don’t miss out on anything!
Chats
FAQ-ID:1042
Buddy is a one-to-one level in WorkDo, and you can add anyone in your workplace as a buddy! When you add your team members as buddies, you can engage in one-to-one chatting, note posting, task assigning, file sharing and etc.
Add Buddies
Steps:
Choose one of the following methods below to add buddies.
- Add buddies from workplace or groups
Click Add Buddy from the Workplace page, select from the workplace roster or groups, choose a member then hit Add Buddy to complete. Repeat the process to add other buddies. - Add buddies using a QR code (App only).
Click Add Buddy from the Workplace page, select QR code to scan a member’s QR code to add a buddy. Repeat the process to add other buddies. - Buddy Icon
Click anytime when you see a buddy icon then hit the Add Buddy button to add a buddy. - Add buddies with Do-ID
Click Add Buddy from the Workplace page, select Search, then enter a member’s Do-ID to add a buddy. - Add buddies using email or mobile number
Click Add Buddy from the Workplace page, select Email or Mobile, then enter a member’s respective information to add a buddy.
Reminder
As a team collaboration app, WorkDo focuses on team communication and collaboration to maximize team efforts, therefore, adding buddies doesn’t require the approvals from the other members.
FAQ-ID:1076
In terms of team collaboration, it is recommended that you create groups to tackle different tasks. When a group is created, members can use various tools to communicate and collaborate, etc.
However, in certain instances, if a simple chatroom is all you need to get things running, you can create a temporary chatroom to message other members. And if they aren’t your buddy, you can ask one of the participants to invite them into the temporary chatroom.
Create a Temporary Chatroom
Steps:
- Select the workplace domain.
- Click Chats.
- Click + New Chat.
- Select participants.
- Click Done if you are using the WorkDo app, and Confirm if you are using the web version.
Reminders
- If you would like to invite participants who are not your buddies into the chatroom, you can ask other participants who are their buddies to invite them.
- A temporary chatroom is for messaging only; therefore, no collaboration tools are provided. If you need to use the collaboration tools, you can either create a group or upgrade the chatroom to a group.
FAQ-ID:1075
Messaging is common practice in modern workplaces, and you can send messages to your teammates with WorkDo to collaborate effortlessly!
Aside from your standard texts, you can send photos, videos, audio messages, locations, stickers, and emojis. If that’s not enough, audio calls and video calls are also available.
1 │ Messaging
Send text messages, photos, videos, audio messages, locations, stickers, and emoji.
2 │ Audio Call & Video Call
Managing remote teams and can’t get together for a proper in-person meeting? Utilizing audio and video calls is the best way to connect you and your teams and get everyone up to date!
3 │ Create Action Items in the Chatroom
Use the shortcut button to create notes, tasks, events, polls, files, and links to document meeting minutes, or to make sure that tasks are assigned and everyone is on the same page.
4 │ Copy, Forward, Recall, Delete Messages
Use copy and forward to relay noteworthy information to other groups and people, and recall and delete messages if you would like to retract and unsend messages.
Sending Messages
Steps:
-
-
- Select the workplace domain.
- Click Chats and select an existing chatroom or click + New Chat to start chatting with yout new buddy.
- Send messages using the WorkDo app.
- Texts
Enter the texts in the text box and click the blue arrow to send. - Audio, Video Calls
Click the + icon and the call icon, then select audio call or video call. - Audio Messages
Click the microphone icon to enable the audio message, then click and hold the middle microphone icon to record, release to finish, and the audio message will be sent. - Photos, Videos
Click the + icon followed by Media or Camera to send photos and videos. - Locations
Click the + icon followed by Location, and set the location pin to send this location. - Stickers, Emojis
Click the smiley face icon to send stickers, and click the emoji icon at the bottom to switch between stickers and emojis. - Action Items
Click the + icon and select the proper tools to create corresponding action items.
- Texts
- Send messages using the web version of WorkDo.
Click the chat icon and select a chatroom to chat, or click the + New Chat to communicate with your new buddy in various ways.- Texts
Enter the texts in the text box and click send. - Emoji
Click the smiley face icon to send emojis. - Photos
Click the photo icon to send photos. - Audio Call
Click the phone icon to initiate an audio call. Please allow WorkDo to access your computer’s microphone if you have not authorized it previously. - Video Call
Click the camera icon to initiate a video call. Please allow WorkDo to access your computer’s camera if you have not authorized it previously.
- Texts
-
Reminder
- If members are unable to send messages at the workplace level, the workplace admins have likely prohibited it.
- Currently, the web version of WorkDo supports receiving and viewing videos but does not support sending video files.
- The web version and app version of WorkDo operate slightly differently. Please see the steps described above for details.
Relevant Questions
Can I use the workplace-level chatroom for admins only?
How do I disable the split-view chat windows in the WorkDo web version?
Can I upload stickers?
Chat message options explained.
What does the “Do” button do?
How do I make a group call?
Do I need to create a group to initiate group chat?
How do I recall a message?
What does the “Read” mark indicate?
How to delete a chatroom?
WorkDo web general navigation.
WorkDo app general navigation.
FAQ-ID:1081
A sticker is worth a thousand words!
There are a few sets of default stickers you may use in the chatroom, but if you want, you may upload your own stickers to make conversations more lively and fun!
And if you like a sticker sent by other people, you can save it to your library.
Upload Stickers
Steps:
- Enter the workplace.
- Click the Chats tab for available chatrooms and groups.
- Enter a chatroom.
- Add stickers to the library.
- Add other people’s stickers to your library.
Long press on a sticker you like then click Add Sticker to save it to your library. - Upload stickers to your library.
Click the emoji icon on the bottom-left corner of the chatroom, then click the rectangular face icon followed by the + button to upload a sticker to the library. Finally, click Done to finish.
- Add other people’s stickers to your library.
- Once stickers are added to your library, you may use them immediately.
Reminders
- Supported sticker format include jpg, png, gif, etc. with(W)320 X (H)320 pixels.
- Do not infringe intellectual property rights when uploading stickers.
FAQ-ID:1079
A picture is worth a thousand words!
All images sent in the chatroom can be saved on your device for reference with just a few simple steps.
On side note, because chatrooms tend to be flooded with messages when too many people are involved, so when images are related to a specific topic, theme or project, we recommend you use the Ablums tool instead.
Save Images in the Chatroom
Steps:
- Switch to the workplace page.
- Click the Chats tab and select a group or chatroom.
- Locate the image you’d like to save.
- Save.
- App │ Tap and hold the image the press Save or click on the image and tap the save icon on the bottom-right-hand corner.
- Web │ Right-click the image the select Save.
FAQ-ID:1080
Have you ever sent a message to the wrong person? Embarassing, isn’t it? We understand, we all made that mistake once or twice. Well, the good news is that you can rectify it!
All your text messages, stickers, emojis, media and locations are retractable within the first 10 minutes in the chatroom. Delete, however, doesn’t have a time restriction. Recalling and deleting messages will not send out any chat notifications to other members.
The difference:
- Delete │ Delete will only delete messages in the original sender’s chatroom, the rest of the group members are still able to view the messages.
- Recall │ By recalling a message, all group members are no longer able to view the message. Recall is only available for 10 minutes after the message is sent and “This message has been recalled” text will replace the original message.
Delete, Recal Messages
Steps:
- On the workplace page.
- Click the Chats tab to display all the chatrooms.
- Find the message you’d like to delete or recall.
- Delete, Recall
- App │ Press and hold the message for half a second, then select Delete or Recall.
- Web │ Right-click the message and select Delete or Recall.
- Confirm your action to execute your command.
Reminder
- The recall option is only avilable for the first 10 minutes after the message is sent, it’s meant to recall messages that are sent to the wrong groups or retract a statement.
FAQ-ID:1077
WorkDo’s messenger features a read receipt function. These receipts are the check marks / read indicator and numbers that appear next to each message you send. The read receipts allow the sender to know when his/her message is read and by how many people in the chatroom.
The read receipt is indicated with
- Chatroom List │ A number and check mark.
- Chatroom │ A number and Read indicator.
In certain chatrooms, if there are things that are of no concern to you, you could use the Read function to instantly appear as read to all messages and posts, and here’s how it’s done!
Appear as Read All Messages and Posts
Steps:
- On the workplace page.
- Click the Chats tab to display all chatrooms chatrooms.
- Read
- App │ Press and hold then select Read or swipe left and select Read to have all messages and posts read.
- Web │ Simply enter the chatroom to have all messages and post read.
Reminder
- The timestamp below the read receipt is the message sent time.
- The read receipt number indicates how many people have read the message thus will only appear in chatrooms with more than two people. In one-to-one chatrooms, only the Read indicator will appear.
FAQ-ID:1082
You can delete outdated chatrooms for a cleaner look or free up some memory in your device, however, once a chatroom has been deleted, there is no way to retrieve the deleted messages.
Please note that deleting a chatroom does not mean that you have left the chatroom or group, you are merely deleting all existing messages up to this point, new messages sent to the chatroom will still pop up and all assigned tasks and related tool posts are still valid.
Delete a Chatroom
Steps:
- Switch to the workplace page.
- Click the Chats tab and select a group or chatroom.
- Delete a chatroom.
- Tap and hold a chatroom then click Delete.
- Swipe left on desire chatroom and select Delete.
- Confirm the action in the pop up window to complete the deletion.
FAQ-ID:1083
By default, the split-view chat window is activated in the web version of WorkDo, but you can disable it if you so desire.
Enable / Disable Split View Mode
Steps:
- Click the icon in the upper-right-hand corner.
- Click App Settings.
- Click Chat Settings.
- Eneble / Disable Split View Mode.
- Enable │ Allows split view of chat windows.
- Disable │ Disallow split view of chat windows.
Reminder
- The Split View Mode setting is applied to all chatrooms.
Relevant Questions
What is Chat Alert? And how do I change its settings?
Can I use the workplace-level chatroom for admins only?
Can I upload stickers?
Chat message options explained.
How do I make a group call?
Should I create a chatroom or group?
Message recall or delete? What’s the difference?
What does the “Read” mark indicate?
How to delete a chatroom?
FAQ-ID:1084
There are various chat message options you can use, but do you know what each option does or when to use them?
Being the basic and number one choice of communication method, you can send texts, photos, emojis, stickers, audio messages, even making audio or video calls, but did you know aside from recalling and deleting sent messages, you can also copy, forward or create action items. Let’s go through each function and when you should use them.
1 │ Copy
- Copy a text message in its entirety, it can be pasted to external apps.
- Only one text message can be copied at a time.
2 │ Forward
- Forward messages to other groups or chatrooms.
- You may select multiple messages for forwarding.
3 │ Post to Notes(App Only)
- Best used for when you want to organize a topic conversation and do not want the messages flooded.
- You can select multiple messages to be posted in a note, photos not included.
- The messages will be listed in a note, you can edit the content before publishing.
4 │ Post to Tasks(App Only)
- Best used when you want to make immediately create a task out of a topic conversation and be able to track its progress.
- You can select multiple messages to be posted in a task, photos not included.
- The first message will be the main task and the rest of the messages will be the subtask you can edit the content before publishing.
Copy, Forward, Post to Notes, Tasks
Steps:
- Enter the workplace.
- Click main function Chats to display all the chatrooms.
- Enter a chatroom and open the option menu.
- Copy, Forward, Post Notes, Post to Tasks.
- App │ Press and hold on a message then select an option.
- Web │ Right-click on a message then select an option.
- Multi-select messages │ Available to Forward, Post to Notes & Post to Tasks.
- Finish by selecting a destination to post.
Reminder
- It is common for some functions in WorkDo to perform differently on different interfaces, such is the case with the chat message options.
FAQ-ID:1030
If you want to keep the workplace-level chatroom free from employee chatter and use it only for company-wide announcements, there is an option for that!
When the setting is on, only workplace admins are allowed to use the workplace-level chatroom. But please note that, although employees are not allowed to send texts, photos, videos, locations, and stickers in the workplace-level chatroom, they are still free to create group chatrooms to communicate and collaborate as normal.
Set Admins-Only Workplace-Level Chatroom
Steps:
- Enter the Workplace Settings.
- Click Workplace Privacy.
- Set the Who Can Chat option.
- Owner and Admin │ Only the workplace owner and admins are allowed to send chat messages in the workplace-level chatroom.
- Everyone │ All members are allowed to send chat messages in the workplace-level chatroom.
Reminder
- WorkDo has designed three levels (workplace, group & buddy) for different kinds of workplace communication and collaboration. It is intentional that settings that control communication and collaboration are separated. As such, Who Can Chat controls who is allowed to chat in the workplace-level chatroom, and Who Can Post controls who is allowed to create tool posts at the workplace level.
Relevant Questions
Sending messages.
Can I use the workplace level for admins only?
Allow members to use their nicknames?
Can I control members from creating public or private groups?
Who is allowed to invite new members into workplaces or groups?
What do different roles do in a workplace or group?
How to add admins to workplaces or groups?
Notifications
FAQ-ID:1097
Aside from the notification center, if you like to receive notifications through emails or customize your notification settings, this is the FAQ for you!
By default, email notifications are turned on and your login email address is used to receive the notifications. If you feel like turning on or off certain types of notifications, you may do so by following the steps below.
01|Turn On / Off Notification Emails
Steps:
- Enter Workplace Settings.
- Click Notifications.
- Toggle the Email Alert button to turn it on and off.
02|Set or Reset an Email Address
Steps:
- Select the HR tool.
- Click Employees Profiles or Employees using the app .
- Select an employee.
- Update employee email address.
- App │ Click the icon then Edit to update the Business Email.
- Web │ Click the Edit icon and update the Business Email field.
- App │ Click the
- Click Save to finish.
Reminders
- If the HR tool is not enabled in your workplace or you used a mobile number upon account sign up and didn’t set an email address then you have to manually bind an email address.
- Email notifications can only be turned on or off, users can’t select the types of notifications they would like to receive.
FAQ-ID:1098
We understand a busy workday can easily overwhelm even the most organized person, which is why in WorkDo, you can set a daily reminder to notify you of unfinished tasks and upcoming events so that you need to attend to.
The Daily Reminder will tell you how many things that require your attention, this number includes the Tasks, Events and Polls from all workplaces, WorkDo Network and Private Space levels, you can click on it and view all the items in the All Upcoming section.
Set Daily Reminder
Steps:
- On the main function screen.
- Click the icon on the upper-right-hand corner.
- Click App Settings.
- Click Notification Settings.
- Enable Daily Reminder.
- Set the reminder time.
Reminder
- The Daily Reminder is a device-based setting. If you use WorkDo on multiple devices, you need to set the Daily Reminder on each device individually.
Relevant Questions
How do I change the notification settings?
What is Chat Alert? And how do I change its settings?
Receive email notifications.
What is Do-ID? How do I set one?
How do I subscribe to an external calendar?
Multi-Language Support.
WorkDo Network, Workplace, Private Space, what are they?
FAQ-ID:1092
When there’s an update related to the tools you use to interact with your team, you will receive a push notification on your mobile device when you are not actively using WorkDo. The Notification Center will display all the updates with a numeric value representing the number of new updates.
The notification methods include alert sound, vibration and daily reminder count. You could also opt to receive notification alerts, email alerts, event alarms and chat alerts of the selected groups and workplaces. Please follow the steps below to personalize your notification settings.
Change App Notification Settings
Steps:
Click the ![]() icon > App Settings > Notification Settings to change the settings.
icon > App Settings > Notification Settings to change the settings.
- Alert Sound: Recieve notification sounds for updates when the app is running.
- Vibrate: Receive notification vibrations for updates when the app is running.
- Daily Reminder: Receive daily notification of items on your to-do list once enabled.
Reminders
- For devices that are running on Android 8.0 or above, the devices’ sound profile will be applied to chat alerts and event alrms.
- Notifications include publishing posts, editing posts, getting likes, receiving comments and various tool actions that require interactions and attention.
Change Workplace Notification Settings
Steps:
Click the Workplace Settings > Personal settings > Notifications to change the settings.
- Notification Center: Controls the Workplace’s notification sound and vibration. When turned off, you will not receive notification sounds and vibrations unless you manually check the notification center.
- Email Alert: Receive email notifications in your email inbox. The default email is set to your email listed in the HR tool, the email you used to register the account or the email used to link your account.
- Event Alarm: Receive event alarms in advance when you reply Going/Maybe to events. Set your reminder time, default is set to 15 minutes prior to the event.
- Chat Alert: Receive chat notifications. The top button determines the overall chat notifications are enabled or disabled, or you could individually turn the notification on/off for selected groups.
Reminder
- You will receive additional push notifications when WorkDo is not closed.
Relevant Questions
What is Chat Alert? And how do I change its settings?
How to set the Daily Reminder?
Receive email notifications.
Why is my Oppo smartphone is not receiving WorkDo’s notifications?
How do I know I’ve read a notification?
WorkDo web general navigation.
WorkDo app general navigation.
FAQ-ID:1093
Chat Alert provides users with chat and event updates in the workplace and groups they are in, urging users to take part in the collaborative effort.
Chatroom Notification Setting
STEPS │ App
- Click the Chats tab on the workplace page.
- Click and swipe right on desired chatroom for settings.
- Toggle the Chat Alert option to turn it on and off.
STEP │ Web
- Click Group Settings or Buddy Settings of the chatroom.
- Toggle the Chat Alert option to turn it on and off.
Reminders
- Read this FAQ if you’d like to change the workplace chat alert setting.
- The notification settings of Android 8.0 or above devices will be directly applied to WorkDo, offering chat and event notifications by sound and/or vibration.
- You will receive WorkDo’s push notifications upon installation if your device’s notification setting is turned on.
Relevant Questions
What is Notification Alert? And how can I change the settings?
How do I disable the split view chat windows in WorkDo web version?
Why is my Oppo smartphone is not receiving WorkDo’s notifications?
Receive email notifications.
How to set the Daily Reminder?
Receive email notifications.
How do I know I’ve read a notification?
About notification center.
WorkDo web general navigation.
WorkDo app general navigation.
FAQ-ID:1094
WorkDo strives to provide the best team collaboration service to our users, as such, we work hard to make sure that WorkDo maintains optimal performance simultaneously across all devices in real-time. However, in rare situations, the system may take a moment to process the messages resulting in a slight delay.
Users could follow the methods below to troubleshoot the delay problem, just in case!
Troubleshoot Message Delay
Troubleshoot:
- Relaunch the app or browser.
- App │ Exit the app and update WorkDo to the latest version and log in again.
- Web │ Close the web browser and open a new browser and log in to your WorkDo account again.
- Maintain a stable connection.
If you are on traveling in high speed, ie., on a high speed train or on the freeway, a stable connection may not be maintained on your device, resulting the delay. Please make sure your device has a stable connection and relaunch the app. - Check the cellphone signal reception.
If you are in areas where signal coverage is weak, you may experience a delay, please check with your service provider. It will be fixed when you have returned to areas with a stable connection. - Refresh the chatroom or click the notification to refresh the messages.
Reminders
- Please ask someone to send you a message to verify whether the delay has been resolved once the troubleshooting has been performed. Should the problem persists, please use the feedback for assistance.
- WorkDo supports multi-device operation, all posts, messages and actions are synced across all devices with the exception of notifications that are based on each device’s notification settings.
FAQ-ID:1095
Don’t want to miss out on important discussions in the workplace? Don’t want to be left out of the loop? Well, WorkDo’s customizable notification settings will make sure that you always stay on top of things!
WorkDo’s notifications settings can be personalized to users’ preferences, including chat notifications, event notifications, and even the daily to-do list notifications, etc.
In rare circumstances, notifications may be delayed due to a number of reasons. Should this occurs, please follow the instructions below to troubleshoot the problem.
Troubleshoot Notification Delay
Troubleshoot:
- Relaunch the app or web browser.
- App │ Exit the app and update WorkDo to the latest version and log in again.
- Web │ Close the web browser and open a new browser and log in to your WorkDo account again.
- Make sure the device notification permission is grant to WorkDo.
- Device │ Check the WorkDo is allowed to send notifications by your device’s notification settings.
- PC │ Click the lock icon in front of the URL in your web browser to change the notification settings.
- Check your WorkDo notifications are turned on.
- Maintain a stable connection.
If you are on traveling at a high speed, ie., on a high-speed train or on the freeway, a stable connection may not be maintained on your device, resulting in the dealy. Please make sure your device has a stable connection and relaunch the app. - Check the cellphone signal reception.
If you are in areas where signal coverage is weak, you may experience a delay, please check with your service provider. It will be fixed when you have returned to areas with a stable connection. - About dealy on iOS 13.
We have identified that some users may experience notification delay using iPhones running on iOS 13. If you are experienceing a delay please log out of WorkDo and then log in again to resolve this issue.
Reminders
- WorkDo supports multi-device operation, all posts, messages and actions are synced across all devices with the exception of notifications that are based on each device’s notification settings.
- Please ask someone to send you a message to verify whether the delay has been resolved once the troubleshooting has been performed. Should the problem persists, please use the feedback for assistance.
- Different PCs, devices and operating systems may name the notification settings differently, please consult each hardware, software provider.
FAQ-ID:1096
Your notification bell will be sure to pop up when you engage in a collaborative effort with your team. When it does, a number next to the notification bell tells you how many notifications there are and what you need to focus on.
Notifications include posts, comments, likes, chat messages, etc. With the help of the notification center, you are sure to stay on top of things!
1 │ WorkDo Notification Center
The notifications are all things that are important and pertaining to you, such as published posts, edits, likes received, comments left, or approved leaves, expenses, overtime applications and other requests. So keep checking back to WorkDo and make sure you don’t miss out on important stuff.
- Unread │ Blue background
- Read │ Grayed out
2 │ Dashboard Notifications
When you receive different types of tool notifications, the dashboard will also show numbers next to the corresponding tools, this helps you quickly identify what needs your attention.
- Unread │ A read dot or a number next to the tools
- Read │ No indicators
Reminder
- Please refer to this FAQ to change your notification settings.
FAQ-ID:1099
The Oppo brand of smartphones has turned off apps’ notification setting by default; please follow the instructions to change WorkDo’s notification setting.
Enable Notifications on an Oppo Smartphone
Steps:
-
- Open up WorkDo and click the … icon for More Settings, then click app settings followed by Notification Settings. Make sure the notification is turned on. (Read-around: How do I change the notification settings?)
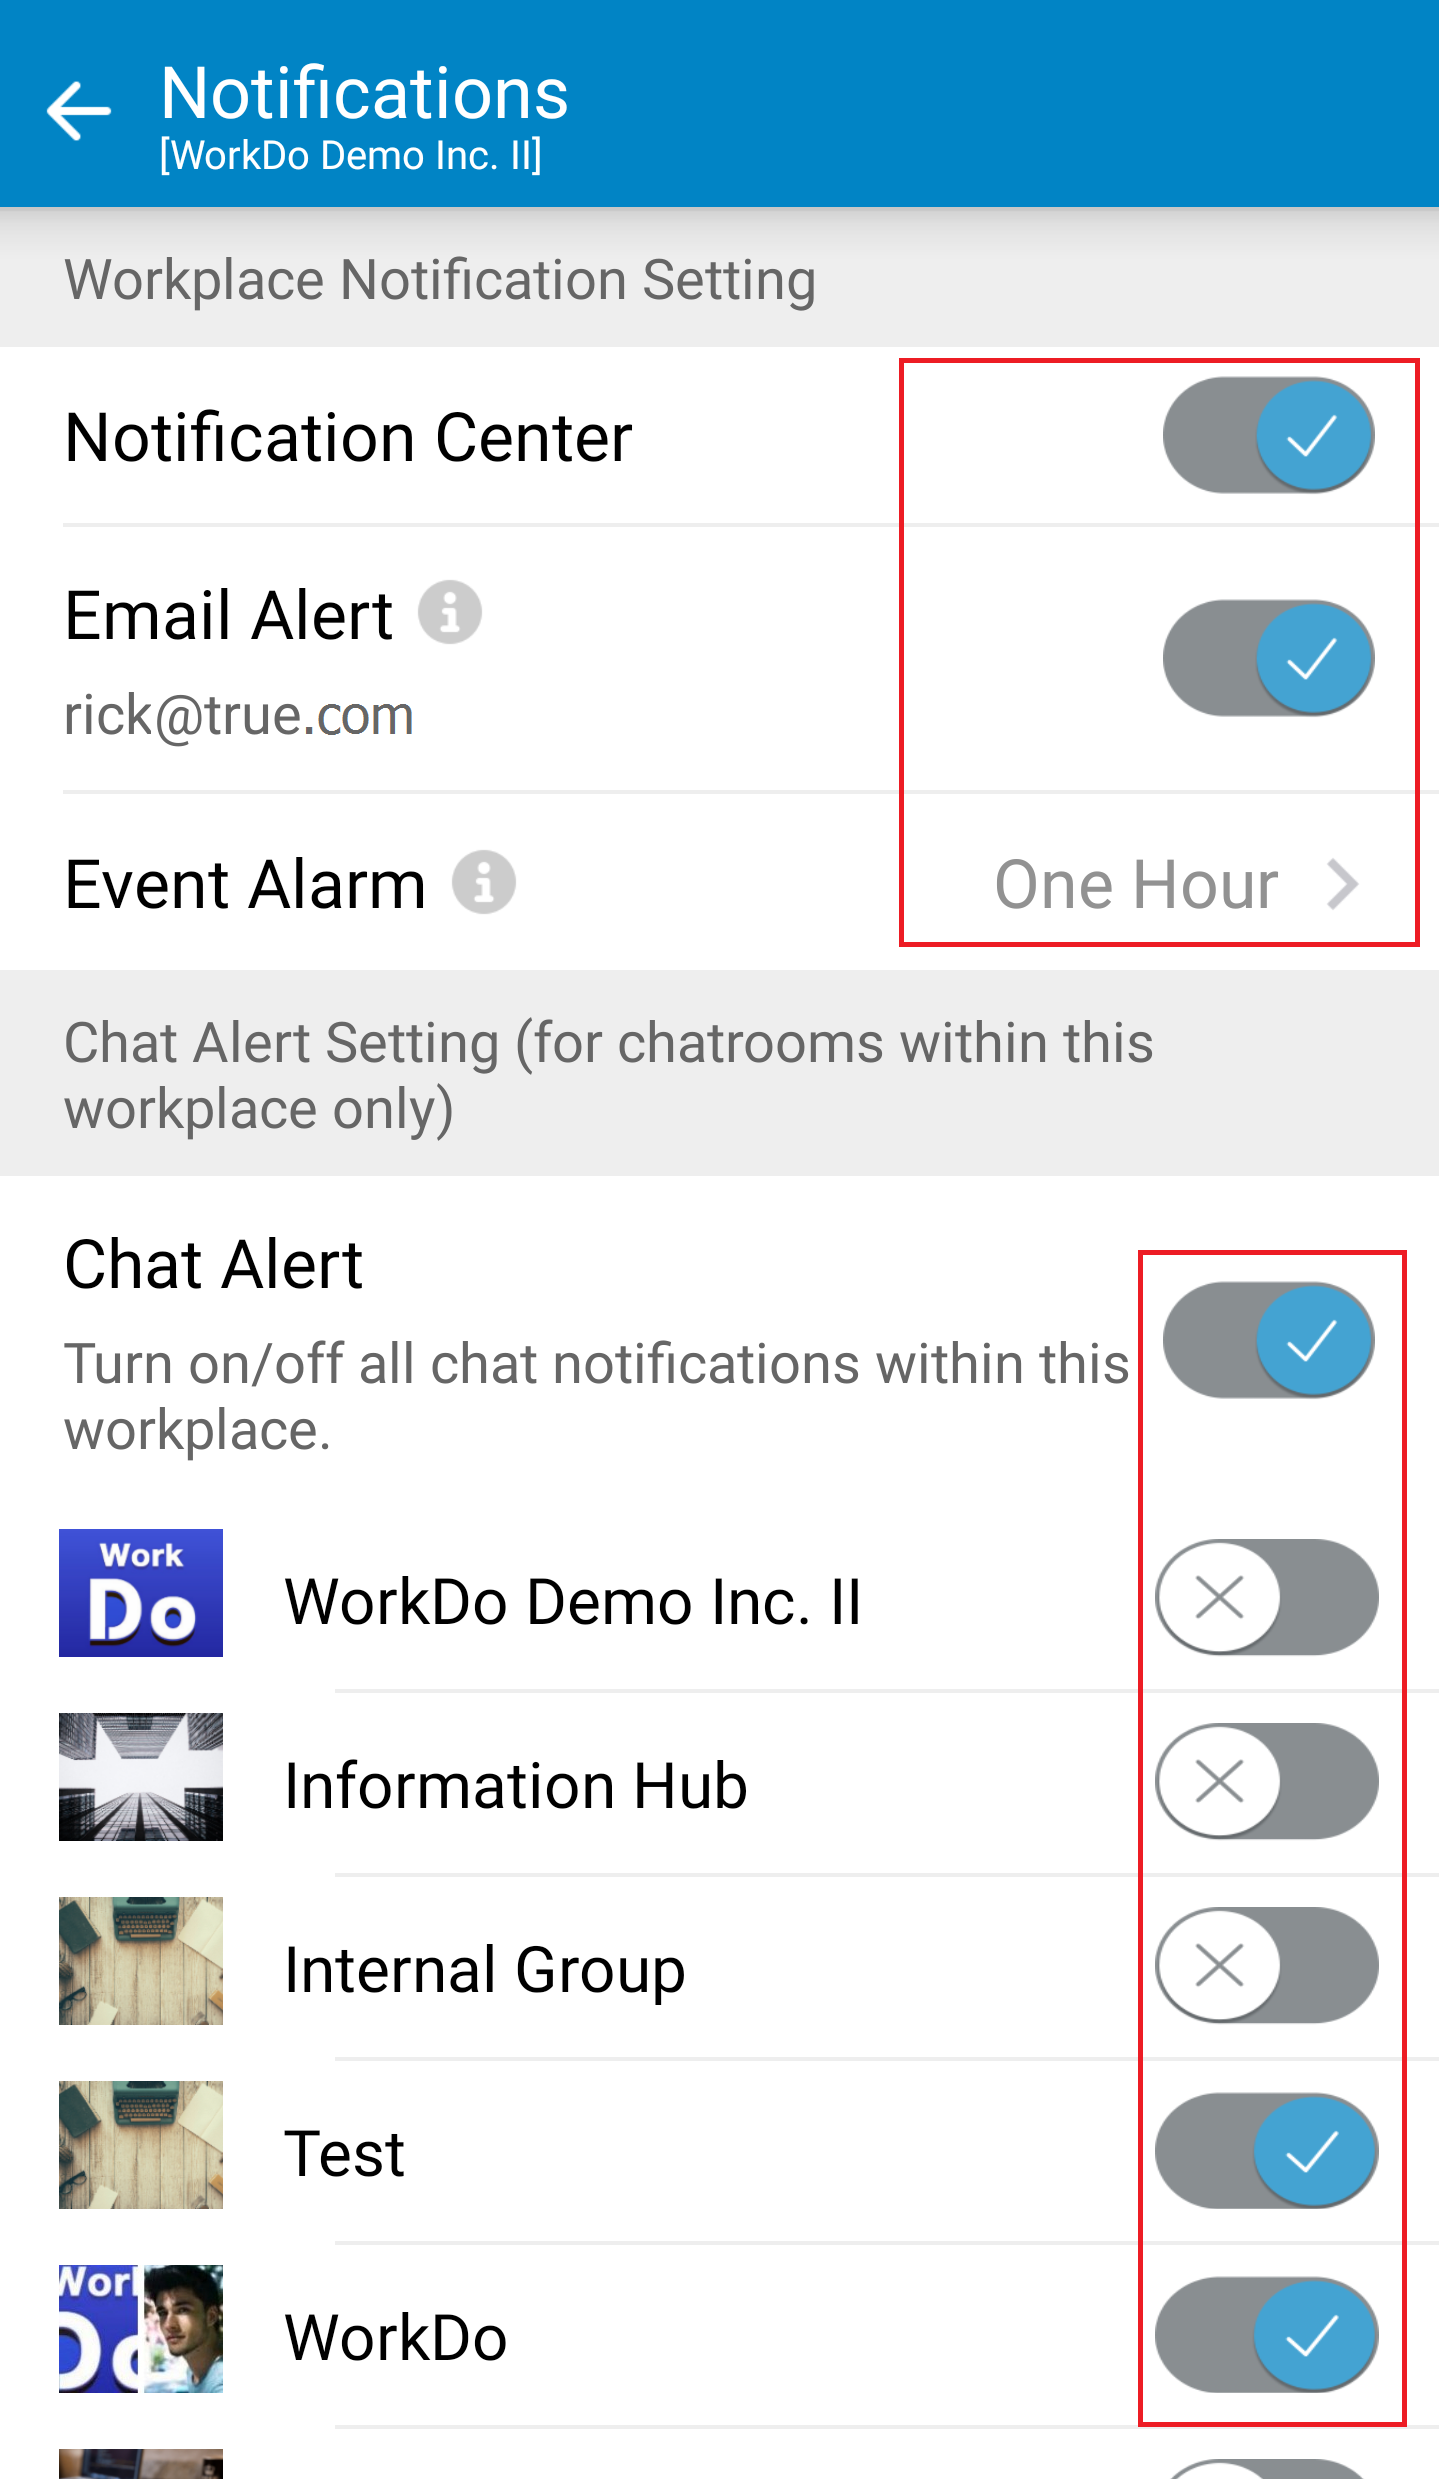
- Enter the device Settings menu and click App Management, then select WorkDo from your list of apps and clcik Notifications. Turn on the different types of notifications you would like to receive from WorkDo.

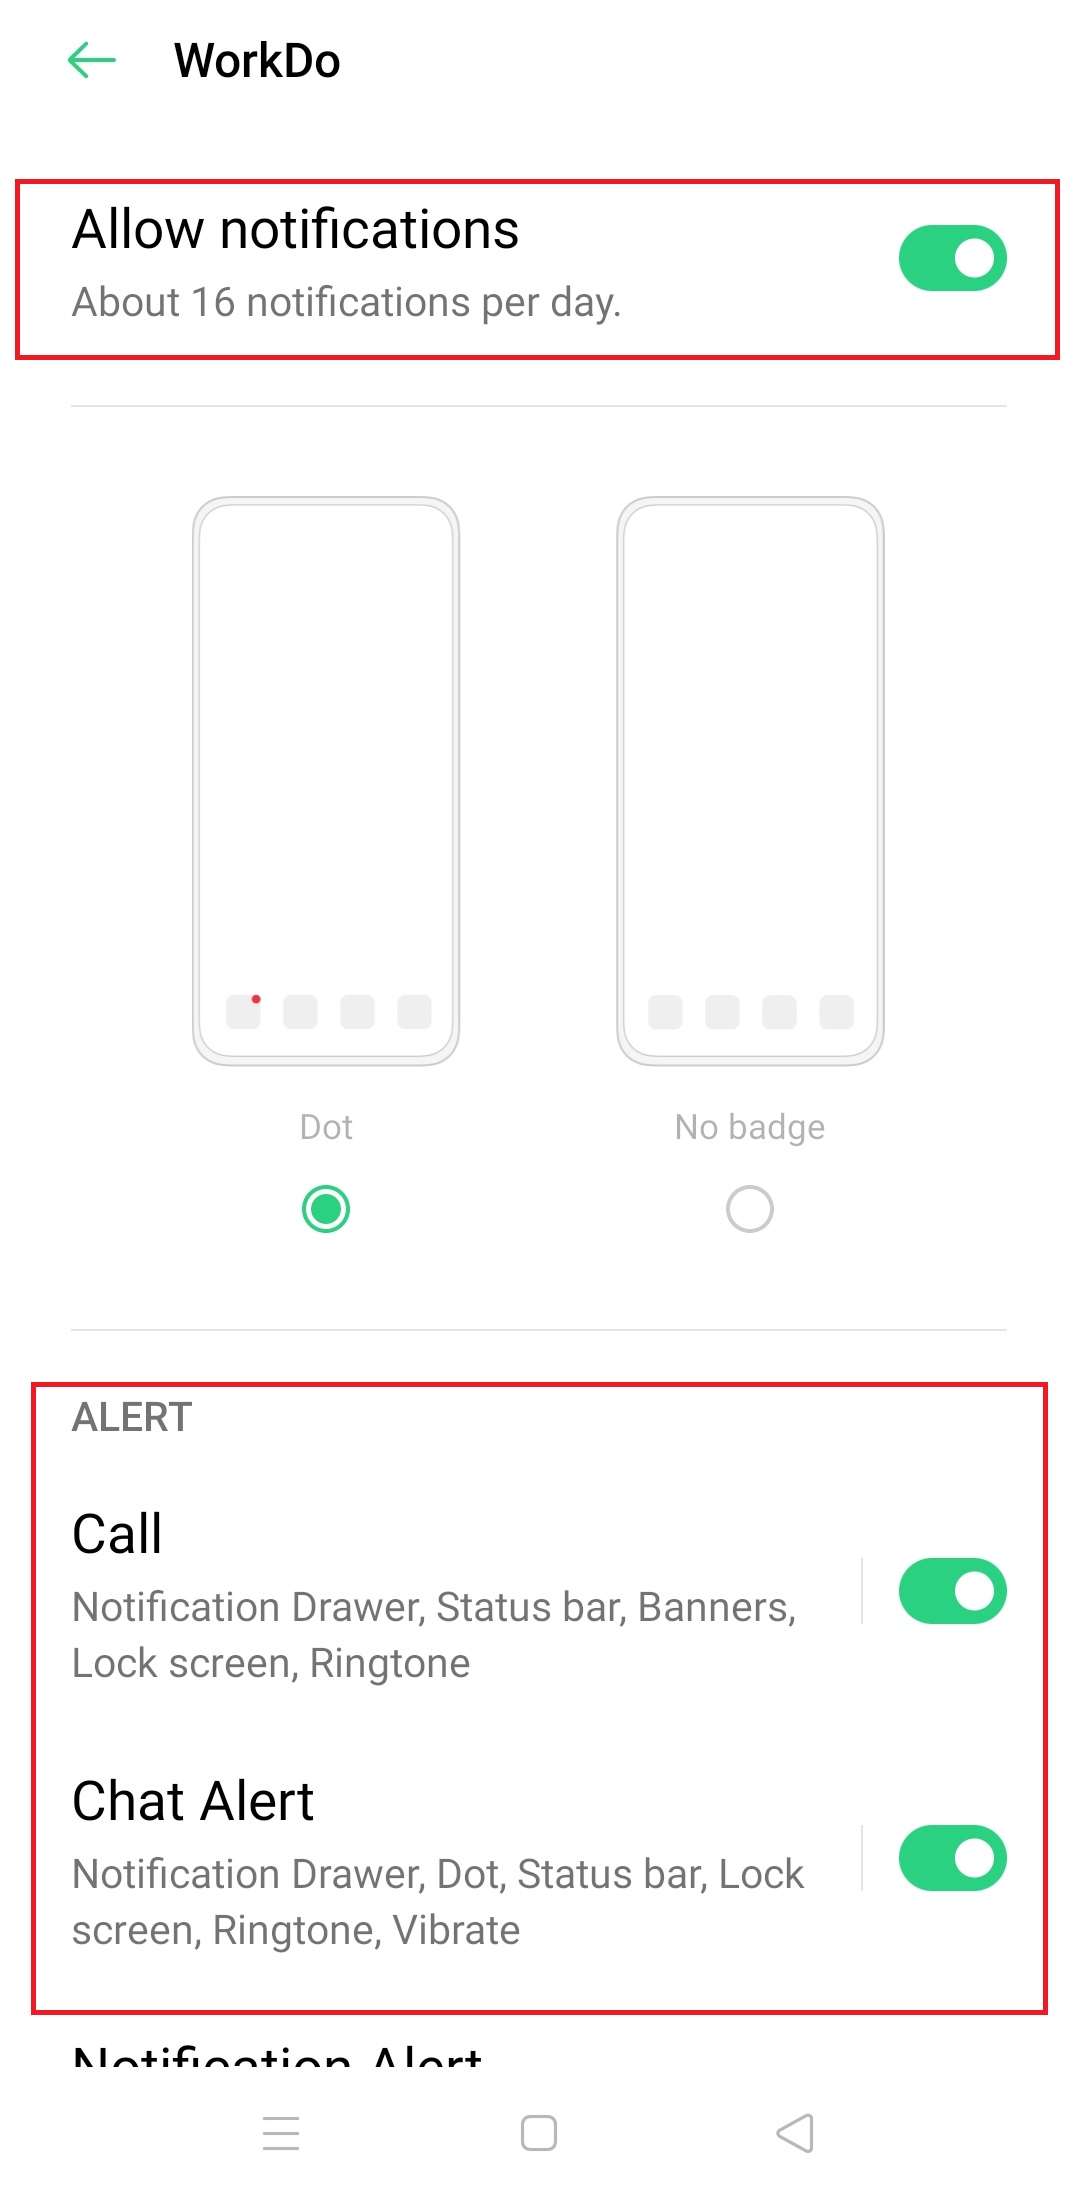
- Open up WorkDo and click the … icon for More Settings, then click app settings followed by Notification Settings. Make sure the notification is turned on. (Read-around: How do I change the notification settings?)
Caution!
You must repeat the steps to turn on the notifications when you delete and reinstall WorkDo.
Relevant Question
Dashboard
FAQ-ID:1103
When you use WorkDo, chances are that you are in multiple groups tackling different projects and assignments. Things could get a bit hectic when you have teammates assigning tasks and creating events, which is why the Dashboard Calendar is the best place for you to check out things that are only pertaining to you. In a way, the Dashboard Calendar is your personalized secretary.
The Dashboard Calendar filters out items that are irrelevant to you, so can you focus on things that truly require your attention. As such, it is normal that your calendar will look different than that of your teammates’ calendars in terms of posts and request forms.
The HR Calendar in the Dashboard integrates posts from the HR, Tasks, Events and Polls tools that require your attention. It is also connected to the HR Calendar to show you future public holidays, make-up work days, etc. so you can better manage your time and resources.
Reminders
- If the Calendar icon does not appear in your Dashboard, it is likely that it has been hidden. Press and hold an icon to adjust the icons and their order.
- The only information that is consistent across all team members is the Leave Overview, everything else is personalize for you only.
FAQ-ID:1100
What is the Dashboard for? What are the benefits of using the Dashboard? Well, in a way, you can think of the Dashboard as your personal assistant or secretary; it always shows you items that await your decisions and replies, so in case you forget a thing or two in your hectic schedule, it will help you focus on things that require your attention!
Dasboard
The main design focus of the Dashboard is to save users’ time by organizing a to-do list for everyone, so users can quickly grasp what is happening in the workplace, and get an outlook on the things they need to do to manage their time and resources accordingly.
There is a Dashboard for each workplace, as well as the WorkDo Network and your Private Space, it reminds you of things that you need to pay attention to, making it the perfect assistant for users!
- Workplace Dashboard: View all workplace, groups and buddies items pertaining to you.
- WorkDo Network Dashboard: View group and buddy items of clients, suppliers and partners pertaining to you.
- Private Space Dashboard: View items of things that you reminded yourself of.
The Benefits of Dashboard
- An automated to-do list that help you keep track of things.
May it be the Dashboard Wall, Calendar, 8 basic tools, Workflow or Leave Overview, the Dashboard tells you all in a neatly and organized fashion, so you can immediately assess the priorities and resources. - All things that pertain to you.
When things get hectic, you may be bombarded with notifications, some may be important to you, some may not be as important, but the Dashboard will help filter items that do not require your actions, so you can put your energy and focus where they matter. - Customizable Dashboard display.
You may customize your Dashboard to your likings. Simply, long-press on an icon to initiate the customization process. Select tools and items you’d like to see on the Dashboard and hide the ones you don’t, then drag and drop to change their order.
Enter the Dashboard Screen
Steps:
App
- Switch to workplace, WorkDo Network or Private Space.
- Click the Dashboard button on the bottom of the screen.
Web
- Switch to workplace, WorkDo Network or Private Space.
- Click the
 icon to enter the Dashboard Wall then click on the tools or items to view its details.
Reminder
- The Dashboard automatically gathers items, posts and request forms that pertain to the user, as such, it is normal that everyone’s Dashboard differs from one another.
Relevant Questions
What is the difference between Wall and Dashboard Wall?
Customize the Dashboard tools and order.
A personalized Dashboard Calendar just for you.
What is All Upcoming on the bottom of the workplace list?
Who is allowed to search or view my posts?
Can I batch-approve request forms?
What is WorkDo Network?
WorkDo Network, Workplace, Private Space, what are they?
What does the “Do” button do?
WorkDo web general navigation.
WorkDo app general navigation.
FAQ-ID:1101
There are tools I rarely use, can I set the tools I want to use in the Dashboard?
Of course! Users can customize the Dashboard to their liking and choose the tools and shortcuts they want in the Dashboard.
May it be the Dashboard Wall, Calendar, 8 basic tools, Workflow or Leave Overview, the Dashboard tells you all in a neatly and organized fashion, so you can quickly assess the priorities and available resources.
By default, the Dashboard Wall, Announcements, Notes, Files, Albums and Links are locked because they are frequently used, but the reset of the tools and shortcuts are completely customizable. Now, you may follow the steps below to customize your own dashboard.
Dashboard Customization
STEPS | App
- Switch to workplace, WorkDo Network or Private Space Dashboard.
- Long-press a tool icon enter into the setting screen.
- Select the tools you want to use and hide the ones you don’t.
- In the setting screen, press and hold a tool icon then drag and drop to change the order.
- Click Done on the upper-right-hand corner to finish.
STEPS | Web
- Switch to workplace, WorkDo Network or Private Space Dashboard.
- Scroll down to the bottom of the tool list and click Custom Dashboard.
- Select the tools you want to use and hide the ones you don’t.
- In the setting screen, press and hold a tool icon then drag and drop to change the order.
- Click Save to finish.
Reminder
- Every user could customize their Dashboard to their own preference and it does not affect other users.
- The Dashboard automatically gathers items that pertain to the user, as such, it is normal that everyone’s Dashboard differs from one another.
FAQ-ID:1085
The Workflow icon in the Dashboard is a one-stop-shop of all the requests you need to process and weigh in on. What is neat about Workflow is that you batch-approve multiple requests to save yourself some time.
So if you are a manager or designated approver, Workflow is something you need to utilize!
Please note that
- Batch-approve only offers Approve and Reject options. If you need to escalate requests, you must individually perform the action.
- You are not allowed to leave a comment when batch-approving requests.
- There will be no action success pop-up message after the action.
Batch-Approve Requests
Steps:
- Switch to the workplace Dashboard.
- Click Workflow.
- Use the filters to find a particular request form or a category of requests to sign off on.
- Multi-select request forms.
- App │ Click the multi-select button on the upper-right-hand corner then select requests.
- Web │ Check the boxes in front of the requests.
- Approve / Reject │ Click Approve or Reject on the bottom of the screen if you are using the app, click Approve All or Reject All button if you are using the web version.
Reminder
- Batch-approve Leave Pro can only be done in the Dashboard Workflow, as for the rest of the requests, you may go to each tool’s Approve section to weigh in your decision.
Relevant Questions
What’s the difference between approving and escalating requests?
A personalized Dashboard Calendar just for you.
Customize the Dashboard tools and order.
What are the benefits of using the Dashboard?
What is the difference between Wall and Dashboard Wall?
What does the “Do” button do?
FAQ-ID:1003
The Dashboard is great for showing your to-do list and all, but if you have multiple workplaces, it would be a hassle for you to enter a workplace to check the Dashboard and switch to another to do the same thing all over again.
Shouldn’t there be a quicker way for this? Well, guess what! This is exactly what the All Upcoming is for!
Because your Private Space, WorkDo Network and each workplace are independent, therefore, typically, you would need to switch to each workplace’s Dashboard to get a glimpse of your to-do list, but that’s not the case now that there’s All Upcoming you can use!
All Upcoming puts all your upcoming events and to-do lists from all domains into one place, so you can conveniently bring it up and immediately get the full picture of what your schedule looks like.
View All Upcoming
Steps:
- Click the icon on the upper-left-hand corner to bring up your workplace list.
- Scroll down to the bottom and select All Upcoming.
- Use the tab to switch between Today’s upcoming items and Next 7 days’.
- Select an item to view its detail.
Reminders
- All upcoming consists of a person’s due tasks and events from the collaboration tools, as such, each individual’s upcoming items are unique and different from other users.
- The web version has an Overdue tab which is absent in the app version.
Wall
FAQ-ID:1105
Wall is the space that exists in each workplace, group and your buddy where you can see all the workplace, group or buddy posts and activities, including Notes, Tasks, Polls, Events, Files and Albums.
Wall is also a great place to locate past posts when you forget who posted them or where they are posted!
1 │ What is Wall?
Wall is bulletin board where team activities are posted, and there is a wall for the workplace level, group level and buddy level.
- The workplace wall is for workplace level posts and activities posted by the entire workplace.
- The group wall contains the group posts and activities posted by a particular group, and each group has its own wall.
- The buddy wall contains the buddy posts and activities posted between you and your buddy, and there is wall for you and each buddy.
2 │ What is the dashboard wall?
The Dashboard Wall is a shortcut to all the posts and activities across the entire workplace, including workplace, groups, buddies, WorkDo Network and Private Space. So if you remember certain activities or posts, use the dashboard wall to swiftly locate them.
- The Dashboard Wall contains the activities and posts of the workplace, all the groups you are in, and between you and all your buddies.
- The Dashboard Wall in the WorkDo Network contains the activities and posts of the Network, all the groups you are in, and between you and all your buddies.
- The Dashboard Wall contains all your personal activities and posts.
3 │ The benefits using the wall:
- View all activities and posts in one place.
All the posts of the 8 basic collaboration tools in the workplace are chronologically listed, the wall gives users a quick glance of all the tool posts. Users can also create and edit posts with just a few clicks! Easy-peasy! - Pinned posts.
Posts like Announcements, Notes, Tasks, Events and Polls can be pinned on the top of the wall highlighting their importance. So users can easily identify posts that are important. - Find posts with ease!
The wall has a search function to help users locate posts, and the keywords used are saved for your convenience! Use it to your advantage!
Now that you know what the wall is for, isn’t it time to give it a try?
Enter Dashboard Wall
Steps:
STEP │ App
- Click Dashboard.
- Click Dashboard Wall on the top to enter into Dashboad Wall.
STEP │ Web
- Click Dashboard.
- Click Wall to enter into Dashboard Wall.
FAQ-ID:1107
Wall is where team posts are published.
The wall is essential to the function of your team because it consists of posts that team members published that require the attention of the entire team. To publish a post, just simply click the + icon and select a tool to publish posts.
Publish a Post
Steps:
- Use the Dashboard Wall to select a wall to publish posts. Choose from workplace, group or buddy wall. Same for WorkDo Network and your Private Space.
- Click the
 icon.
icon. - Select a tool.
- Fill out all necessary information and click post.
Reminder
- Workplace, WorkDo Network and Private Space are independent levels, so you must switch to the right domain before publishing a post.
- The workplace wall can be used for workplace admins only instead of all members, and once set, the admins are allowed to post on the wall.
- The group walls will be accessible to you if you are a group member, and the same goes for buddy walls.
Relevant Questions
Who is allowed to search or view my posts?
Pin important posts to the wall.
What’s the file upload size in WorkDo?
Share a post or forward a post?
How do I edit or delete a post?
What does a wall do?
What’s the difference between discard and delete in an event or task?
What is Wall? What is the difference between Wall and Dashboard Wall?
Ways to create tool posts.
What does the “Do” button do?
What are tools?
WorkDo web general navigation.
WorkDo app general navigation.
FAQ-ID:1106
Although WorkDo promotes team collaboration, we understand that at times, information compartmentalization is crucial in carrying out certain tasks, and some sensitive information should not be made available to everyone in the workplace.
How does WorkDo handle information and at each level?
Well, if you have been wondering about this, then this FAQ is for you! Before answering this question, let’s go over the concept of “posts”.
When you use any one of the basic collaboration tools, a post will be created in the chatroom and wall notifying the others, this is a tool post.
To publish a post, you will first need to select an appropriate level, may it be the workplace, private space, or WorkDo Network. Once published, the tool post will be seen on the wall, tool wall, and in the chatroom.
One exception to this is that when using the Events and Tasks tools, creators are asked to select participants, and only participants will be able to view Events and Tasks posts pertaining to them.
- Viewable by all level members │ All members in the level will be able to view, comment and reply to the post.
- Viewable by creators and participants only │ Only the creators and selected participants will be able to view, comment and reply to the post.
So it is completely normal that your Dashboard Wall contains different notifications and posts to other team members, and not all posts will be made public to all members to search and view.
Post Search
Steps:
- You may begin your post search from
- Advanced search
- Use keywords, Post-ID, Edit Time and Creaor to search for the post you are looking for.
- You can also use the Service Item Type and Update Time to filter the posts.
- Click on one of the search result to view the post.
Relevant Questions
How to publish a wall post?
How to create a tool post?
How to edit or delete a post?
What are tools are available for use?
What’s the difference between discard and delete in an event or task?
Share a post or forward a post?
Could I remind members of unread posts or unfinished tasks?
What are tools?
What does the “Do” button do?
Can I set only admins are allowed to post at the workplace level?
FAQ-ID:1109
Wall is the place to find all the posts in chronological order. So if you ever need to edit or delete a post, the wall is the quickest way to do so.
Note that, you can designate post viewers. And after editing a post, you will be asked if you’d like to notify others about the changes made. Post deletion on the other hand will not send out notifications when the post is removed from the wall.
Edit a Post
Steps:
- Either enter the wall page or the dashboard wall page.
- Find the post to edit.
- Edit
- App │ Click the icon then select Edit.
- Web │ Click the checkmark icon on the upper-right-hand corner then select Edit.
- App │ Click the
- Make the necessary changes.
- Click Save to finish.
- Notify members of changes made?
- No │ Small changes that do not require members’ immediate attention.
- Yes │ Important changes that require members’ immediate attention.
- The post will carry an Edited label and will be chronologically displayed on the wall.
Delete a Post
Steps:
- Either enter the wall page or the dashboard wall page.
- Find the post to delete.
- Delete
- App │ Click the icon then select Delete.
- Web │ Click the checkmark icon on the upper-right-hand corner then select Delete.
- App │ Click the
- Confirm the action to delete the post.
Reminders
- Only the post creators and the level admins are allowed to edit and delete posts. Everyone else can react, comment or share the posts.
- You may select members to notify regarding the changes made to a post.
- Click the icon in the post using the app version to find out what other actions you can perform.
Tool Box
FAQ-ID:1116
The biggest difference between a level admin and a tool admin is that one has control over the entire level’s settings and the other only has control over the settings and data of a particular tool. Let’s put it this way…
- Scenario 1 │ Mike is the IT Technician who is responsible for maintaining the overall settings of the workplace in WorkDo, but he should have access to employees’ profiles. What’s his role?
- Scenario 2 │ Richard is the head of the company and is the workplace admin in WorkDo, so how come he can’t view the employee profiles and their leave records?
The two scenarios represent a common misconception of authority and access control. Which is why WorkDo intend to separate the administrators and managers to satisfy different types of data management.
│ Admin Permissions(WorkDo Quick Start Settings) │
1 │ Level Admins
Much like a real company is run by executives, managers and employees, WorkDo reflect these roles as members, admins and owners. (Click to learn more)
2 │ Tool Admins
Of course, there is a lot to running a company, different departments are in charge of different data and files. For example, the HR, Accounting and Marketing departments don’t exchange information. And it is with this mindset, WorkDo also designed different roles for different tools, and each role is only privy to what is allowed for that role. (Click to learn more)
Scenario Sulutions
- Scenario 1 │ Set Mike as the workplace admin to maintain the workplace settings, but for tools like HR, Attendance, Leave and Payroll, set the appropreiate personnel as the managers instead.
- Scenario 2 │ Richard, the head of the company should also be set as the tool admin to gain access to detailed information.
Reminder
- Only the advanced tools have different tool roles for access control, and these tools are only for paid plan. Upon creating your first workplace, users have a 30-day trial period to try out all the tools and features of WorkDo. It is high recommended that all users take the opportunity and get an in-depth experience of WorkDo!
FAQ-ID:1110
 All the tools you need in one place, just Do it!
Communication, collaboration, resource management, WorkDo knows what you need! WorkDo amassed all the tools you need to collaborate seamlessly, allowing employees to be more flexible, responsive and productive.
Tap the Do button to switch instantly tools or enter the toolbox!
 A dedicated toolbox for workplace, group and buddy level collaboration.
A toolbox for each level offers a clear line of authorization. Admins are able to set permissions for all employees and everyone can check their permission in the workplace, group and buddy toolbox for details.
 Use the basic tools to collaborate with high efficiency!
The basic tools allow for more streamlined workflow and focused communication. Post company announcements, assign tasks, share files, send event notifications, make calls and send messages, there is a tool for it! Use them wisely and watch your team’s productivity soar!
- Basic Tool
- Workplace
- Groups
- Buddies
- Announcement


- Notes
- Tasks
- Events
- Albums
- Files
- Links
- Polls
- Dashboard
- Wall
- Calendar
- Workflow
- Chats
- Audio Call
- Video Call
- Group Call
View All Basic Tools Features
Download Basic Tools Quick Start Guide
 Advanced tools for improved resource management!
The advanced tools are flexible to meet all team’s work style and company policies and they are interconnected to provide a marvelous team collaboration experience!
- Advanced Tool
- Workplace
- Groups
- Buddies
 HR tool must be enabled.
- HR
- Payroll
- Attendance
- Check In
- Leave
- Leave Pro
- Shift
- Overtime
- Timesheet
- Expenses
- Approvals
- Conf. Rm
- CRM
- Cashbook
- Phonebook
- We Buy
- IOU
Download Advanced Tools Quick Start Guide
 User guides available for detailed step-by-step walkthrough.
For every tool there is a detailed user guide showing users the set up process with examples, perfect for any newcomer! You can download them in the Resource Center or in the toolbox.。
FAQ-ID:1117
Upon first glance, the all-in-one WorkDo and its plentiful tools may look daunting to new users, however, if you look at the tool info and tool role descriptions, you can quickly get a clear idea of what each tool can do and how your team can focus its collaborative effort.
Tool Info & Tool Roles
Method 1 │ Enter the Tool Box and select an advanced tool
- Click the “i” icon to view your own tool role of this tool.
- Scroll down to view all the tool roles. Click on each tool role to view functions that are tied to each role.
Method 2 │ From workplace, group or buddy level
- Enter the workplace, group, buddy level settings.
- Click Manage Tools option followed by advanced tool tab.
- Select a tool to view it’s tool info.
- Scroll down to view all the tool roles. Click on each tool role to view functions that are tied to each role.
Reminders
- The advanced tools are available to premium users and new users who are on their trial period. The new users will have 30 days to try out all the tools, after the trial period expires, they will be switched to the Free plan and will no longer be able to use any advanced tools.
- Like to give the advanced tools a try? Well, if you are a level admin, you could use the advanced tools by enabling them; if you are not a level admin, you could send a request to the level admin to enable the advanced tools for use.
FAQ-ID:1112
Can’t find the tools you are looking for? Are there tools that your team doesn’t need? Want a cleaner UI?
Tools like Attendance, HR, and Approvals that help improve your workflow and operations are what we categorize as advanced tools, and you can choose to activate and deactivate these tools if you so desire. This is solely dependent on whether your team needs them for its daily routine or not.
Some of the advanced tools are automatically enabled upon workplace creation, but you can deactivate the tools that you don’t need and activate those you need.
Tool Activation / Deactivation
Steps
- Select the level (workplace, group, buddy) of the tools you wish to activate or deactivate.
- Workplace – Click the name of the workplace for the workplace settings (Click the gear icon for the web version).
- Group – Click the Groups tab on the workplace page then swipe right for Settings.
- Buddy – Click the Buddies tab on the workplace page then swipe right for Settings.
- Click Tool Box
- Select the tool
- Activate or deactivate
- Activate – Click Activate to enable the tool.
- Deactivate – Click Manage then tap the switch to deactivate the tool.
Reminders
- The advanced tools are available to the customers of the paid plans. However, all users have a 30-day trial period to try out all the advanced tools and features. After 30 days, all users will be switch to the Free Plan, at which point you will not be able to access the advanced tools unless you subscribe to one of the paid plans.
- Only the admins of their respective levels (workplace, group, buddy) are able to activate and deactivate advanced tools.
FAQ-ID:1113
Designed with company structure and access control in mind, WorkDo’s tools offer different roles (permissions) for each advanced tool. So, if there are certain functions that you can’t seem to locate, it is possible that you do not have the right tool role to access them. If this is the case, please ask the workplace admins to change your tool role.
Each tool has its unique settings and features, but only the tool admins could access and manage its information. So once a tool is enabled, please be sure to check everyone’s tool role is correctly assigned.
By default, WorkDo will automatically assign workplace admins with the highest tool role whenever a tool is enabled, everyone else will be assigned with the lower access level. It is up to the workplace admins to manually assign appropriate roles to each team member.
Know Your Tool Role
Steps:
- Enable / disable tools for workplace / groups / buddies.
- Workplace │ On the workplace page.
- Groups │ On the workpalce page, tap the Groups tab to displace all the groups you are a part of.
- Buddies │ On the workplace page, tap the Buddies tab to display all your buddies.
- Click on the Do button.
- Select a tool.
- Verify your tool role.
- App | Click on the “i” on the top for your tool role inofrmation.
- Web │ Your role is displayed next to the tool on the left.
Manage Members’ Tool Roles
Steps:
- Select a tool in the desired workplace / groups / buddies level to change members’ tool roles.
- Workplace │ Click the gear icon on the workplace page.
- Groups │ On the workplace page, tap the Groups tab and swipe right and click Settings.
- Buddies │ On the workplace page, tap the Buddies tab and swipe right and click Settings.
- Click Tool Box.
- Click Manage.
- Manage All Member Roles.
- Use the search bar to quickly locate a member.
- Click the edit icon on the right to change roles.
Reminders
- Currently only the advanced tools offer different tool roles and they are only avilable in the Premium Plan users. However, when you create a workplace in WorkDo, you will have a 30-day trial with all the tools avilable to you to try out. If you do not opt for the premium plan, by the end of the trial period, all the advanced tools will be turned off.
- Only the admins are able to manage mebers’ tool roles, if you are not an admin of that level, managing tool roles is not avilable to you.
Relevant Questions
Understand your tool role and what it does.
How to activate / deactivate a tool?
What should I do on the Start WorkDo page?
What do different roles do in a workplace/group?
What are the differences between tool admins and workplace admins?
What are tools?
How to request the activation of a tool?
What does the “Do” button do?
FAQ-ID:1114
Here’s a few possibilities if there are tools that are not available for use.
- Unable to use Notes, Tasks, Events or other basic tools.
This is due to the option Who Can Post is set to owner and admins in the the Workplace Privacy. - Unable to use Attendance, Leave Pro, CRM or other advanced tools.
Only the workplace admins and group admins have the authority to decide what advanced tools to make available to team members. If you are unable to use any of the advanced tools, please check whether the tools have been activated or your permission to use the tools, aka, your tool roles.
Check Your Tool Roles
Steps:
- Choose the workplace, group or buddy level.
- Click Tool Box in the settings.
- Check tool activation status or tool role.
- Permission (Tool Role)
On the Activated tool tab, the role below each tool will display your authorization. - Request
Click Request on the tool tab to send a notification to the workplace admins asking to enable a tool for use.
- Permission (Tool Role)
Reminders
- The advanced tools are for paid plans only. During the trial period, users will have 30 days to try out all the tools upon creating a workplace. After the trial period expires, users will no longer be able to use the advanced tools.
- Instead of the Request button for most users, the admins will have the tool activation button in its place.
- In the buddy level, both parties are admins by default, unless otherwise changed.
FAQ-ID:1111
For an all-in-one collaboration app, WorkDo houses many tools, and the “Do” button shows all the services and tools you can use within your workplace, group, or buddies. It also a shortcut that takes you to the toolbox to see all the available tools you can use.
Whatever you need, just hit the Do button!
Tool switch using the Do button
Steps:
- Enter the workplace page.
- Simply click the Do button on the right side of the screen to switch tools.
- Depending on the workplace, groups and buddies, the available tools may be different.
FAQ-ID:1044
As the only all-in-one team collaboration app on the market, WorkDo packs quite a punch! And we also understand that you gotta be able to switch tools on the fly to seamlessly collaborate with folks on different teams and projects.
This is no simple task, but WorkDo did it! With the help of the “Do’ button and the “+” button, users can swiftly access different tools and create different tasks.
Do │ Switch Tools
There is a Do button in each level (workplace, group and buddy), by clicking it, you can instantly access all the available tools you can use at that level. Simply put, it takes you directly to the tool box so you can select the right tool to use.
The Do button comprises all the basic tools and advanced tools, so just click the Do button to see what tools are available and how you can use the available tools to engage with your team.
+ │ Create
Normally, to initiate an action, you need to find the right group then select the tool for the appropriate action, but this can get frustrating when you need to create multiple tasks across different groups. The + button allows you to quickly create a task or begin an action then select the right group or level to post.
From now on, simply return to the main screen and use the + button to create items to save yourself valuable time!
Use the + Button to Create Items
Steps:
- Enter the main workplace page.
- Click the button.
- App │ Located on the bottom main functions.
- Web │ Located on the bottom left of the screen.
- Select the tool to initiate the action.
Reminders
- Invite Members, Create Group, Add Buddy and the QR code scanner are additional app-only features.
- Only the set number of tools you frequently use will appear when you click the + button. The idea is to streamline your workflow with the tools you frequently use.
Relevnt Questions
Who is allowed to search or view my posts?
How to create a tool post?
What’s the file upload size in WorkDo?
How to create a tool post?
Pin important posts to the wall.
WorkDo Web Navigation.
WorkDo App Navigation.
What does the “Do” button do?
What are tools?
How to activate or deactivate a tool?
How to activate tools?
Basic Tools
FAQ-ID:1118
Posts created on the wall and chatroom using the any of the 8 collaboration tools are considered as tool posts.
You can create a tool post by:
- Clicking the + icon on main workplace pages.
- From the wall.
- From the tool page.
- From the chatroom (App only).
When a new tool post is published, it will appear on the wall and in the chatroom. Let’s have a look on how it’s done!
Publish a Tool Post
Steps:
- Select the desired tool.
- Create
- App │ Click icon on the bottom-right-hand corner.
- Web │ Click the desired tool button.
- App │ Click
- Fill out the necessary fields (Title, date, location, links, photos and files, etc.).
- Click Post to publish.
Publish a Tool Post from the Chatroom
Steps:
- Select the desired chatroom to post.
- Click the + icon on the bottom-left-hand corner.
- Select a tool.
- Fill out the necessary fields (Title, date, location, links, photos and files, etc.).
- Click Post to publish.
Reminders
- There is a setting that only allows admins to publish posts in the workplace level.
- The Announcement tool is only for the workplace level. Tools displayed in each level will be displayed depending on the availability and member authorization.
- The Albums tool is not supported in the app version of WorkDo.
- When a post is published, a notification will be sent to the participants, and if it pertains to all members of a level, then the post is sent to the chatroom.
Relevant Questions
Who is allowed to search or view my posts?
Can I set only admins are allowed to post at the workplace level?
Share a post or forward a post?
Pin important posts to the wall.
How to edit or delete a post?
Could I remind members of unread posts or unfinished tasks?
How to set an event alarm?
What’s the difference between discard and delete in an event or task?
How to upload photos to an album?
What’s the file upload size in WorkDo?
What are the basic tools?
WorkDo web general navigation.
WorkDo web general navigation.
FAQ-ID:1088
You can check an assigned task off the list and let everyone know you’ve done your part!
When you are assigned a task, you can click the circle displayed on the left of the task to check it off. So anyone who sees this will know that you have completed the assigned task. If there is a task with no circles to check off, it means this task is not assigned to you, you just have the authority to view this task.
Now follow the instructions below to see if anyone has assigned a task to you!
Check Off a Task
Steps:
- Click the Dashboard.
- Click the Tasks on the Dashboard and it will list all the incomplete tasks that have been assigned to you.
- Click on a task to view its details.
- Click on the circle to check it off the list, signaling others that you have completed the given task.
Reminder
- When a task has been checked off, it will no longer be in the incomplete tasks section, instead, it will be moved to the completed tasks section.
- Check out the user guide for more detailed explanation now!
relevant Questions
Who is allowed to search or view my posts?
How to create a tool post?
FAQ-ID:1086
Did you know pinning important posts to the top of the wall is a great way of keeping everyone well-informed and in the loop? Well, you do now!
Tool posts like Announcements, Notes, Tasks, Events, Files, Links and Polls can all be pinned, so when you need to make sure everyone in the team knows their priority, you can pin posts on the top of the wall and make sure they won’t be overlooked! Of course, you can unpin the posts when they expire.
If there are multiple posts pinned to the top of the wall, they will be chronologically listed.
Pinning Posts
Steps:
- Enter the post that you wish pin or unpin.
- Click the icon on the upper-right-hand corner.
- Pin or Unpin
- Pin │ Pin a post on the top of the wall.
- Unpin │ Unpin a pinned post from the top of the wall.
Reminders
- Posts that are not open to all cannot be pinned.
- Only the level onwer and admins pin posts. members are allowed to like , comment and share.
- Click the icon to see what other actions you can perform.
Relevant Questions
Who is allowed to search or view my posts?
Share a post or forward a post?
What’s the difference between discard and delete in an event or task?
Could I remind members of unread posts or unfinished tasks?
How do I check off a task when it’s completed?
What is Wall?
What are the basic and advanced tools?
FAQ-ID:1121
Did you know that you could send reminders to those who have not responded to your posts?
No, you do not have to take forever and text them individually. Simply use the post reminder feature to send a reminder to those who have yet to read or respond to your post! This feature applies to Announcements, Notes, Tasks, Events and Polls, you just need to be the post creator or the level admin to send out the reminders.
- Announcements & Notes │ Send read reminders.
- Tasks │ Send task reminder.
- Events │ Send participation reminder.
- Polls │ Send vote reminders.
The post reminder will be sent to the chatroom if you and the reminding member are buddies, else it will be sent to the notification center.
Send Post Reminders
Step:
- On the post page.
- Send reminders.
- App │ Click the icon on the upper-right-hand corner and select Remind.
- Web │ Click the checkmark icon the upper-right-hand corner and select Remind.
- App │ Click the
- Select members to send the reminders. (The system would list members who have yet to read or responded by default.)
- Click Done in the app version and the Remind button in the web version to send out the reminders.
Reminders
- Only the post creator or level admins are allow to send out reminders, else you may only like, comment and share the post.
- Click the icon to see what other actions you can perform.
Relevant Questions
Who is allowed to search or view my posts?How do I check off a task when it’s completed?
How to create a tool post?
How to edit or delete a post?
What’s the difference between discard and delete in an event or task?
The “Do” button or the “+” button, which one do I use?
What are the basic and advanced tools?
FAQ-ID:1087
You can share or forward posts depending on the situations. We’ll explain further!
│ Share or Forward
-
Share
Tools such as Announcements, Notes, Tasks, Events, Files, Links and Polls can all be shared. You can use the the share function to obtain the post link and share it with other buddies, groups, workplaces or even external apps. However, the people you share the link with must have the authority to view the post to view the content.
-
Forward
When you forward a post, you basically republish a post in its entirety, so in the eyes other users, you are the post creator. You can forward a post to your buddies, groups or workplaces.
Share a Post
STEPS │ App
- On the post page.(Announcements, Notes, Tasks, Events, Files, Links & Polls)
- Click the icon on the upper-right-hand corner.
- Select Share.
- Select a destination.
- Share to WorkDo │ Select a workplace, group or buddy to share, then select to either share it to the chatroom as a link or to Notes.
- Chatroom │ The Post link will be shared to the chatroom.
- Notes │ You will share the post by creating a new post in Notes.
- Share to external apps │ Select an app to share the post as a link.
- Copy link │ Copy the post link and paste it to other people or apps you wish.
- Share to WorkDo │ Select a workplace, group or buddy to share, then select to either share it to the chatroom as a link or to Notes.
- The people you share the link with must have the authority to view the post in order to view the content.
STEPS │ Web
- On the post page.
- Click the checkmark icon the upper-right-hand corner.
- Click Share.
- Copy the post link and share it as you wish.
- The people you share the link with must have the authority to view the post in order to view the content.
Forward a Post
Steps:
- On the post page.(Notes, Files & Links)
- Click the icon on the upper-right-hand corner.
- Click Forward.
- Select a workplace.
- Select a group or buddy.
- Click Next to forward the post.
Reminder
- Click the icon to see what other actions you can perform.
Relevant Questions
Who is allowed to search or view my posts?
Pin important posts to the wall.
How to create a tool post?
How to edit or delete a post?
Could I remind members of unread posts or unfinished tasks?
What’s the file upload size in WorkDo?
What’s the difference between discard and delete in an event or task?
What are the basic and advanced tools?
FAQ-ID:1130
Upon creating a new photo album you will be asked to upload photos and videos, but there’s some limitations you need to know.
│ Upload Limitations │
- File Size │ A single file size is limited to 50 MB or below.
- Files │ You may select up to 20 files in a single upload using the app version, the web version on the other hand has no limit.
Follow the steps below to upload photo and videos to WorkDo!
Upload Photos & Videos to Albums
STEPS │ App
- Switch to the Albums tool.
- Select an album to upload.
- Click the + icon.
- Select up to 20 photo or video files to upload.
- Click Done to begin the upload process. A notification will be sent to the chatroom informing members of this upload when completed.
STEPS │ Web
- Switch to the Albums tool.
- Select an album to upload.
- Click the Upload Photos button.
- Select the files then review them before uploading.
- Once confirmed click the Save button to upload the files. A notification will be sent to the chatroom informing members of this upload when completed.
Reminders
- If your workplace is set to only admins may publish posts, other members will not be able to upload files to the albums.
- Currently, the drag-and-drop gesture is not support for uploading media files.
FAQ-ID:1119
Found a typo in the post? Want to amend the original post? Or simply like to delete it?
If you are the post creator, the level owner or admin, then you are allowed to edit or delete the post as needed.
│ What’s the difference between edit and delete?
-
Edit
Use edit for adding attachments or modifying the content. The post creator has the ability to notify other members regarding the changes. And the post will be listed chronologically on the wall.
-
Delete
Deleted post will be removed from the wall, become inaccessible and not send out any notifications.
Edit a Post
Steps:
- Enter the post.
- Edit.
- App │ Click the icon then select Edit.
- Web │ Click the checkmark icon on the upper-right-hand corner then select Edit.
- App │ Click the
- Make the necessary changes.
- Click Save to finish.
- Notify members of changes made?
- No │ Small changes that do not require members’ immediate attention.
- Yes │ Important changes that require members’ immediate attention.
- The post will carry an Edited label and will be chronologically displayed on the wall.
Delete a Post
Steps:
- Enter the post.
- Delete.
- App │ Click the icon then select Delete.
- Web │ Click the checkmark icon on the upper-right-hand corner then select Delete.
- App │ Click the
- Confirm the action to delete the post.
Reminders
- Only the post creators and the level admins are allowed to edit and delete posts. Everyone else can react, comment or share the posts.
- For Polls, once a vote has been casted, the rules are not allowed to change or edit. If you need to edit a poll post such as this, you will need to delete it and create another poll post.
- You may select members to notify regarding the changes made to a post.
- Click the icon in the post using the app version to find out what other actions you can perform.
FAQ-ID:1089
For any reason, if you would like to halt an ongoing event or a task you can either use the Discard or Delete function, so long that you are the event or task creator or the level admin. But what is the difference?
│ Discard or Delete?
-
Discard
When an event or task is discarded, it is halted and cannot be resumed. All participants will be notified and the post will be kept in the chronological order for record keeping or references.
-
Delete
When an event or task is deleted, participant will not be notified and the post will be deleted completely. Please note that, deleted data cannot be recovered once the action is executed.
Discard an Event or Task
Step:
- Enter the event or task post.
- Discard.
- App │ Click the icon the the upper-right-hand corner and select Discard.
- Web │ Click the option button next to the tooll label on the upper-right-hand corner and select Discard.
- App │ Click the
- Confirm the action in the pop-up window. Participating members will be notified of this action, but the post will be kept for references.
Reminders
- Only the post creator and level admin may perform the discard action, else, members can only like, comment, share and forward the post.
- You may notify selected participants or all participants when discarding an event or task.
- A discarded event or task cannot be resumed. You can only create a new event or task.
- For the app version, click the icon in the post to see what other actions you can perform.
Relevant Questions
Who is allowed to search or view my posts?
Pin important posts to the wall.
How do I check off a task when it’s completed?
The “Do” button or the “+” button, which one do I use?
How to create a tool post?
How do I edit or delete a post from the wall?
Could I remind members of unread posts or unfinished tasks?
What are the basic and advanced tools?
HR
FAQ-ID:1151
The HR tool serves as the most integral part of WorkDo! Its settings are connected to employees’ daily clock-ins/outs, leave applications, overtime applications, and various eForm approval flows.
There are 6 important steps that you need to follow, so please follow the instructions below to properly set up HR.
│ HR is key to improving yor team’s workflow │
Please make sure that you have first followed basic setup done in Start WorkDo in 5 Steps to find the settings of the picrure below.
│ Read HR Tool Manual │
If you have the HR Staff tool role, then you may follow the steps below and use the web version of WorkDo to set up HR!
6 Important Settings in HR
STEP 1 │ Work Hours
Your workplace’s work hours directly influence the team’s workdays, clock in/out times, flexible work times, etc. You can use the default work hours or you can create multiple work hours for different teams. Your call!
If you need to use the Attendance tool for employee clock in/out, please activate it first to for the related clock time settings to be available here.
STEP 2 │ Departments
Departments settings dictate how eForms are passed and signed. Properly set up your organization’s hierarchy and the employee requests will follow the set flow and get to the right person to be signed.
- Trial Period: We recommend you invite 1 to 3 people to help you test out the request flow, each with a different role and title.
- Adoption: Invite the rest of the teammates to join the workplace and assign them with the right roles and titles.
STEP 3 │ Employment Type
By default, WorkDo has 3 employment types, you can create, deactivate, or change them as you see fit. The employment type will affect certain tool privileges, ie, who are allowed to apply for overtime and how many leave days they are entitled to have each month/year. So don’t forget!
STEP 4 │ HR Calendar Management
Non-working days such as the federal holidays, special company events are set with the HR Calendar. A workplace’s HR calendar will determine whether employees are able to apply for leaves, overtime, or clock in/out normally.
A workplace is allowed to use multiple HR calendars for different teams, so you don’t worry about managing remote teams in different countries!
STEP 5 │ System Settings
The most important setting in the System Settings is that you don’t have to manually set each new employee is required to clock in/out. However, this function is not retroactive, meaning it only applies to new employees after the setting has changed.
You can always go to the Attendance tool and individually change this setting if you want, but if your workplace doesn’t require employees to clock in/out, you can bypass this step.
STEP 6 │ Import Employee Profiles
The aforementioned 5 steps are for the HR personnel to manage each employee, and each employee’s profile can be updated anytime. But to make life simpler, you can also batch import employee profiles by using WorkDo’s template file. This can drastically reduce the amount of time spent on profile setting and it’s the quickest way to get your workplace up and running!
Reminders
- Only members with the HR Staff tool role are allowed manage the workplace and employee settings instead of the workplace admins. This is an added layer of security, and in most cases, company HRs are not always in charge of maintaining the entire workplace.
- These 6 important settings are crucial to connecting to advanced tools like Attendacen, Leave, Leave pro and Overtime, so be sure to complete them before using these tools.
- Wanna know more HR details, say no more! The most comprehensive HR Tool Manual is here!
Relevant Questions
HR Settings for New Employees
Problems importing employee profiles?
Why is there’s a member with two employee profiles?
What is the HR Calendar?
How do I create new departments in the organization?
Why do I have limited tool access?
What are the HR tool features?
Understand your tool role and what it does.
FAQ-ID:1152
What do I do when new employees are on board?
What settings are tied to new employees?
Well, if all the tools your workplace needs to use are all activated, all you really have to do at this point is to edit their profile information and a few settings in the HR tool to get them hit the ground running!
Before we begin, please make sure that you have the authority to update employee profiles, meaning that your tool role is HR Staff in the HR tool.
HR Settings for New Employees
Steps:
- Switch to the HR tool.
- Click Employee Profiles on the side menu.
- Click the edit icon next to the employee to begin editing.
- Update the information below.
- Emloyee ID
The Payroll tool requires the Employee IDs to send payslips to corresponding employees. So if your team is using Payroll, you need to assign an employee ID to everyone. - Login Email or Mobile Number
Employee’s login email or mobile number will be displayed upon joining the workplace, please take the time to make sure the information is correct. If some employees are using Apple ID to log in to WorkDo, please refer to this FAQ to bind another email address to their account. - 1st & 2nd Deputy
Set a deputy when an employee is on leave. In Leave Pro, there is an option to check whether the deputy is on leave before you are allowed to apply for leave. Skip if this is mandatory in your workplace. - Work Hour
If your workplace has multiple hours or flexible work hours, assign one to the employee, if not, the default will be used. - On Board Date
In Leave Pro, the system will automatically dole out leave days based on employee tenure or other user-specified conditions, so the on-board date will directly affect this. And employees cannot clock in/out before this date. - Dotted-Line Manager
Can be used in the employee has to report to a second manager. - Process Signing Requests by Dotted-Line Manager
If Yes, then the employee request signing flow will be changed to assigned dotted-line manager, by passing the original department flow. - Designated Approver
If Yes, then this employee can be selected by others to process the requests without being assigned as a manager. - Department
If the dotted-line manager is void, the signing requests will follow the department flow. - Employment Type
This option controls employee’s ability to apply for overtime and leave, so don’t forget! - Gender
Some leaves may be gender specific.
- Emloyee ID
- Click Save and you should see all the changes refelcted and the employee can begin collaborating with the team now!
Reminders
- Before updating the employee profiles, please be sure that you have completed Start WorkDo in 5 Steps and other settings in HR.
- In most instances, when employees are not able to apply for leaves, overtimes or post-clocks are caused by omitted settings in the HR, so please double-check every employees’ HR settings.
- Note that even if the HR Staff has imported employees to the workplace, all the aforementioned information is still required for the employees to use all the advanced tools smoothly.
- Wanna know the HR tool in detail? Check out the HR tool Manual!
FAQ-ID:1150
The HR tool is the most integral tool of WorkDo because its settings are connected to other tools and it affects the way you those tools. The HR Calendar function in the HR tool is especially so, and here’s why!
Tools like Attendance, Leave Pro, Overtime rely on a business calendar to differentiate working days from non-working days so employees could apply leaves on working days instead of holidays, and clock in/out in business hours instead of weekends, and so on.
So for your virtual workplace to operate seamlessly, it is crucial to properly set up your HR Calendar and the HR tool!
│ HR: The Pillar of WorkDo │
Properly utilize your business calendar and you can create different business calendars for different departments or overseas offices. But first, there four event types you need to know!
- Company Event │ For company events, this event type does not affect any attendance and working hours related calculations.
- Working Days │ Generally used for make-up work days. On these days the system tracks attendance, employees could apply for leaves, and overtimes.
- Non-Working Day │ On these days the system doesn’t track attendance and employees can’t apply for leaves, but overtime applications are allowed.
- Public Holiday │ Same as Non-Working Day.
1 │ What about our overseas offices that use different business calendars?
Simply create different calendars for remote workers or overseas offices that use different business calendars to manage their work hours.
2 │ Weather-related cancellations.
You could use Public Holiday or Non-Working Day event types for weather-related cancellations. Once set, the employee attendance is no longer required, applied leaves will be voided, and overtime applications are allowed.
Alternatively, you could create a leave type for weather-related cancellations for employees to apply. However, this would require the HR Staff to dole out the leave quota first, then the managers have to sign off on them, and the overtime applications are not allowed during normal business hours because these days are considered as working days.
3 │ What happens if I set the HR Calendar at later date?
WorkDo will not retroactively change past records and data, so the HR Staff would have to manually grant leave quotas to employees for applied leaves, attendance and overtimes have to be recalculated. So it is recommended that you always set the HR Calendar ahead of time to avoid unnecessary complications.
Reminders
- It is recommended that you create an HR Calendar every year. Updating old HR Calendar event dates will mess up attendance records if you ever need to look up old records.
- This FAQ only summarize the few key points of the HR Calendar, for the more comprehensive tutorial, please check out the HR Tool Manual!
FAQ-ID:1160
At the moment, the Attendance tool of WorkDo only records employees’ clock-in/out times, but if your team requires team members to move around, our Check-In tool can help you get the job done!
Recommended!
Check-In: Check-in/out at places you go!
If your workplace consists of sales and field staff who are constantly on the run, the Check-In tool is your best friend! The Check-In tool records multiple location check-ins/outs via GPS, so employees could easily report their whereabouts.
Reminder
Follow us on various platforms and receive the latest news and updates!
Relevant Questions
FAQ-ID:1153
Generally speaking, employee applications and approvals are sent to their corresponding department managers for signing, however, in certain scenarios, this may not be possible. This is why the workplace admins should set dotted-line managers to help sign off and process the employee requests.
All employee request forms follow the organizational chart set in the HR tool for approvals. Setting dotted-line managers will make sure that the workflow will not be impeded.
This setting has to be done using the web version of WorkDo, so please log into WorkDo from a web browser and follow the steps below to set the dotted-line managers.
Set Dotted-Line Managers
Steps:
- Switch to the HR tool.
- Click Employee Profiles.
- Click the Edit icon of an employee.
- Edit the following fields.
- Dotted-Line Manager
Select an appropriate member. - Process Signing Requests By Dotted-Line Manager
Click Yes to allow another member to process employee requests.
- Dotted-Line Manager
- Scroll down to the bottom and click Save. From now, all employee requests of this member will pass on to the selected dotted-line manager for approvals, and should the dotted-line manager escalates the requests, they will follow the signing flow that’s set for him/her.
Reminders
- Prior to adjusting employee profiles, please follow the instructions in Start WorkDo in 5 steps and The HR tool setup.
- The employee requests sent to the original manager prior to the change will not pass on to the dotted-line manager.
- The Expenses and Approvals tools allow employees to select designated approvers that are outside of the signing flow.
- Wanna know in-depth setting tutorials? Be sure to check out the HR Tool Manual!
FAQ-ID:1031
In order to satisfy and cater to a wide range of companies’ human resource management, the HR tool offers quite a few fields in the employee profiles to fill in, mostly optional, of course!
Simply put, these three options are purely for annotation purposes in the HR tool and can be used to filter different types of employees in advanced searches. So if the rest of the information is not required, filling in the Job Title will suffice.
In this FAQ, we’ll discuss
- The Employee Profiles information in the HR tool.
- Does the information in the employee profiles affect certain functions?
- Do Role, Job Title and Job Type limit certain tool access?
1 │ Employee Profiles Information
- Personal Information │ Phone Number, Home Address, Date of Birth, Education, Emergency Contact, etc.
- Work Information │ Department, Job Title, Job Type, Role, Work Hours, Dotted-Line Manager, Designated Approver, Deputies, Contract information, etc.
2 │ Does the information in the employee profiles affect certain functions?
Most of the information fields are purely for annotation and documentation purposes and don’t affect any functions and features. Just be sure to fill out the necessary fields marked with a red star sign (*).
Please be sure to read this employee HR settings FAQ to determine whether the information fields listed are important to your company and need to be filled out to facilitate the workflow.
3 │ 『Do Role, Job Title and Job Type limit certain tool access?
They don’t! WorkDo’s access control is managed by both the level admins and tool admins. So the information fields are for documentation purposes only. If they are not required to be filled out, you may leave them blank.
Role, Job Title and Job Type Examples
The Role options are built-in presets and can’t be customized, while Job Title and Job Type are completely customizable.
- Scenario 1 │ John is a Front Desk Representative intern.
His employee profile may describe him as an intern for Role, administrator for Job Title, and part-time personnel for Job Type. - Scenario 2 │ Natalie is a Senior Android Developer
Her employee profile may describe her as an Engineer for Role, Android Software Engineer for Job Title, and Senior Engineer for Job Type. - Scenario 3 │ Nora the Executive Secretary
Her employee profile may describe her as an Admin for Role or leave it blank, Executive Secretary for Job Title, and Senior Secretary for Job Type.
Reminder
- You may use the Company information field to assign employees to a brand or entity if your company is a conglomerate.
- You may use the Branch information field to assign employees to a branch office or a store location.
FAQ-ID:1156
When a new member joins a workplace, an employee profile will be created for this person automatically, however, in special instances, a duplicated employee profile could be created of the same person.
- Member leaves then rejoins the workplace again.
- Error during the Import Employee Profiles process.
- Member registered a new WorkDo account then rejoins the workplace.
- Reemployment.
Whichever the case may be, once a person leaves the company, it is wise to mark his/her employee profile as terminated so they can no longer access the workplace’s data.
You may configure the settings using the web version of WorkDo if you are the HR Staff of the HR tool.
Troubleshooting Duplicate Employee Profiles
STEPS │ Continue using the old profile: All past records and data are inherited.
As the HR tool is interconnected to tools like Attendance, Check In, Leave Pro, Leave, Overtime, Expenses and Approvals, it is crucial that every member’s profile is correctly set.
Every member’s Login Email or Mobile Number is used bind the person to their profile, and it cannot be occupied by other account. So you need to delete the newly created employee profile then set the old profile to Activate.
- Switch to the HR tool.
- Click Employee Profiles.
- Delete the newly created employee profile.
- Locate the old employee profile using the filters provided.
- Checkmark the employee.
- Click the yellow Activate button.
- Click Confirm in the pop-up window to complete.
STEPS │ Use the new employee profile.
Generally, when a company rehires an old employee, everything starts from scratch, so using a new employee profile is fine in this case.
- You do not need to do anything to the old profile.
- Simply edit all the require information in the new employee profile as needed.
Reminders
- By default, all employee profiles displayed are currently in employment. If you would like to view profiles in other statuses, please use the filter provided.
- When a member rejoins the workplace all buddy-to-buddy data would recovery when they add all friends and colleagues back.
FAQ-ID:1138
Just as the HR procedure shown below, the settings done in the first five steps leading to importing employee profiles are crucial to every employee’s profile.
By filling in information such as emails, mobile numbers, departments, eployee types, etc, with the provided template, the Import Employee Profiles feature allows you to quickly batch invite employees into the workplace.
│ Download WorkDo HR Tool Manual for detailed setup instructions. │
Most cases of failing to import employee profiles can be categorized in one of the six reasons below: the first five steps are incomplete, uploading an outdated template, overwriting the references sheets, changing the template format, inputting the same record twice, uploading template not carried out.
Please refer to the troubleshooting section below if you are failing to import employee profiles.
1 │ Incomplete HR Settings
Follow the HR procedure Step a to e to complete the basic settings for all employees. Downloading the template before completing the necessary employee profile settings could result in errors during template uploading.
Troubleshooting Tip: Be sure you have completed all five necessary employee profile settings before downloading the template for editing.
2 │ Outdated Template
Many company HRs are using the template as a form of backup. However, if the template is outdated and no longer compatible, uploading the template file would cause an error.
Troubleshooting Tip: When updating employee profile information is required, it is recommended that you use Employee Profiles instead. Import Employee Profiles is best suited when you need to invite a great number of employees at once, and you must download the new template each time.
3 │ Overwriting the References
As mentioned in the template procedure rule 4-1, only the Employee and Department sheets are required to be filled out, and their tabs are highlighted in red. The rest of the sheets are all references, please do not make any changes to them.
- Gender │ Please use the drop-down menu for gender selection. Any other display type is not supported and will cause an error.
- Employment Type │If you change the Employment Type of an employee after downloading the template, uploading it back would cause an inconsistency; the system would leave the Employment Type field blank, leaving this person unable to use tools that rely on this setting.
- Role │ The field is mainly for annotation purposes only. Any inconsistency between the template and the system would result in an error, leaving the field blank.
Troubleshooting Tips: Download the template again, then copy column A and paste it to your original template in their respective sheet. Use the drop-down menu in the Employee sheet to fill in the information then upload the template back to the system.
4 │ Template Format Altered
How to properly fill in each column is clearly defined, please follow the instructions when filling in each sheet to avoid unnecessary errors.
Troubleshooting Tip: Please follow the instructions below to update the template file or on the system before importing employee profiles.
5 │ Duplicated Employee Profile
Whenever you have edited an employee profile, you need to download the latest template so the information is up to date. Please check the following information when editing employee profiles.
- Employee Code │ The Employee Code is automatically generated by the system and hidden in Column A of the template. If you delete an employee profile from the template and add the same profile again, the system would view this profile as a different person, resulting in a person having two employee profiles.
- Department Code │ Same as the Employee Code which is automatically generated by the system and hidden in Column A of the Department sheet. Inconsistency between the template file and the system would result in a person having two employee profiles.
Troubleshooting Tip:Please refer to “Why is there’s a member with two employee profiles?” FAQ.
6 │ Template Upload Unexecuted
The Import Employee Profiles feature requires you to upload the template, check for possible errors, and fix them before finally uploading the template. Any stops in the middle of the process and the employee profiles aren’t going to be imported.
Troubleshooting:Please follow the instructions below to complete employee profiles importing.
Method 1 │ Direct Employee Profile Editing
Steps:
- Switch to the HR tool.
- Click Import Employee Profiles.
- All past templates used are kept for record, select a template with Pending status for editing.
- Use the Status filter to locate the template.
- Click the template to view all the profiles it contains.
- Click the Edit icon of a profile to begin editing.
- Update profile information.
- Click Save to finish.
- Make sure there are no error messages then click Import and the template status will change to Completed.
Method 2 │ Employee Profile Template Editing
Steps:
- Following Step 1 to 3 from Method 1 to edit the profiles and make sure there are no error messages shown.
- Download the latest template.
- Click Import Employee Profiles.
- Upload the template.
- Upload the Excel template.
- Click Upload and the system will tell you whether there are any errors.
- Make sure there are no error messages then click Import and the template status will change to Completed.
Reminders
- The error messages will appear during the template uploading phase as well as the importing phase when cross-referencing data. If you are still unsure of what went wrong, please contact us for assistance.
- Templates that are unsuccessfully imported (with a Pending status) can not be deleted. You may however continue editing the template file until you have successfully imported it back to the system.
- You can use Skip Import to bypass profiles with error messages and import the rest of the profiles into the system. Doing so will mark the template file as Completed, but you can no longer edit the profiles that were bypassed in this template file.
- So long the template file has not been imported, you can deselect profiles marked with Skip Import by using the Cancel Skip button, however, you will need to correct all the errors found by the system to successfully execute the import function.
- Wanna know detailed tutorials? Check out the HR Tool Manual!
Relevant Questions
What settings in HR are required for new employees?
How to invite people to a workplace?
How do I create new departments in the organization?
The HR tool setup.
Why is there’s a member with two employee profiles?
Would Role, Job Title and Job Type options limit employees’ tool usage?
Why do I have limited tool access?
Start WorkDo in 5 steps.
FAQ-ID:1157
It is possible that duplicated employee profiles got created during your trial period trying to bring employees into your workplace. “So how do I delete the duplicated profiles?” you ask. Well, just change the status of the profiles to Suspend or Terminate then you can delete the profiles for good.
If an employee’s profile has been deleted but he/she has not left the workplace, then he/she can only use the basic tools from this point on; all other advanced tools that require an employee profile to function will be locked. However, said employee’s past records and data will be kept for perusal.
Under normal circumstances, every employee only has one employee profile, and the workplace HR Staff could change the profile status accordingly to reflect the employment status.
Delete Employee Profiles
Steps:
- Use the filters to search the profiles.
- Check the boxes to select the profiles.
- Change the profiles to Suspend or Terminate.
- Select the profiles again and click the Delete status to permanently delete the profile.
Reminder
- Please refer to your local labor laws on how long you need to keep resigned employees’ profiles and records for perusal purposes.
FAQ-ID:1155
When employees left the workplace on their own or were removed by the workplace HR Staff, they can no longer access the workplace data and files. As such, when employees resign from their posts, the HR Staff must verify their last day of work then remove them from the workplace or ask them to leave the workplace.
However, should you accidentally removed an employee or they left the workplace by mistake, here’s how you can rectify it!
Just invite the employee to rejoin the workplace and make sure the employee profile is intact, then everything is all set! These settings require the help of workplace admins and HR Staff to maintain to safeguard workplace information security.
Rectification Method
STEP 1|Rejoin
Depending on the situation, you can either ask the employee to rejoin on their own or send them an invitation to join the workplace using their existing WorkDo account.
How to invite people to a workplace?
Can I join the company workplace on my own?
STEP 2|Employee Profile Adjustment
There is an employee profile of every workplace employee found in the HR tool. When an employee rejoins the workplace, a duplicated employee profile will be created. So please follow the below FAQs to make the necessary adjustments in the employee profile. This will allow the employee to resume using the advanced tools that are tied to the HR settings.
Why is there’s a member with two employee profiles?
What settings in HR are required for new employees?
Reminders
- Please note that when employees leave the workplace, all their chat histories and tool posts will be erased.
- If a resigned employee rejoins the workplace using their original account within a year, all their chat histories and tool posts will be recovered in the web version of WorkDo, the app version, however, will only recover the tool posts only.
FAQ-ID:1034
Typically, the company benefits are paused for employees who are on leave without pay (LWOP). So how to process employees who are on leave without pay in WorkDo?
Employee tenure will be paused for those who are on leave without pay. And, for workplaces that have enabled Leave Pro, it will stop delving out leaves for them. So this is a necessary and important setting that the workplace HR staff must know!
If you have a leave type for leave without pay for your team to select, or the employee has formally filed a request for taking leave without pay, it is still strongly recommended that you set the employee status to suspend through the HR tool to accurately reflect this change.
Set LWOP Employee Status to Suspend
- Leave without Pay │ It is recommended that the employee sends a request for taking leave without pay for the workplace HR staff as a reference, then follow the steps below and set the employee status to suspend.
- Parental Leave | For employees who would like to apply for parental leave, we recommend that they use Leave or Leave Pro to apply for parental leave first, then have the HR Staff set their employee status to suspend.
If your role is HR Staff in the HR tool, you may use the web version of WorkDo and follow the steps below to set LWOP employees to suspend status.
Suspend / Resume
1 │ Suspend
- Switch to the HR tool.
- Click Employee Profiles.
- Use the filter to select applicable employees.
- Click the Suspend button.
- Fill in the reason and return date information.
- Click Suspend and confirm the action. This suspension record can be viewed in the Suspension option.
2 │ Resume
- Switch to the HR tool.
- Click Employee Profiles.
- Use the filter to select applicable employees.
- Click the Resume button and confirm the action.
Reminders
- Suspended employees are still able to use and access WorkDo. Only their tenures and Leave Pro’s automatic leave granting function are paused.
- Suspended employees are still in the workplace and do not need to be removed from the workplace.
- Should suspended employees resign, it can also be done by following similar steps.
Relevant Questions
How does WorkDo handle the data and records of resigned employees?
What do I do when employees resign from their posts?
Why is there’s a member with two employee profiles?
An employee left the workplace or was removed by mistake, is there a way to rectify it?
Why do I have limited tool access?
The HR tool setup.
What settings in HR are required for new employees?
FAQ-ID:1002
Does WorkDo retain the messages, posts and records of resigned employees?
For a virtual workspace to operate seamlessly, it is important to know how data is being handled, especially for resigned employees. Fortunately, you came to the right place!
When employees are suspended, terminated even deleted, so long they haven’t left the workplace, all their chat histories, posts, files, records and data are still intact. However, when they have left the workplace, then things will be a little different.
1 │ Buddy Level
- When an employee leaves the workplace, all colleagues are unbuddied, therefore, posts and chat histories between buddies are all erased. So please be sure to inform the workplace members and have them back up all necessary posts and files before their departure.
- With the exception of chat histories, all posts can be restored if the resigned employee rejoins the workplace and adds their buddies back within one year.
2 │ Group and Workplace levels
- Chat histories are retained for 5 year. │ All messages sent in the group or workplace chatrooms are retained for up to 5 years, including texts, photos, videos, locations, stickers and audio messages. We recommend that users save important project and task information using other tool posts.
- Posts and Records │ All tool posts and records, unless otherwise deleted by the tool admins, are kept forever.
3 │ Private Space & WorkDo Network
Employee claims the ownership of his/her WorkDo account, and the posts in their Private Space and the WorkDo Network are retained forever unless deleted by them.
Reminder
- The Employees Profiles in the HR tool can be deleted, but before doing so, please make sure that you have surpassed the record keeping period mandated by your local labor regulations.
FAQ-ID:1154
What do I do for employees who want to resign? Should I set their status as resigned? What access do they have until they leave the workplace? Find out now!
The necessary settings require the help of both Workplace Admins and HR Staff to complete. Let’s get started!
Plan:![]() Free
Free ![]() Paid
Paid
Permission:![]() Member
Member ![]() Workplace Admin
Workplace Admin ![]() Tool Admin
Tool Admin
Role:![]() Employee
Employee ![]() Manager
Manager ![]() HR Staff
HR Staff ![]() HR Viewer
HR Viewer
Method 1|Resigned employee can no longer access workplace data.
STEP 1|Member removal by the Workplace Admin.
- Enter the Workplace Settings.
- Click Roster.
- Use the search bar to search and select the member.
- Click Manage Member then Remove Member from the Workpalce.
- Enter the confirmation code and click Remove to complete the process.
- Remove
This step will remove the member from the workplace and mark him/her as terminated in the employee profile, making the workplace contents inaccessible. Reinstating and inviting the member back into the workplace will lift this restriction. - Block & Remove (Web Only)
This action puts the member on a permanent blacklist, and this account is never to be used to rejoin the workplace.
- Remove
STEP 2|Enter the reason of resignation by the HR Staff.
- Switch to the HR tool.
- Click Employee Profiles.
- Use the filter to search for the terminated employee profile.
- Click the Edit icon and confirm the action in the pop-up window.
- Scroll down and click the Enrollment/Resignation tab.
- Click the Edit icon in fron of the record and fill out the information.
- Click Save to finish.
STEP 3|If you don’t need to keep the employee profile, the HR Staff can delete it permanenetly.
Method 2|Allow the employee to stay in the workplace until the handover is completed.
STEP 1|Enter the reason of resignation by the HR Staff.
- Switch to the HR tool.
- Click Employee Profiles.
- Select the employee with the checkbox.
- Click the Terminate button.
- Fill out the reason of resignation.
- Click the Terminate button below to complete.
- The basic tools are available to the employee.
- All the records of the advanced tools can still be viewed by the employee, but he/she can no longer use them.
STEP 2|Remove the employee by the Workplace Admin.
- Enter the Workplace Settings.
- Click Roster.
- Use the search bar to search and select the member.
- Click Manage Member then Remove Member from the Workpalce.
- Enter the confirmation code and click Remove to complete the process.
This step will remove the member from the workplace and mark him/her as terminated in the employee profile, making the workplace contents inaccessible. Reinstating and inviting the member back into the workplace will lift this restriction. - Block & Remove (Web Only)
This action puts the member on a permanent blacklist, and this account is never to be used to rejoin the workplace.
STEP 3|If you don’t need to keep the employee profile, the HR Staff can delete it permanenetly.
Reminders
- The option is available in the Workplace Settings for members to leave the workplace on their own.
- When employees leave the workplace, all buddy-level contents, including chat histories and posts are erased as well, so be sure to ask other members to backup necessary contents before then.
- The paid plans of WorkDo charge by the workplace member count, so the subscription fee may be affected when members join and leave the workplace depending on the time of the month.
Relevant Questions
How does WorkDo handle the data and records of resigned employees?
How to delete an employee profile?
How to set employees who are on leave without pay?
Get notifications when members join and leave.
What settings in HR are required for new employees?
Can I leave a workplace?
Why do I have limited tool access?
FAQ-ID:1120
Is there anything I should be aware of when creating new departments?
Before we begin, let’s not forget that all applications, approvals, and requests follow the workflow set in the HR tool’s Department Chart. As such, the department chart is crucial for your organization’s day-to-day workflow and department expansion.
Please refer to the instructions below to create new departments and restructure the department chart and hierarchy.
Restructure the Department Chart
1 │ Update Department Information
Updating the department information will not affect the features and functions in any way, nor to the employees that are assigned to the department and how they use WorkDo on a daily basis.
2 │ Deactivate Department
Currently, the delete function is not offered in Department Chart, but you may deactivate closed-down departments.
Below are three things you need to know when deactivating departments.
- Employees’ department assignment, and these records can be found in the Records of Change option, and remember to reassign employees to other departments before deactivating a department.
- Employees’ clock in/out times, leave, overtime applications and attendance will comply with their new department’s HR Calendar.
- Use the search filter in the Department List find the list of deactivated departments.
Create New Departments
STEP 1 │ Use the Right HR Calendar
The HR Calendar is responsible for determining which days are workdays and which days are public holidays, makeup workdays, etc, this is connected to the Attendance, Leave, Leave Pro, and Overtime tools. So if a department operates on a different calendar and schedule, be sure to select the right calendar for the team.
When a new department is created, it will use the default HR Calendar for its team, but if it uses a different HR Calendar, please refer to HR Tool Manual’s Step 2-e to create or update an HR Calendar.
STEP 2 │ Use the Right Work Hours
The department Work Hours determine clock in/out times of the department. When a new department is created, it will use the default work hours. Please refer to HR Tool Manual’s Step 2-b to create or update work hours.
STEP 3 │ Leave Pro – Set the Corresponding Leave Types
Each type of leave in the Leave Pro tool is automatically granted to each employee based on a number of conditions, so it is important to use Leave Pro to set employees’ leave conditions and statuses for them to receive the appropriate amount of leaves. Please refer to the Leave Pro Tool Manual’s Addendum 1 for detailed explanation and instructions.
Reminder
- The System Settings and Employees Profiles will also affect the eForm workflow. Please refer to the HR Tool Manual for details.
Attendance
FAQ-ID:1159
WorkDo’s Attendance tool was designed to accommodate most companies’ policy, whether it’s for field staff, on-site employees or desk workers, one tool solves all clocking issues. Utilizing Wi-Fi and GPS for clocking in/out, the Attendance tool is extremely easy to set up. And best of all, it is integrated into the HR and Leave Pro tool so the HR staff can instantly get an overview of the work hour employees put in, making payroll management much easier!
Have trouble activating the Attendance tool? Worry not, we’ll walk you through the steps.
For starters, follow the steps in Start WorkDo in 5 steps and HR tool setup.
│ Settings in the HR are key to activating Attendance. │
│ Read the Attendance Tool Manual │
If your tool role is HR Staff of the Attendance tool, then you may proceed with the steps below using the WorkDo app!
2 Key Steps with Attendance
STEP 1 │ Clock Method
Flexible to accommodate desk employees and field staff!
- Desk Employees
Clock using pre-set Wi-Fi hotspots, GPS can be used for a more precise location. Employees can clock in/out using their mobile device when they are within set range or a PC that’s connected to the Wi-Fi hotspot. - Field Staff
The remote clock option enables employees to clock in/out remotely with a set GPS position using their mobile device. The tool admins can then select individuals who are allowed to remote clock.
STEP 2 │ Employees Required to Clock
This step will have the tool admin set those who are required to clock in/out and those who aren’t, e.g. managers.
Be sure to use the clock methods to set the Wi-Fi and GPS locations first then select employees who are allowed to remote clock in/out!
STEP 3 │ Configuration
If employees forget to clock in/out, there is a post-clock deadline setting that controls the length of time that is allowed for filing a makeup request.
Reminders
- The New Members Required to Clock option in the HR tool is directly connected to the Attendance tool, if set to No, all new members on boarding the workplace won’t be asked to clock in/out, and vice versa.
- This FAQ briefly covers the Attendance tool setup, if you would like a more detailed explanation, be sure to check out our Attendance Tool Manual!
FAQ-ID:1160
At the moment, the Attendance tool of WorkDo only records employees’ clock-in/out times, but if your team requires team members to move around, our Check-In tool can help you get the job done!
Recommended!
Check-In: Check-in/out at places you go!
If your workplace consists of sales and field staff who are constantly on the run, the Check-In tool is your best friend! The Check-In tool records multiple location check-ins/outs via GPS, so employees could easily report their whereabouts.
Reminder
Follow us on various platforms and receive the latest news and updates!
Relevant Questions
FAQ-ID:1161
Clock-in, clock-out with your smartphone is easy, but there’s gonna be times when it slips your mind. But what happens to my perfect attendance you ask? Is there a way to remedy this? Fortunately, there is!
Whenever employees forgot to clock-in and clock-out and past the clocking times, they can use the post clock function to record their times. Of course, the post clock applications will have to be approved before they are recorded. And it is recommended that admins set a deadline for post clock applications to avoid possible conflicts later on.
Post Clock Deadline
STEPS │ App
- Switch to the Attendeance tool.
- Click the Management tab.
- Select Settings.
- Select System Configurations.
- Click Post Clock Deadline.
- Set the deadline from 1 to 90 days.
- Click Confirm to finish.
STEPS │ Web
- Switch to the Attendance tool.
- Click System Config.
- Click Edit.
- Set the deadline from 1 to 90 days.
- Click Save to finish.
Reminders
- Please note the Post Clock Deadline counts in calendar days, not business days, and 90 days max.
- Ex. If the Post Clock Deadline is set to 30 days and an employee forgot to clock-in on Oct. 13, the deadline for post clock is Nov. 12.
FAQ-ID:1162
Employee attendance is important in most workplaces but there are times when you forget to clock in or clock out once in a while. Fortunately, the post clock function gives you a chance to record your time.
Simply hit the Post Clock button to send a post clock application to the manager, and your time will be recorded once the manager approves it!
Exceptions
There are two factors that determine whether employees are required to clock in/out, and post-clock is a direct result of this; as such, two exceptions would prevent employees from post clocking.
- Join the workplace after the On Board Date
It is when you join the workplace would the system deem you as a valid member. If you join the workplace later than the On Board Date the HR Staff set for you, the system wouldn’t ask you to post clock for the void period before you joined the workplace. - Not set as one of the Members Required to Clock
The time before you were required to clock doesn’t count towards your attendance record, so post clocks are not required.
Remedy │ Have the HR Staff help employees post clock, then the managers would follow the normal approval workflow to approve the post clocks.
Post Clock
STEPS │ App
- Switch to the Attendance tool.
- Select a preferred method below.
- Stats │ Click My > Stats (Monthly) > Click the list view button on the upper-right-hand corner > Absent Clock.
- Clock In/Out │ Click the Clock In/Out tab then click on the date or the arrow buttons next to the date to change the date.
- Click Post Clock.
- Fill out the time and relevant information.
- Click Save to send out the post clock application.
STEPS │ Web
- Switch to the Attendance tool.
- Click Clock In/Out Records.
- Hit the Post Clock button next a missed clock-in/out record.
- Fill out the time and relevant information.
- Click Save to send out the post clock application.
Reminders
- If the Absent Clock is 0 in the Stats (Monthly), it means there’s no need to apply for post clock requests.
- Click My > My Claims to check the status of each post clock request.
FAQ-ID:1168
The Attendance tool in WorkDo is fairly straightforward, it offers employees to clock in/out with their PCs/phones via Wi-Fi/GPS when they enter the preset ranges.
If you cannot clock in/out, it is typically one of these 4 reasons. 1. The Attendance tool settings are incomplete. 2. The device is not connected to the set Wi-Fi hotspot or in the set GPS range. 3. WorkDo hasn’t been given permission to access your device’s location. or 4. Unstable internet connection.
Please refer to the steps below to troubleshoot the problem if you cannot clock in/out with your device.
Troubleshooting Clock In/Out Issues
Steps:
- Have you completed the Attendance tool settings?
The settings include select employees who are required to clock, set the Wi-Fi hotspots and GPS locations, and whether remote teams and work from home employees are allowed to remote clock. - Make sure your device is connected to a set Wi-Fi hotspot.
- iPhone │ Must connect to the Wi-Fi hotspot to clock in/out.
- Android │ Some Android devices are allowed to clock in/out so long as the hotspot is discovered without having to connect to it.
- Make sure WorkDo is allowed to obtain your device’s location.
- App │ Enter the device settings and select Apps > WorkDo > Permissions > Location and allow access for WorkDo to obtain your device location to clock in/out.
- Web │ Click the padlock icon in front of the browser link and allow location access.
- Make sure the GPS service is not blocked.
The GPS service of your device can be blocked in certain buildings and structures. Please be sure that your device has GPS access before attempting to clock in/out. - GPS drift.
GPS drift, in the most practical sense, is the difference between your actual location and the location recorded by a GPS receiver. Consumer-grade GPS receivers are not 100% accurate, this will usually cause a difference between your actual location and your recorded location. If this happens, follow the below steps to fix the problem.- Enter the clock in/out screen.
- Click “Check clockable area” and your current GPS location to see if you are within range.
- Click “Revise Location” when your GPS location is undetected or drifting.
- If most employees are often out of the clockable range, please ask the HR Staff to extend the clockable range.
- Make sure you have a stable internet connection.
Be sure that your device has a stable connection to the set Wi-Fi hotspot before clocking in/out.
Reminders
- Post-Clock utilizes the same clocking method, so if the Post-Clock button does not appear when you are late for work, please refer to the same steps to troubleshoot the problem.
- Different brands of devices may name the settings and options differently, please refer to your device’s manual for proper names and functions.
FAQ-ID:1169
As people become more conscious about what companies are allowed to access their personal data, most software products will ask users for certain privacy-related permissions in order to properly perform tasks and WorkDo is no different.
If you cannot clock in/out using your PC, it is likely that you have not given WorkDo permission to access your location data. Please use the below instructions as a rule of thumb to grant your location data for clocking in/out.
Before you begin, please make sure you have ruled out possible reasons for failing to clock in/out.
│ 1 Settings > 2 Privacy │
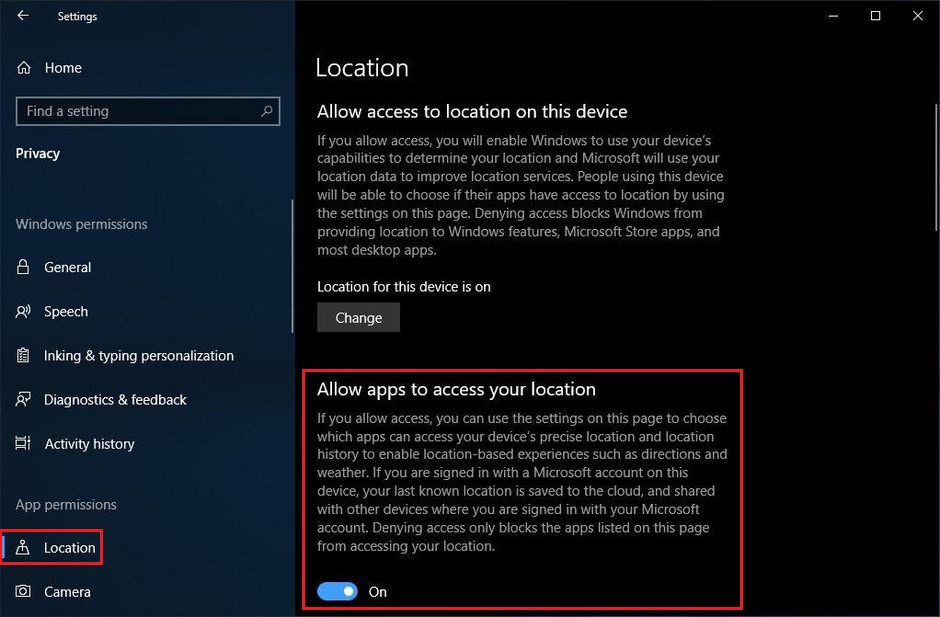
│ 3 Select Location > 4 Allow apps to access your location │
Reminders
- The steps may vary depending on the brand of devices and operating systems. Please take instructions as a rule of thumb. You may also use “location” as a keyword in searching for the setting.
- For smartphones, please go Settings > Apps > WorkDo > Permissions > Location to enable location access.
- For web browsers, please click the padlock in front of the url and allow location access.
- If you are using a desktop connected to an ethernet cable, you may set a “default location” for your PC for location access.
- For Windows 10 GPS, location and privacy services, please check out Windows 10 location service and privacy for details.
Relevant Questions
FAQ-ID:1164
Whether you are visiting clients, working on-site or working from home, so long the HR Staff has permitted you to clock in/out from remote sites, then you are allowed to clock in/out anywhere. Follow the instructions below to see if remote clock is enabled for you.
Verify Remote Clock Permission
Steps:
- Select the Attendance tool.
- Click Settings > Clock Methods.
- Remote Clock.
- All Allowed │ All members are allowed to clock remotely,
- Not Allowed │ Remote clock is disabled to all members.
- By User │ Meaning some members are allowed to clock remotely.
- Return to the last screen.
- Click the Clock In/Out screen. If you are outside of the set clocking ranges and Remote Clock is shown, then you are allowed to remote clock in/out.
Reminders
- Remote Clock uses your device’s GPS location for clocking in/out.
- If you are working from home or on-site, you may provide your physical location for the HR Staff to set a GPS location for you to clock in/out, too.
- If your workplace has a mobile workforce or sales team who are running from place to place, we recommend you use our Check In tool instead.
FAQ-ID:1163
Life can be hectic, and we understand that employees are bound to forget to punch in or punch out once in a while, and your sales force doesn’t always sit behind desks and punch in and punch out like the rest of the team. But what happens to employees’ irregular work hours? This is when the appeal function comes in.
When you file an appeal, you may input a new clock in/out time, this provides a way to rectify your attendance records and make sure that your salary won’t be affected.
Attendance Appeal
STEPS │ App
- Select the Attendance tool.
- Date selection.
- Click main function My > Stats (Monthly) > Late Clock or Early Clock
- Click main function Clock In/Out > Click the date or use the arrow keys to select the date to appeal.
- Click Appeal.
- Fill out the time and relevant information.
- Click Save to send the appeal request to the manager for approval.
STEPS │ Web
- Select the Attendance tool.
- Click Clock In/Out Records.
- Click the Appeal button next to a record.
- Fill out the time and relevant information.
- Click Save to send the appeal request to the manager for approval.
Reminders
- If 0 is shown in the Late Clock/Early Clock in the Stats (Monthly) in the app, it means you have a perfect attendance.
- Click the main function My > My Claims to verify whather your appeal request has been approved.
FAQ-ID:1166
Don’t worry! Employee attendance is tied to the work hours set in the HR tool, and once you understand how everything is close-knit and works, you’ll come to appreciate the flexibility WorkDo offers.
Employees’ clock in/out screens will not show that they are not required to clock in/out even though they have applied for leaves, considering the fact that they could still cancel or withdraw the requests at the last minute.
As such, in the attendance report, when employees did not clock in/out in accordance with agreed work hours set in the HR tool, then they will be marked absent.
The system, however, will later check whether absent employees are on leave with the records in the Leave Pro tool. If they are on leave, the attendance report will show that they are absent because they are on leave. Therefore, when the HR Staff checks their attendance report before the system process this step at the end of the day, employees who are on leave will appear as if they are absent.
- When an employee’s clock in/out times are on the same day, their complete attendance record will be available the next day.
- When an employee has a cross-day clock out time, their complete attendance record will be available after their latest clock out time
Attendance Report Export
Steps:
- Switch to the Attendance tool.
- Click the Attendance Report.
- Use the filter to refine your search.
- Report export.
- Export PDF:In PDF format.
- Export CSV:In Microsoft Excel format.
- Export CSV with (Clock in/out) Date:Suitable for cross-day clock in/out employees. In Microsoft Excel format.
FAQ-ID:1167
We understand that employee attendance records are important and required by the Department of Labor and WorkDo does a great job to record them. But there are times when employees simply just forget to clock in/out. So is there any way to remedy this?
Typically, the HR Staff could set a post-clock deadline allowing employees to post clock and record their own clock in/out records. But should they manage to forget to do that as well, then your final resort is to adjust their clock in/out records for them.
Clock In/Out Record Adjustment
Steps:
- Switch to the Attendance tool.
- Click Management > Modify Record.
- Refine your search with the filter.
- Select a record.
- Record modification.
- App │ Click the icon > Modify
- Web │ Modify
- App │ Click the
- Fill out the time, location, and add photos and files if necessary.
- Click Save to finish.
Reminders
- The HR Staff can not modify the location of a post-clock record applied by the employees.
- Modified records is sync across all devices and can be view in the modified log.
FAQ-ID:1165
Is there an employee who is unable to post clock?
Please verify that whether the employee has been included in the list of employees who are required to clock as described in the STEP 2-b of the Attendance Tool Manual.
Secondly, please be sure that you have followed all the necessary procedures to properly set up each newly onboarded employee allowing them to gain access to all the tools and features, including the post clock function right away.
If you have missed the timing on the aforementioned solutions, then your final resort is to create a blank record then ask the employee to post clock or post clock for the employees yourself to make up for the missed attendance records.
Post Clock for Employees / Attendance Record Adjustement
Steps:
- Switch to the Attendance tool.
- Click Management > Modify Record.
- Clreate a record.
- App │ Click the icon.
- Web │ Click the + Create button.
- App │ Click the
- Fill out the information (* must be filled)
- Employee
- Punch Date
Selectable only up to the onboard date of the employee. - Absent Type
- Click Save to finish.
- Ask the employee to post clock or post clock for him/her.
Reminders
- Use the function to create blank records for employees to clock on non-routine workdays.
- When a blank record has created, it still needs to comply to the Post Clock Allowance limit set by the HR Staff.。
Leave
FAQ-ID:1171
Leave is a simple leave management tool that allows employees to apply leave requests and managers to approve leave requests and track the teams’ leave status in the most convenient way possible.
Leave is easy to use and it only has two settings that you need to configure before they bring it online for the entire workplace.
Assuming that you have completed the Start WorkDo in 5 steps and The HR tool setup, we’ll now move on to the Leave tool configurations.
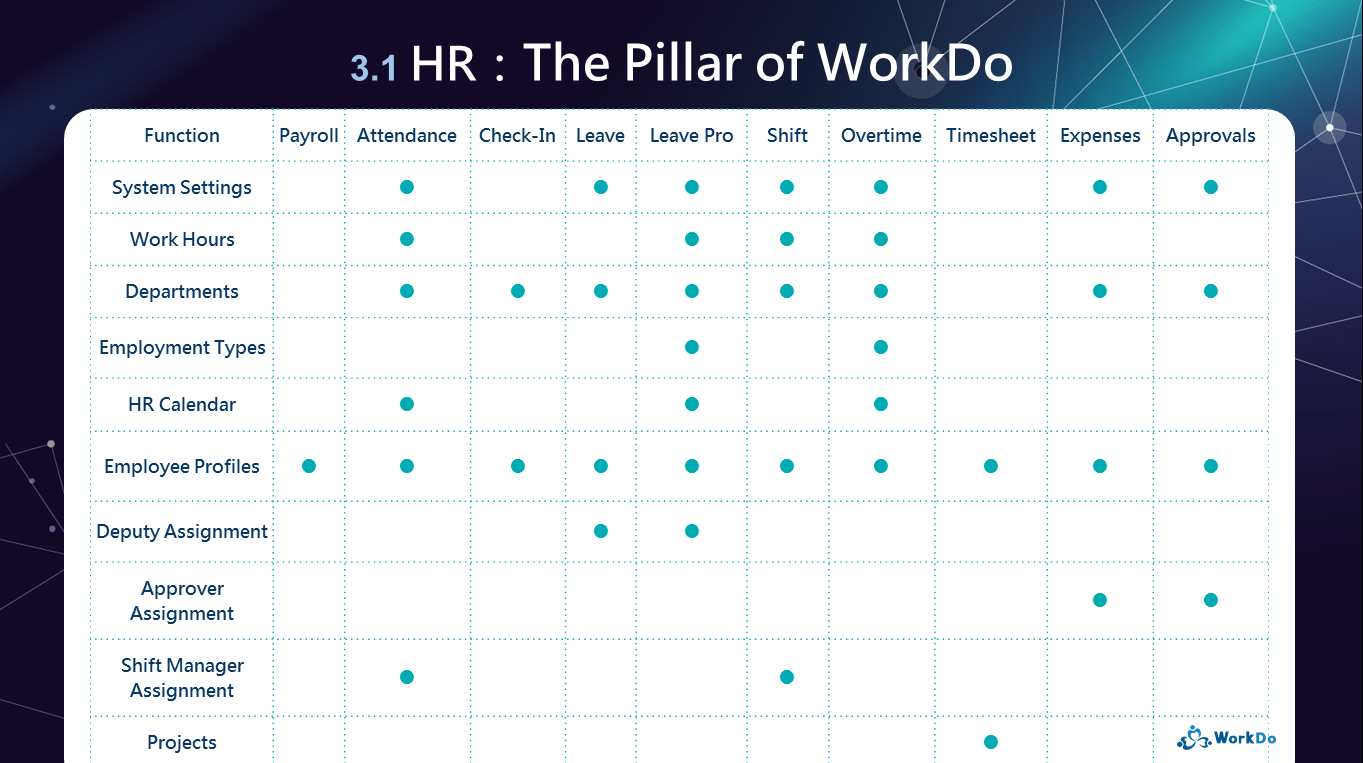
│ Be sure that you have set up the 3 HR settings related to Leave │
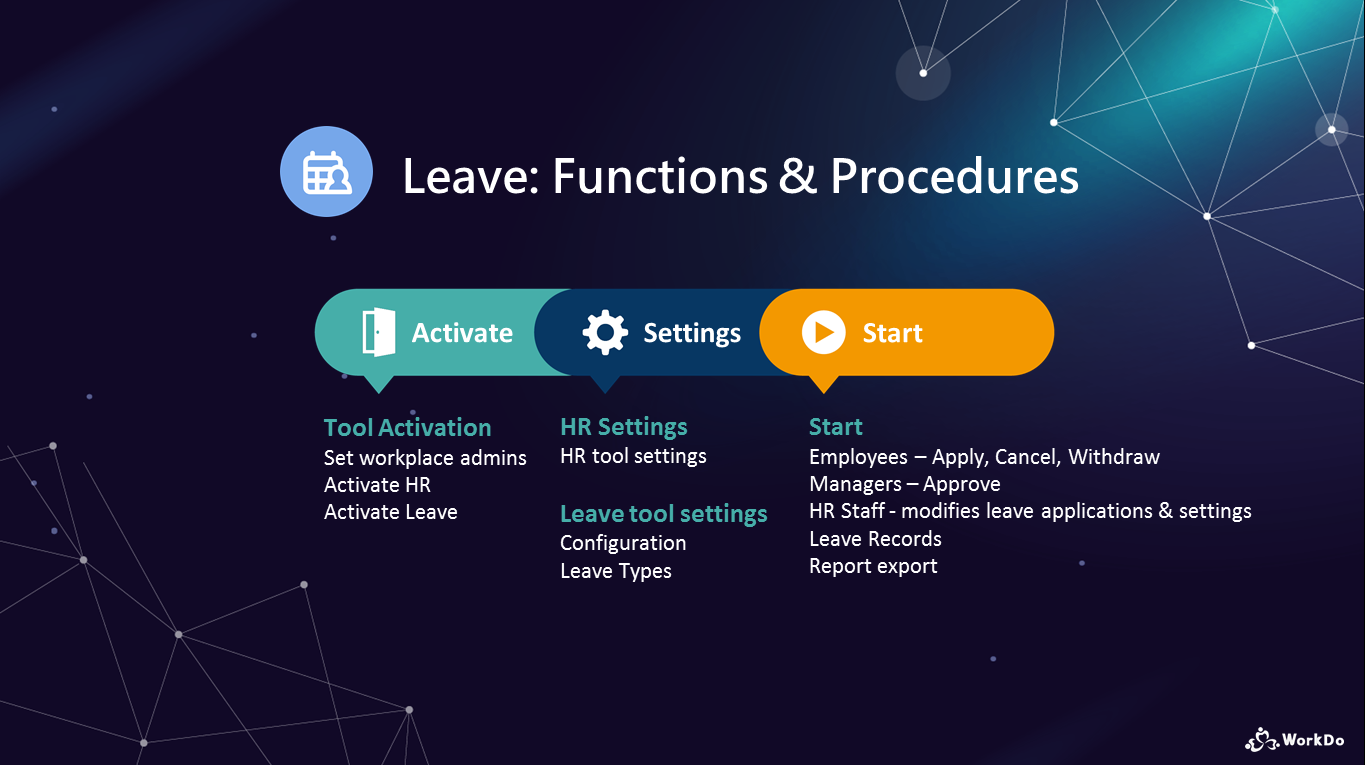
│ Read the WorkDo Leave Tool Manual │
You may configure the settings if you role in the Leave tool is HR Staff. We recommend that you use the web version for a more comprehensive view.
Leave Tool Settings
STEP 1 │ Configuration
The two settings in the configuration are responsible for the minimum leave time employees can apply for and whether to hide the sensitive leave details from other members.
- Leave Unit
Select from Hourly Basis, Half Day or Whole Day. Please note that half an hour is allowed on Hourly Basis. - Hide Sensitive Data(Web only)
If Yes is selected, the leave types and comments are hidden from other members in the leave overview.
STEP 2 │ Leave Type
Create different types of leave for employees to apply for.
Reminder
- Deputy is an important setting tied to leave applicants, you may refer to the HR Tool Manual for details.
- Be sure to read the Leave Tool Manual for detailed instructions and tutorial!
FAQ-ID:1172
Should your team use “Leave” or “Leave Pro”? What’s the difference between “Leave” and “Leave Pro”? Let’s find out now!
Leave │ For teams that work on shift schedules.
Leave is a simplified version of Leave Pro, it keeps track of employee leaves and their time off so you can better manage your employees and resources.
Leave Pro │ For teams with fixed work hours that require a more refined leave system.
Leave Pro is an advanced version of Leave, not only does it keep track of employees leaves, it also offers admins to set rules on when and how to grant leaves and carryover leaves. Leave Pro is connected to the HR Calendar, so employees can plan their leaves accordingly and ahead of time. Leave Pro is suitable for teams that require a more refined and semi-automatic leave system.
│ The HR settings that are required for using Leave and Leave Pro │
If you want to know the finer differences between Leave and Leave Pro, please refer to the Leave Tool Manual and Leave Pro Tool Manual.
1 │ Common Features
- Employees │ Employees can apply, cancel, withdraw leaves. They can also check their leave records and see who is on leave each day.
- Managers │ The managers are responsible for approving or escalating employees’ leave requests to a higher authority. They are able to view their teams’ leave records when needed.
- HR Staff │ The HR Staff sets the leave types and leave units. They also have the authority to export leave reports.
2 │ Unique Leave Features
- Employees │ The employees are allowed to manually adjust leave days before applying for leaves, whereas Leave Pro automatically calculates the leave days because the HR Calendar will exclude weekends, holidays or non-working days set by the admins.
- HR Staff │ The HR Staff has the authority to adjust employees’ leave time when necessary.
3 │ Unique Leave Pro Features
- Employees │ Connected to the HR Calendar, the semi-automatic system tells each employee of their available leaves and past leave records.
- Managers │ The system will automatically escalate leaves that match the Long Leave setting and offer various leave reports for managers to plan ahead and allocate their resources.
- HR Staff │ The HR Staff sets the rules of each leave type, including automatic grant rules, advanced notice, carryover rules, and deputy availability, etc. The leave reports are available to the HR Staff and they are allowed to apply and adjust leaves for employees when necessary.
Reminders
- Although both Leave and Leave Pro are available for Premium Plan users, and we generally advise users to pick one of the two for use. You can indeed use both tools simultaneously, but please make sure that all employees are fully aware of their situations and know when to use the right tool when applying for leaves.
- All the finer details and tutorials are in the manuals, take a look!
FAQ-ID:1173
Apply for the wrong type of leave? Wrong date? Incorrect amount of leave days? Fret not! If you want to adjust something on your leave application, you may use any of the methods to rectify your request.
- Cancel / Withdraw.
- The manager rejects the leave request.
- Adjust by the HR Staff.
1 │ Employee: Cancel / Withdraw
When a leave request has not been approved, the applicant could cancel it. If it has been approved, the applicant could withdraw it, but the manager will have to approve it. You may refer to STEP 2-d of the Leave Tool Manual or STEP 3-b of the Leave Pro Tool Manual.
2 │ Manager: Reject the Request
If the leave request has not been approved, you may inform your direct manager of the error and ask him/her to reject the request as shown in STEP 2-e of the Leave Tool Manual and STEP 3-c of the Leave Pro Tool Manual.
3 │ HR Staff: Request Adjustment
Whether your team is using Leave or Leave Pro, the correct methods of retracting a leave request are always to cancel, withdraw, or have the manager reject it. However, as a last resort, you could always ask the HR Staff to adjust the leave request.
- Leave
The HR Staff may refer to the STEP 2-h Adjustment of the Leave Tool Manual. - Leave Pro
For the sake of data integrity, the status of the leave application should be canceled, withdrawn, or rejected, before the HR Staff stepped in, then the HR Staff can use the Employee Balance to verify and adjust the leave days.
Download Leave Tool Manual Download Leave Pro Tool Manual
Reminders
- Leave Pro is connected to the HR Calendar that takes work hours, business days, and public holidays into consideration when applying for leave, which is absent in Leave. So if your team relies on a shift schedule and is using Leave, the leave application has an “actual applied leave hours field” that the applicant and manager could use to manually adjust the leave time.
- Please use the feedback and error report function to contact us if all the aforementioned steps failed to grant employees their correct leave days.
Leave Pro
FAQ-ID:1078
In principle, if you follow the instructions in setting up the Attendance tool correctly, all employees will get their leaves. But in case you have any employee whose leaves are incorrect, please follow the steps in this FAQ to adjust employee leaves.
Be sure that your tool role in Attendance is HR Staff then you may begin the troubleshotting procedure by using the web version of WorkDo.
Troubleshooting Incorrect Employee Leaves
Troubleshoot:
STEP 1 │ Check Leave Records
Employee could use Leave Records to verify if their personal leaves are correct, or the HR Staff could use Company Leave Records to perform the same move.
- Leaves were incorrectly given at the start │ Follow STEP 2 to 4 this is the case.
- Incorrectly set by other HR Staff │ Follow STEP 4 to rectify employee leaves.
- Leave Deduction / Compensatory Leaves / Canceled Leaves
- Employees may cancel their leave applications if they are not approved yet.
- Managers could approve or reject employee leave applications.
- Incorrectly set HR Calendar may result incorrect employee leave balances.
STEP 2 │ Check Employee Profile
Some leaves are tied to employees’ tenures in the company, so if the leave is given based on employees’ tenures, you need to check whether the information is correct in their Employee Profile in the HR tool. You may also refer to this FAQ for the HR settings details.
,
STEP 3 │ Check the Rules of Each Leave Type
When new rules are set for a leave type, they are applicable to new employees, and employees who become eligible for this leave, else, the new rules will be applied the next time it auto-grants. This is done so in consideration that some employees may have applied for this leave already, so in keeping the data correct and consistent, therefore, the system will not change any leave records retroactively.
- When employee tenure does not affect this leave type.
In the Detail tab, please check the Default Leave Quota and whether this leave is given in proportion to new employees are correct. - When employee tenure does affect this leave type.
In the Auto Grant tab, please check the Grant Frequency is set correctly. - Grant Frequency
Depending on the option chosen for Grant Frequency, it determines when the leaves are given and in full or not. If you missed this setting when creating a leave type, please follow STEP 4 to rectify it.- By Employee Tenure
Unless employees have reached the set tenure, they will not receive any leaves until the condition is met. - By a Specified Date
Employees will receive the leaves in full when the set date is reached.
- By Employee Tenure
STEP 4 │ Adjust employee leaves
Please refer to STEP 2-c of the Leave Pro Tool Manual to adjust employees’ leave balances or you may use the Import Employee Balance to adjust multiple employees’ leave balances.
What are the essential settings of Leave Pro?
Reminders
- Please use the feedback, error report function to contact us if all the aforementioned steps failed to grant employees their correct amount of leaves.
- For detailed information and tutorials please refer to the Leave Pro Tool Manual below!
FAQ-ID:1017
Leave Pro is a powerful leave management tool. It allows your team to apply and approve leaves online whilst the system will dole out, deduct and carry over leaves based on user-defined rules that save the HR personnel the troubles any additional manual labor. Leave Pro offers various comprehensive leave reports and the semi-automated system minimizes manual errors making it the best employee leave management tool that is sure to satisfy any team.
Leave Pro is connected to some of the settings in the HR tool, so please use the manual to set up Leave Pro for the best experience possible!
Before you begin, please make sure that you have completed the the setups in Start WorkDo in 5 steps and The HR tool setup.
│ Be sure to complete the 7 important settings that are tied to the Leave Pro tool.│
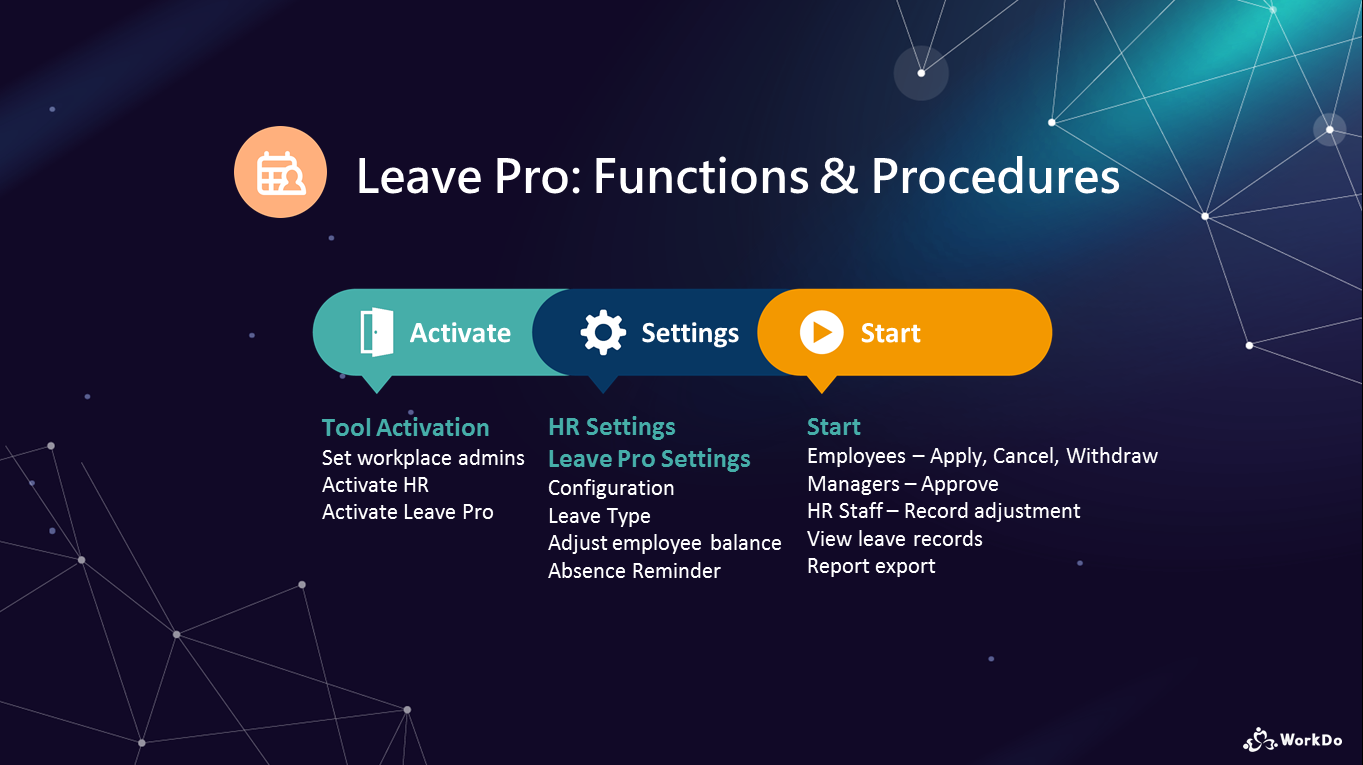
│WorkDo Leave Pro Tool Manual │
You may configure the settings using the web version of WorkDo if you role in the Leave Pro tool is HR Staff.
Leave Pro Tool Settings
STEP 1 │ Configuration
To save time, you may set the default values for all leave types in the General Settings, then each new type of leave will inherit the default values that can be adjusted as per your company policies.
- Schedule
Set the default leave value, how many leave days qualifies as long leave, advanced notice, reminder trigger, etc. - Carryover Balance Settings
Set whether employees are allowed to carry over unused leave into the next calendar year and related settings. - Leave Time Balance
Set whether employees are allowed to post-apply leaves in case of emergencies. - Privacy
Set whether leave types and comments are hidden from other members in the leave overview.
STEP 2 │ Leave Type
Leave Type controls each leave’s detailed settings, including eligibility and grant rules.
- Detail
This section offers the general rules of the leave type, such as checking whether the deputy is also on leave at the same time, how unused leaves are being carried over into the next calendar year, default quota, paid or unpaid leave, etc. - Eligibility
The eligibility determines who are offered this type of leave. It may be gender specific, department specific or by employees’ tenure. - Auto Grant
This section determines whether the system will automatically grant employees leaves based on the time and set rules.
STEP 3 │ Adjust Employee Balance
Please note, once all leaves have been created, the HR Staff must manually set the leave balance or unused leave days for all employees before bringing Leave Pro online.
- Balance Calculation │ All employees will be given the appropriate amount of leave days in accordance with the rules you set, you may use the Balance Calculation to see whether verify employees’ leaves are correct.
- Employee Balance │ You may use the Employee Balance to individually adjust the leave days of a particular employee or use the Import Employee Balance to adjust multiple employees’ leave days.
STEP 4 │ Absence Reminder
Once in a while, employees may have forgotten or been unable to file leave requests due to unforeseen circumstances, Leave Pro offers an absence reminder to remind employees to file a proper request in the system.
Reminder
- The deputy setting in the HR tool plays a big role in whether employees are able to apply for leaves, please refer to the HR Tool Manual.
- For detailed information and tutorials please refer to the Leave Pro Tool Manual below!
FAQ-ID:1172
Should your team use “Leave” or “Leave Pro”? What’s the difference between “Leave” and “Leave Pro”? Let’s find out now!
Leave │ For teams that work on shift schedules.
Leave is a simplified version of Leave Pro, it keeps track of employee leaves and their time off so you can better manage your employees and resources.
Leave Pro │ For teams with fixed work hours that require a more refined leave system.
Leave Pro is an advanced version of Leave, not only does it keep track of employees leaves, it also offers admins to set rules on when and how to grant leaves and carryover leaves. Leave Pro is connected to the HR Calendar, so employees can plan their leaves accordingly and ahead of time. Leave Pro is suitable for teams that require a more refined and semi-automatic leave system.
│ The HR settings that are required for using Leave and Leave Pro │
If you want to know the finer differences between Leave and Leave Pro, please refer to the Leave Tool Manual and Leave Pro Tool Manual.
1 │ Common Features
- Employees │ Employees can apply, cancel, withdraw leaves. They can also check their leave records and see who is on leave each day.
- Managers │ The managers are responsible for approving or escalating employees’ leave requests to a higher authority. They are able to view their teams’ leave records when needed.
- HR Staff │ The HR Staff sets the leave types and leave units. They also have the authority to export leave reports.
2 │ Unique Leave Features
- Employees │ The employees are allowed to manually adjust leave days before applying for leaves, whereas Leave Pro automatically calculates the leave days because the HR Calendar will exclude weekends, holidays or non-working days set by the admins.
- HR Staff │ The HR Staff has the authority to adjust employees’ leave time when necessary.
3 │ Unique Leave Pro Features
- Employees │ Connected to the HR Calendar, the semi-automatic system tells each employee of their available leaves and past leave records.
- Managers │ The system will automatically escalate leaves that match the Long Leave setting and offer various leave reports for managers to plan ahead and allocate their resources.
- HR Staff │ The HR Staff sets the rules of each leave type, including automatic grant rules, advanced notice, carryover rules, and deputy availability, etc. The leave reports are available to the HR Staff and they are allowed to apply and adjust leaves for employees when necessary.
Reminders
- Although both Leave and Leave Pro are available for Premium Plan users, and we generally advise users to pick one of the two for use. You can indeed use both tools simultaneously, but please make sure that all employees are fully aware of their situations and know when to use the right tool when applying for leaves.
- All the finer details and tutorials are in the manuals, take a look!
FAQ-ID:1173
Apply for the wrong type of leave? Wrong date? Incorrect amount of leave days? Fret not! If you want to adjust something on your leave application, you may use any of the methods to rectify your request.
- Cancel / Withdraw.
- The manager rejects the leave request.
- Adjust by the HR Staff.
1 │ Employee: Cancel / Withdraw
When a leave request has not been approved, the applicant could cancel it. If it has been approved, the applicant could withdraw it, but the manager will have to approve it. You may refer to STEP 2-d of the Leave Tool Manual or STEP 3-b of the Leave Pro Tool Manual.
2 │ Manager: Reject the Request
If the leave request has not been approved, you may inform your direct manager of the error and ask him/her to reject the request as shown in STEP 2-e of the Leave Tool Manual and STEP 3-c of the Leave Pro Tool Manual.
3 │ HR Staff: Request Adjustment
Whether your team is using Leave or Leave Pro, the correct methods of retracting a leave request are always to cancel, withdraw, or have the manager reject it. However, as a last resort, you could always ask the HR Staff to adjust the leave request.
- Leave
The HR Staff may refer to the STEP 2-h Adjustment of the Leave Tool Manual. - Leave Pro
For the sake of data integrity, the status of the leave application should be canceled, withdrawn, or rejected, before the HR Staff stepped in, then the HR Staff can use the Employee Balance to verify and adjust the leave days.
Download Leave Tool Manual Download Leave Pro Tool Manual
Reminders
- Leave Pro is connected to the HR Calendar that takes work hours, business days, and public holidays into consideration when applying for leave, which is absent in Leave. So if your team relies on a shift schedule and is using Leave, the leave application has an “actual applied leave hours field” that the applicant and manager could use to manually adjust the leave time.
- Please use the feedback and error report function to contact us if all the aforementioned steps failed to grant employees their correct leave days.
FAQ-ID:1045
If you approve a leave request and it still got escalated, it’s most likely that it has met the criteria of auto-escalate rules.
There are auto-escalation rules in Leave Pro that will escalate the requests to the upper management when the rules are met.
The auto-escalation rules are set to ensure that the workplace management is aware when employees are taking long leaves, so the company can better allocate its resources. If you are a workplace manager, you may ask the HR Staff of Leave Pro to verify or change the rules of auto-escalation.
Long Leave Auto-Escalation Rules
Steps:
- Switch to the Leave Pro tool.
- Click General Settings.
- Click the Edit button under the Schedule tab.
- Set the long leave rules.
- Long Leave Threshold
When a leave request meets this number, it is considered as a long leave and will automatically got escalated. - Advance Notice (Long Leave)
Fill in the number of days that is required for advance notice when employees take long leaves.
When employees request for long leaves at a short notice, the leave requests will be marked as “urgent”.
Example:When 5 is entered, employees who apply for long leaves under a 5-day notice will be marked as “urgent”. - Auto Escalate for Long Leave
Yes │ Long leaves will be automatically escalated when the first-line managers approve them.
No │ Automatic escalation is not required. When first-line managers approve them, the process is completed.
- Long Leave Threshold
- Click the Save button the complete.
Reminder
- The leave request approval flow is set in the employee profiles of the HR tool.
FAQ-ID:1174
If you are a manager in WorkDo, chances are you are assigned to sign off on employee requests, but aside from approving and rejecting requests, if the situation calls for it, you can also escalate a request.
Request Sign-off
Managers or dotted-line managers are tasked with signing off various types of requests, and when employee send out their requests, managers are notified to take action. Below are the different actions you can take to sign off the requests.
-
Approve / Approval Withdraw
Select Approve and the requests will be approved and processed, and the next-level managers will not be notified.
If a request form is erroneously approved, the managers can use Withdraw to cancel the approval and all the changes will be reverted back to the original state.
-
Escalate
Select Escalate and the requests will follow the workplace workflow and send to the next-level managers for approvals. This option is only available in the Leave, Leave Pro, Overtime, Approvals and Expenses tools.
-
Reject
Select Reject to overrule requests and all the changes will be reverted back to the original state.
Note that, if an approved request form is being withdrawn by the employee, selecting Reject means that you reject this employee’s request to withdraw this request form.
Request Sign-off
Steps:
- Select a request form.
- From the Notification Center.
- Click Workflow form the Dashboard and use the filters to select a request or narrow down to a particular type of requests.
- Click the Do button > select a tool > click Approve> search for particular request form.
- Click on the request form.
- App │ Click the icon > select a desired action and the employee will be notified of your decision.
- Web │ Click on the apropriate action button and the employee will be notified of your decision.
- App │ Click the
Reminders
- By selecting Escalate, you can select to escalate the requests based on the organizational structure or designated-approver set by the HR tool.
- By selecting Escalate, a notification will be sent to the approver and the request sender.
- Use the HR Tool Manual to set managers, the organization structure and workflow now!
Relevant Questions
Learn the the HR tool setup now.
How to sign off approvals on behalf of other managers?
Can I batch-approve request forms?
Why do some leave requests are automatically escalated?
What do I do when there is an error on my leave application?
I forgot to clock-in or clock-out. What do I do?
Attendance appeal.
FAQ-ID:1032
Typically, when the workplace admin has completed the Leave Pro settings, all members should have their leaves in the proper amount and start applying for leaves, but if this is not your case, you might have missed a setting or two.
Follow the instructions below to complete all the necessary settings and everything should be good to go!
You may configure the settings using the web version of WorkDo if you are the HR Staff of the Leave Pro tool.
Unable to Apply for Leaves Troubleshooting
1 │ Leave Pro is not in the toolbox.
If some of your team members can’t find Leave Pro in their toolbox and the tool has been enabled, chances are that their role is set to No Role. Please adjust their roles to Employee or higher to fix it.
How to change team members’ tool role?
2 │ Members are seeing an error message when entering Leave Pro or they are missing certain type of leaves
Remember, the system will automatically dole out leaves base on rules and eligibility. If some employees are receiving their leaves, please check whether they have been set eligible to receive the leaves.
-
- Eligibility
In most workplaces, some leaves are given based on seniority, positions, or gender-specific, in STEP 2 of the Leave Pro tool setup FAQ, eligibility plays a big role in who gets what types of leaves. Please make sure that you have properly selected the right type of employees for each leave type for them to receive their leaves.
- Eligibility
What are the necessary settings of Leave Pro?
-
- Employee Profiles
As mentioned, some leaves are doled out based on different factors, and the employee profiles are where you can find these settings for each employee. When everything is properly set, then everyone should be getting the correct leaves.
- Employee Profiles
What are the necessary settings for each employee?
- Employee Balance
Steps 1 and 2 should handle most cases of employees who aren’t receiving their leaves. If all else fails and you have no idea why some employees are getting their leaves, you can use the Employee Balance function to grant leaves individually. But consider this as the last resort, so long the root cause is not found, you always have to manually grant leaves to these employees.
What are the necessary settings for Leave Pro?
3 │ HR Calendar
Don’t forget that the HR Calendar is connected to Leave Pro as well!
- Setting federal holidays and workdays throughout the calendar year will determine when employees can apply for leaves and how leaves are deducted.
So if employees’ leaves are incorrectly deducted, it probably has something to do with the company’s HR Calendar.
Reminder
- Wanna know more about the Leave Pro tool? Check out the Leave Pro Tool Manual!
Relevant Questions
The Leave Pro tool setup.
Why are employees’ leaves don’t add up? How do I fix them?
Why do I have limited tool access?
About Apple ID verification.
The HR tool setup.
What settings in HR are required for new employees?
What’s the difference between “Leave” and “Leave Pro”?
What is the HR Calendar?
Shift
FAQ-ID:1115
Shift scheduling is an integral part of any business that operates on shift work. Effective scheduling helps businesses reduce labor costs, boost staff morale, improve efficiency, and much more.
But creating shift schedules can be a challenging and time-consuming process with many businesses also struggling to track, and even maintain them.
So if your team operates on a shift schedule, then Shift is the tool for your team! The Shift tool simplifies the managing and scheduling processes and offers flexibility and efficiency that will surely amaze your team!
│ What Shift can do for your team?
- Employees │ View shifts and upcoming schedule and leave comments and to communicate details.
- Managers │ Schedule, maintain employee work shifts, and export shift schedules.
Once you have activated the Shift tool, be sure to complete the settings in Start WorkDo in 5 Steps, especially set who are the Shift tool Managers.
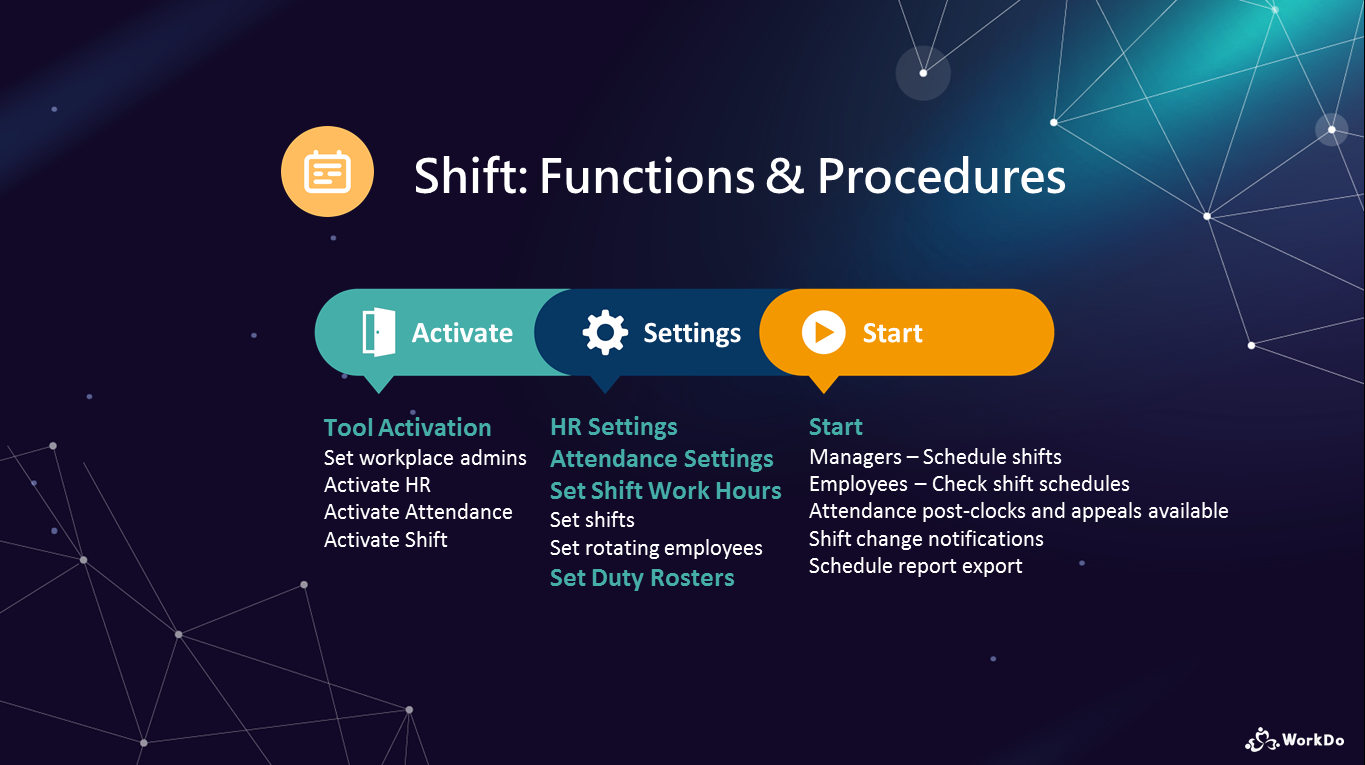
│ Read the WorkDo Shift Tool Manual│
Companion Tools
- Attendance | Shift employees could use Attendance to clock in/out on specified locations.
Use Check In if certain employees move from location to location. - Leave │ We recommend shift employees use Leave for leave applications.
Shift Tool Setting
A necessary tool for teams that require employees to clock in/out, else can be bypassed.
STEP 2 │ Set the Attendance Tool
Another necessary tool for teams that require employees to clock in/out, else can be bypassed.
STEP 3 │ Set Shift Work Hours
A necessary setting for shift employees and teams that require employees to clock in/out, else can be bypassed.
Think of it as a schedule or shift table, managers could create multiple schedules with multiple shifts to manage different teams and departments.
STEP 4 │ Set Duty Rosters
Duty Rosters are more geared towards specific tasks, duties, or departments that require rotating employees to handle on a day-to-day basis, which is not the same as shift employees. Managers could create multiple schedules with multiple shifts to manage different tasks and duties.
The two likely scenarios for teams that might need duty rosters are:
- Teams that do not require emloyees to clock in/out using the Attendance tool but still need a shift schedule to operate.
- Tasks and duties that require rotating employees to manage and monitor.
Reminders
- Wanna know how to create shift schedules, manage shifts, switch shifts and notify employees of their upcoming shift schedules? Well, have a look at the Shift Tool Manual for details.
Expenses / Approvals
FAQ-ID:1123
Sometimes, cross-functional approvals are signed by different team leads and sometimes approvals don’t follow the regular workflow, instead, they are processed by designated approvers.
In either situation, if your approval or expense request does not go through your line manager or dotted-line manager, you may select from a list of designated approvers.
If the approver is not in the list of designated approvers, please save your approval or expense request draft first and ask the HR Staff to set the designated approver in the HR tool, then you can resume your approval process by selecting the approver for your request.
Designate an Approver
STEP 1 │ Approval & Expense Request
- Save the draft if it’s already filled out and wait until the HR Staff has set a new designated approver for you, or you can send the request when the new designated approver is set.
STEP 2-1 │ Add a New Designated Approver (Method 1)
- Switch to the HR tool.
- Click Approver Assignment.
- Click the Add button.
- Select an employee.
- Click the blue Add button to confirm your selection. This employee is now a request approver.
STEP 2-2 │ Add a New Designated Approver (Method 2)
- Swtich to the HR tool.
- Click Employee > Profiles.
- Click the an employee’s Edit icon.
- In the Designated Approver filed, check Yes.
- Scroll down to the bottom and click Save. This employee is now a designated approver.
Reminders
- A designated approver can be selected to process the expense or approval request in each level of the workflow based on your workplace’s structure.
- For detailed information and tutorials on how to use the Expenses and Approvals tools, please refer to the manuals below!
FAQ-ID:1122
Managing business expenses have never been easier with the Expenses tool!
With the help of the Expenses tool, the entire expense management process is digitized, from filing, approving expenses, to reviewing expense records and reimbursement. So the entire process is not only simple, convenient and also environmentally friendly.
The expenses tool only requires one simple setup, just follow the instructions below and your team can begin a simplified expense filing process in no time.
│ Oniline Expense Filing
- Employees │ A single expense report can include multiple expenses, take pictures of receipts and proofs of expenditures, then the expense report can be processed by the accountants forreimbursement.
- Managers │ Approve employee expense reports and review team expenditures.
- Accountants │ Review all expense report and reimburse employee expenditures.
Before you begin, please make sure that you have completed the the setups in Start WorkDo in 5 steps and The HR tool setup.
│ Be sure to complete the 4 important settings that are tied to the Expenses tool. │
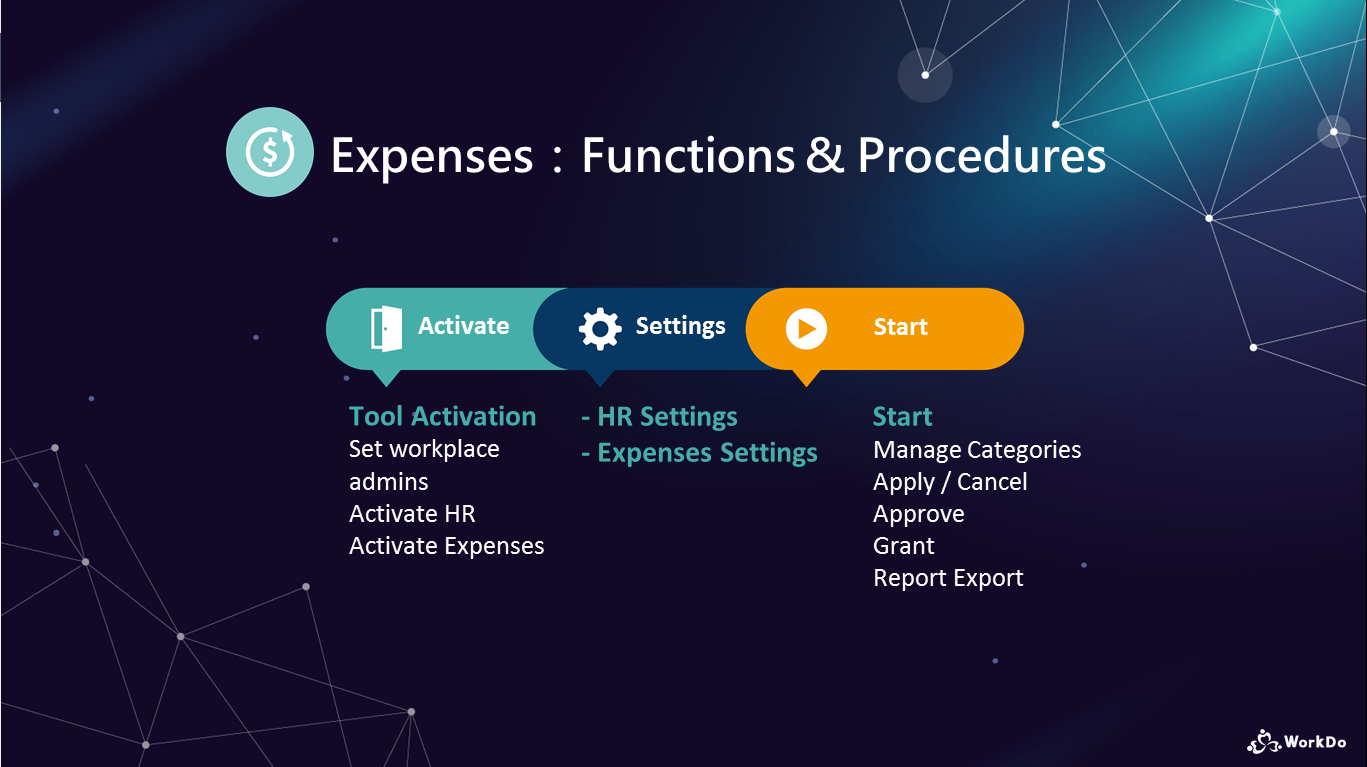
│ WorkDo Expenses Tool Manual │
You may configure the settings if you role in the Expenses tool is Accounting.
Expenses Tool Setting
STEP 1 │ Manage Categories
Upon tool activation, the default expense categories include travel, transportation, meals, communication and office expense, if your workplace doesn’t require any other types of expenditures, you are good to go! Else, simply create the required categories for use.
For detailed information and tutorials on how to apply, approve expenses, please refer to the Expense Tool Manual below!
Expenses Tool Manual
Reminder
- The default expense categories provided are commonly used across most workplaces, so at the moment, they cannot be edited or deleted.
- Remember to complete the Approver Assignment setting in the HR tool, as it is an essential part of the Approvals tool.
FAQ-ID:1126
The currency of a workplace is based on the region and time zone of the workplace upon creation, but if your workplace primarily uses another currency, the workplace admin could set another currency as the default currency for everyone.
Default Currency Change
Steps:
- Enter the workplace settings.
- Click Workplace Info.
- App │ Click the Edit iconon the upper-right-hand corner.
- Web │ Click the Edit icon next to the workplace name.
- There is a currency option you can adjust.
- Click Done / Save to finish.
Reminder
- The employees could still change the currency when they file expense requests depending on their needs.
FAQ-ID:1174
If you are a manager in WorkDo, chances are you are assigned to sign off on employee requests, but aside from approving and rejecting requests, if the situation calls for it, you can also escalate a request.
Request Sign-off
Managers or dotted-line managers are tasked with signing off various types of requests, and when employee send out their requests, managers are notified to take action. Below are the different actions you can take to sign off the requests.
-
Approve / Approval Withdraw
Select Approve and the requests will be approved and processed, and the next-level managers will not be notified.
If a request form is erroneously approved, the managers can use Withdraw to cancel the approval and all the changes will be reverted back to the original state.
-
Escalate
Select Escalate and the requests will follow the workplace workflow and send to the next-level managers for approvals. This option is only available in the Leave, Leave Pro, Overtime, Approvals and Expenses tools.
-
Reject
Select Reject to overrule requests and all the changes will be reverted back to the original state.
Note that, if an approved request form is being withdrawn by the employee, selecting Reject means that you reject this employee’s request to withdraw this request form.
Request Sign-off
Steps:
- Select a request form.
- From the Notification Center.
- Click Workflow form the Dashboard and use the filters to select a request or narrow down to a particular type of requests.
- Click the Do button > select a tool > click Approve> search for particular request form.
- Click on the request form.
- App │ Click the icon > select a desired action and the employee will be notified of your decision.
- Web │ Click on the apropriate action button and the employee will be notified of your decision.
- App │ Click the
Reminders
- By selecting Escalate, you can select to escalate the requests based on the organizational structure or designated-approver set by the HR tool.
- By selecting Escalate, a notification will be sent to the approver and the request sender.
- Use the HR Tool Manual to set managers, the organization structure and workflow now!
Relevant Questions
Learn the the HR tool setup now.
How to sign off approvals on behalf of other managers?
Can I batch-approve request forms?
Why do some leave requests are automatically escalated?
What do I do when there is an error on my leave application?
I forgot to clock-in or clock-out. What do I do?
Attendance appeal.
We Buy
FAQ-ID:1127
Whether you want to add new items to your deal or item prices and descriptions for your ongoing deals, here’s how to do it!
If there’s anything wrong with your ongoing deals, fret not! First, suspend the deal, then you can start editing it.
On ongoing deals must be suspended first before performing any edits to avoid discrepancies and disputes. So when the necessary edits are done, you can resume the deals for people to place their orders.
Only the deal creator is allowed to edit the deal. In other words, even the level admins or tool admins aren’t allowed to change it!
Edit a Deal
,
1 │ App
- Switch to the We Buy tool.
- Click the More tab and select Deals by Me.
- Select a deal to edit.
- Suspend the deal.
- Click the icon and change the deal status to Suspend.
- Click the
- Edit the deal.
- Click the icon again and the Update button is now available.
- Make the necessary updates.
- Click Save when finished.
- Click the
- Resume the Deal.
- Click the icon for the third time and select Resume this time to reopen the deal.
- Click the
2 │ Web
- Switch to the We Buy tool.
- Click Deals by Me.
- Select a deal to edit.
- Suspend the deal.
- Ue the checkbox to select a deal.
- Click the Suspend button.
- Provide a suspension reason and click Suspend.
- Edit the deal.
- Click the edit icon.
- Make necessary updates.
- Click Finish to end.
- Resume the deal.
- Select the suspended deal.
- Click the Resume button to reopen the deal.
Reminders
- Those who have placed an order will receive the deal suspension or reopen email notifications regarding their deals.
- The reason for the deal suspension is only available to the web version, and it is used to provide a clear reason for the suspension in the notification email.
FAQ-ID:1128
We Buy is the perfect group buy tool! It automatically calculates the quantity and subtotal of each item ordered by every member, then it generates a comprehensive purchase report that makes it easy to organize group purchases.
Here are some tips on We Buy that will make it easier to organize group purchases!
1 │ Public or Private?
There is an option to make the deal public or non-public. Non-public deals will not appear in the list of ongoing deals, and anyone who wishes to make a purchase will need to obtain the deal link first.
This option is only available in the web version. Deals created using the app version will always be public and can’t be changed.
2 │ Share Order Status?
The Share Order Status option will display all items’ quantity ordered to everyone.
This option is checked off by default for all deals, and you will need to use the web version to change it if you don’t want to share the order status information.
3 │ Allow Deal Duplication?
Wanna open up past popular deals?
If this option is checked off in the advanced settings, then other members can duplicate this deal and use it as a template to create a new deal. Convenient, right?
This option is checked off by default for all deals, and you will need to use the web version to change it.
4 │ Currency Type
You may change the currency for your deal if needed in the advanced settings. Please refer to this FAQ if you want to set a default currency.
- Option
- App
- Web
- Setting Change
│ Default is marked with │
Organize a Private Deal
Steps:
- Switch to the We Buy tool.
- Click Deals by Me.
- Click + Create.
- Deal information.
- Deal │ Topic, time, public or non-public, etc.
- Items │ Click + Add to add items, descriptions and set order limits, etc.
- Advanced Settings │ Group purchase description, category, minimum and maximum purchase quantity, view order status, deal duplication and currency, etc.
- Click Finish and your deal has been created. At this point, you can still make changes before you publish the deal.
- Publish
- Use the checkbox to select a deal.
- Click the Publish button and your deal is ready to take orders.
Reminders
- Note that some default settings will be different when creating deals using the app and web version. Please use the web version to change these settings.
- A deal is immediately published when created using the app.
- Click the + button on the bottom right-hand corner in the Ongoing Deals page.
- Or click the More tab, select Deals by Me then click the + button on the bottom right-hand corner.
- Please contact the tool admin for adding new categories if the existing ones don’t fit category of your deal.
Get to know WorkDo
FAQ-ID:1046
If you need a personal reminder, a place to keep your notes and references, or make up your own to-do list, the private space is precisely what you need!
Collaborate in workplaces and the private space is for your personal use.
1 │ What is WorkDo Private Space?
Every WorkDo member has a private space, and the private space is an independent level for personal use only. You are free to use the tools however you like to take notes and keep references. The private space is accessible only to you.
In other words, you could use the WorkDo Network with clients and people outside of your workplace, and internally use the workplaces, groups, and buddies for collaboration, then use the private space for personal reminders and such, so that all three facets are covered.
2 │ The Differences between Private Space, Workplace and Network.
Every WorkDo user must join at least one workplace or network. It is then the user can create groups and add buddies for collaboration. As such, the workplace and network are the highest levels, and all groups and buddies are attached to them. The private space is also its independent level, no one can join and access your private space, and no one except you can see its contents. It is truly your own private space!
- Workplace │ An independent level for internal team collaboration with basic and advanced tools available.
- Network │ An independent level for external communication and interactions with clients and customers with the basic tools available for use.
- Private Space │ An independent level with basic tools available for personal use only. It is inaccessible to other members and groups.
3 │ What can You Do in the Private Space?
- Note keeping
Keep important notes, references, make a personal to-do list, your call! Totally private and completely safe! - Use the available tools to document
The private space offers Notes, Tasks, Events, Albums, Files, and Links tools for you to use. You are free to use it however you want, and the integrated Dashboard will also remind you of things that are due to make sure that your day goes smoothly!
Feel free to use your private space now!
Reminder
- Your WorkDo account is yours for the keeping, even when you have left the workplace, everything in your Private Space and WorkDo Network remains intact, and you can still use the account to join new workplaces.
FAQ-ID:1043
The WorkDo Demo Inc. is a demo workplace created by WorkDo Team for all WorkDo users to play around and try out the functions. You can create notes, tasks, events or other items and apply for leave and expense within the demo workplace. You could leave the demo workplace anytime or you’ll automatically leave the demo workplace in 30 days.
Benefits
-
Quickly assess and experience WorkDo!
Feel free to try out all the available features in the demo workplace and see if this is the right collaboration tool for your team!
-
Get your questions answered!
You could use the feedback function or just simply ask your questions in the demo workplace, our admins and moderators will address them for you when they see them.
-
Get your first-hand news!
We’ll post updates information and upcoming event news in the demo domain, so you could get your first-hand information here!
Join WorkDo Demo Workplace
Steps:
- Tap on the workplace menu on the upper-left hand corner of the screen.
- Select + Join / Create Workplace.
- Tap on Join Demo Workplace and you are in!
Reminder
- All new users will be removed from the WorkDo Demo Inc. after 30 days.
FAQ-ID:1009
Don’t have a clue on where to start after registration? Well, why not have a look at our Resource Center?
The Resource Center offers a comprehensive look at all the features that WorkDo encompasses, including feature introduction, quick start guides, user manuals, and FAQs. So if there’s anything that you are not sure of, just have a gander at the Resource Center!
Plan:![]() All plans
All plans
Permission:![]() All users
All users
Interface:![]() App
App ![]() Web
Web
Quick Start Guides & Tutorials
- Enter the More Settings page.
- App │ Click the icon on the upper-right-hand corner of the main pages.
- Web │ Click the icon on the upper-right-hand corner.
- App │ Click the
- Click Resource Center.
- Click the More button to view relevant guides and manuals.
- View and download the documents as needed.
User Guides
STEP 01 │ Tool Box
- Enter the tool box.
- Tool box │ Enter the workplace, group or buddy Settings then click Tool Box and select the Advanced tab.
- Do button │ Enter the workplace, group or buddy level then click the Do button, click More and select the Advanced tab.
- Select a tool.
- Click User Guide to begin download.
STEP 02 │ Resource Center
- Enter the More Settings page.
- App │ Click the icon on the upper-right-hand corner of the main pages.
- Web │ Click the icon on the upper-right-hand corner.
- App │ Click the
- Click Resource Center.
- Click More on the User Guide Section.
- Download the guides as needed.
Reminder
- Click the Basic and Advanced tabs and you can download the quick start guides respectively.
FAQ-ID:1202
Aside from the Contact Us page on the official website, you could also use the built-in feedback function to send us your questions, comments, or report errors.
Follow the instructions below and take advantage of this feature and send us your constructive comments or suggestions for improvements and we just might make them happen! Together, we make WorkDo even better!
Feedback
Steps:
- Click More Settings from the workplace page.
- App │ Click the icon.
- Web │ Click the icon on the upper-right-hand corner.
- App │ Click the
- Select Feedback.
- Select the type of feedback you are reporting and describe in detail. If you are reporting an error, please be as specific as you can, if possible, send us your screenshots and we will do our best to resolve your issue.
- Suggestion – Send us your comments and suggestions for future improvements.
- Ask Question – Send us any questions you may have.
- Report Issus – Not working properly? Let us know!
- Click Submit to send the feedback.
Reminder
- WorkDo will obtain the users’ device model number and operating system information when users send feedback. And when permission is given to obtain user logs, WorkDo will use the logs to determine and debug possible issues.
- Your business email set in the HR tool is used as the default email when sending feedback. You can update the email address if needed.
Relevant Questions
How do I view past feedback and replies I received?
Contact us in WorkDo Network.
FAQ-ID:1203
You can use the feedback function to ask us questions, send in feedback or give us a word of encouragement!
All past feedback and questions are available in the feedback history in chronological order; a red dot next to the feedback indicates that you have received a reply from WorkDo Support. And a comment section is available if you’d like to provide more information or communicate with the support team.
View Feedback Progress
Steps:
- Click More Settings from the workplace page.
- App │ Click the icon.
- Web │ Click the icon on the upper-right-hand corner.
- App │ Click the
- Select Feedback.
- Click the History tab.
- View your past feedback and click the feedback to view its details and replies.
Reminder
- Every feedback ticket will have a status to indicate its progress.
Relevant Questions
How do I send feedback or report an error?
Contact us in WorkDo Network.
FAQ-ID:1008
WorkDo supports multi-device login, allowing users to collaborate across different devices seamlessly. As such, the interfaces on the web browser, app and laptop will be somewhat different to accommodate the devices. But worry not, our FAQ section will cover different interfaces and explain each function in detail.
This FAQ is focused on the web interface, it is the most feature-complete and comprehensive version, but when you are on the run or working remotely, we recommend the app interface for a more streamlined user experience.
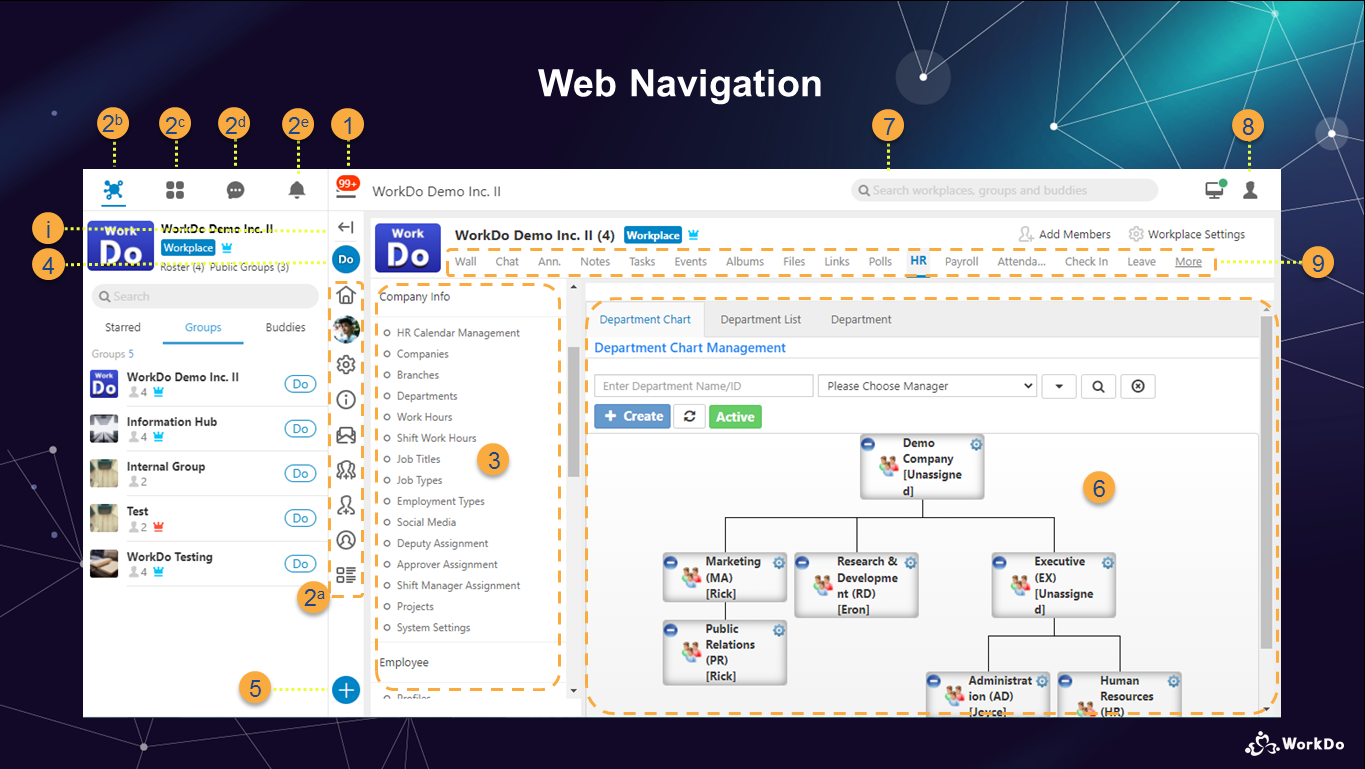
│ For the complete WorkDo web interface tutorial, please refer to the WorkDo Quick Start Settings │
Web Interface Navigation
1 │ Workplace List
Switch between workplaces, WorkDo Network, My Upcoming, My Shelf and Join/Create Workplaces.
2 │ Main Menu
- a. Workplace Settings, Workplace Info, Invite New Member, Create Group, Add Buddy, Roster, Public Groups.
- b. Displays all the groups you are in and buddies you befriended and starred buddies.
- c. Dashboard │ Check your to-do list here, in a way, it’s your personal secretary.
- d. Chatrooms │ Displays all the chatrooms you are in.
- e. Notification Center │ All notifications pertaining to your tasks.
3 │ Sub-Menu
The corresponding sub-menu of each tool.
4 │ Do Button
Switch to other tools you can use in the workplace or groups.
5 │ + Create
Create new tool posts with the + Create button.
6 │ Main Page
This is the main working area, the content is dependent on the tool used and action that is being performed.
7 │ Search Bar
Use the search bar to search for workplaces, groups and buddies, it also shows your past search history.
8 │ My Settings
Your account settings, App Settings, Resource Center, Feedback, FAQ are all here.
9 │ More Tools
When many tools are enabled in the workplace, some will be stored here.
i │ Expand/Callapse
Expand or callapse the Main Menu.
Reminder
- This is the web interface navigation of WorkDo, for the complete WorkDo web interface tutorial, please refer to the WorkDo Quick Start Settings!
Relevant Questions
WorkDo app general navigation.
What do different roles do in a workplace or group?
Workplace, Group, Buddy Settings.
Workplaces, groups, buddies? Use each level to your advantage.
Can I join multiple workplaces with my account?
The “Do” button or the “+” button, which one do I use?
How do I send feedback or report an error?
FAQ-ID:1044
As the only all-in-one team collaboration app on the market, WorkDo packs quite a punch! And we also understand that you gotta be able to switch tools on the fly to seamlessly collaborate with folks on different teams and projects.
This is no simple task, but WorkDo did it! With the help of the “Do’ button and the “+” button, users can swiftly access different tools and create different tasks.
Do │ Switch Tools
There is a Do button in each level (workplace, group and buddy), by clicking it, you can instantly access all the available tools you can use at that level. Simply put, it takes you directly to the tool box so you can select the right tool to use.
The Do button comprises all the basic tools and advanced tools, so just click the Do button to see what tools are available and how you can use the available tools to engage with your team.
+ │ Create
Normally, to initiate an action, you need to find the right group then select the tool for the appropriate action, but this can get frustrating when you need to create multiple tasks across different groups. The + button allows you to quickly create a task or begin an action then select the right group or level to post.
From now on, simply return to the main screen and use the + button to create items to save yourself valuable time!
Use the + Button to Create Items
Steps:
- Enter the main workplace page.
- Click the button.
- App │ Located on the bottom main functions.
- Web │ Located on the bottom left of the screen.
- Select the tool to initiate the action.
Reminders
- Invite Members, Create Group, Add Buddy and the QR code scanner are additional app-only features.
- Only the set number of tools you frequently use will appear when you click the + button. The idea is to streamline your workflow with the tools you frequently use.
Relevnt Questions
Who is allowed to search or view my posts?
How to create a tool post?
What’s the file upload size in WorkDo?
How to create a tool post?
Pin important posts to the wall.
WorkDo Web Navigation.
WorkDo App Navigation.
What does the “Do” button do?
What are tools?
How to activate or deactivate a tool?
How to activate tools?
FAQ-ID:1003
The Dashboard is great for showing your to-do list and all, but if you have multiple workplaces, it would be a hassle for you to enter a workplace to check the Dashboard and switch to another to do the same thing all over again.
Shouldn’t there be a quicker way for this? Well, guess what! This is exactly what the All Upcoming is for!
Because your Private Space, WorkDo Network and each workplace are independent, therefore, typically, you would need to switch to each workplace’s Dashboard to get a glimpse of your to-do list, but that’s not the case now that there’s All Upcoming you can use!
All Upcoming puts all your upcoming events and to-do lists from all domains into one place, so you can conveniently bring it up and immediately get the full picture of what your schedule looks like.
View All Upcoming
Steps:
- Click the icon on the upper-left-hand corner to bring up your workplace list.
- Scroll down to the bottom and select All Upcoming.
- Use the tab to switch between Today’s upcoming items and Next 7 days’.
- Select an item to view its detail.
Reminders
- All upcoming consists of a person’s due tasks and events from the collaboration tools, as such, each individual’s upcoming items are unique and different from other users.
- The web version has an Overdue tab which is absent in the app version.
FAQ-ID:1006
There are two possibilities that you are getting notifications from the WorkDo Network, and they are:
- Group, buddy notifications
When you have befriended customers, clients, partners or collaborators in the WorkDo Network, you will get notified when they would like to collaborate with you using the tools. - WorkDo Team notifications
You will get notifications periodically from our official account WorkDo Team on the latest news, updates, events or tutorials.
3 Pros from Following WorkDo Team:
-
Tutorial Sessions
We offer tips and tricks, even detailed tutorials on how to utilize and adopt the tools into your digital workplace, so if the topics are of interest to you, be sure to hit that notification!
-
Get the Latest News
We will also send notifications to inform you the latest development and updates of WorkDo, so you can quickly take advantage of them!
-
Events and Special Offers
We will announce events and special offers through the notifications as well. Stay tuned! So you don’t miss out on any incredible discounts and savings.
Reminder
- WorkDo Team is the official account of WorkDo in the WorkDo Network that we use to send the latest news and information to all our users. Stay Tuned. So you don’t miss out on anything!