Top 10 Qs You'd want to know
FAQ-ID:1019
Not sure what to do after registration? Take it easy, now we’ll show how to get your workplace up and running in 5 simple steps!
With the correct settings and user-defined rules, a virtual workplace in WorkDo can perform real-life routine practices and operations of your workplace. Here’s how!
Start WorkDo in 5 Steps
STEP 1 │ Create a Workplace
The first thing you should do after registration is to create a virtual workplace, then you can follow the next step and bring your teammates and collaborate on board.
View file:WorkDo Quick Start Settings
STEP 2 │ Invite Teammates to Your Workplace
In this step you could either ask your teammates to join your workplace or have the workplace admin send join invites.
- Trial run:We recommend you invite at least 1 to 3 people assigned with different roles into the workplace to help try out all the tools and features in the trial run.
- Adoption:Invite the rest of the your team into the workplace and deligate their roles accordingly by repearting Step 3 and 4.
How to invite people to a workplace?
Can I join the company workplace on my own?
View file:WorkDo Quick Start Settings
STEP 3 │ Set Workplace Admins
You are assigned as the workplace owner by default upon creating the workplace. The ownership can be transferred if need be, you should also assign other members, typically HR and/or IT staff, as admins to help manage the workplace and various settings.
How to add admins to workplaces or groups?
View file:WorkDo Quick Start Settings
STEP 4 │ Set Tool Roles
Wanna enable payroll management, automated leave system, overtime calculation or Wi-Fi / GPS clock in / out? Whatever you need, they are in the tool box!
Just as a company has different people and managers to access different data and files, the tool roles in WorkDo ensure that members would use the tools and access the data with their permission for information compartmentalization.
How to activate / deactivate a tool?
Why do I have limited tool access?
View file:WorkDo Quick Start Settings
STEP 5 │ Customize Tool Settings
Taking into consideration that each workplace operates differently, the tools in WorkDo are just as flexible to cater to workplaces of various industries and team cultures. In this step, you will learn how to customize the tool settings that can best represent how your workplace truly operates.
View file:WorkDo Quick Start Advanced Tools
 Reminders
- Although listed as admins only, all users are able to create workplaces, i.e. Step 1, however, from Step 2 forward, are only the admins are allowed.
- By now, your workplace should be up and running, but if you need more detailed explanation, please use the guides below.
Download Quick Start Settings (Step 1 to 4) Download User Guides (Step 5)
Relevant Questions
What do different roles do in a workplace/group?
How do I sign up for WorkDo?
How to create a workplace?
Can I join the company workplace on my own?
How to invite people to a workplace?
How to add admins to workplace or groups?
What are tools?
How to activate / deactivate a tool?
Why do I have limited tool access?
What’s the difference between “Leave” and “Leave Pro”?
FAQ-ID:1038
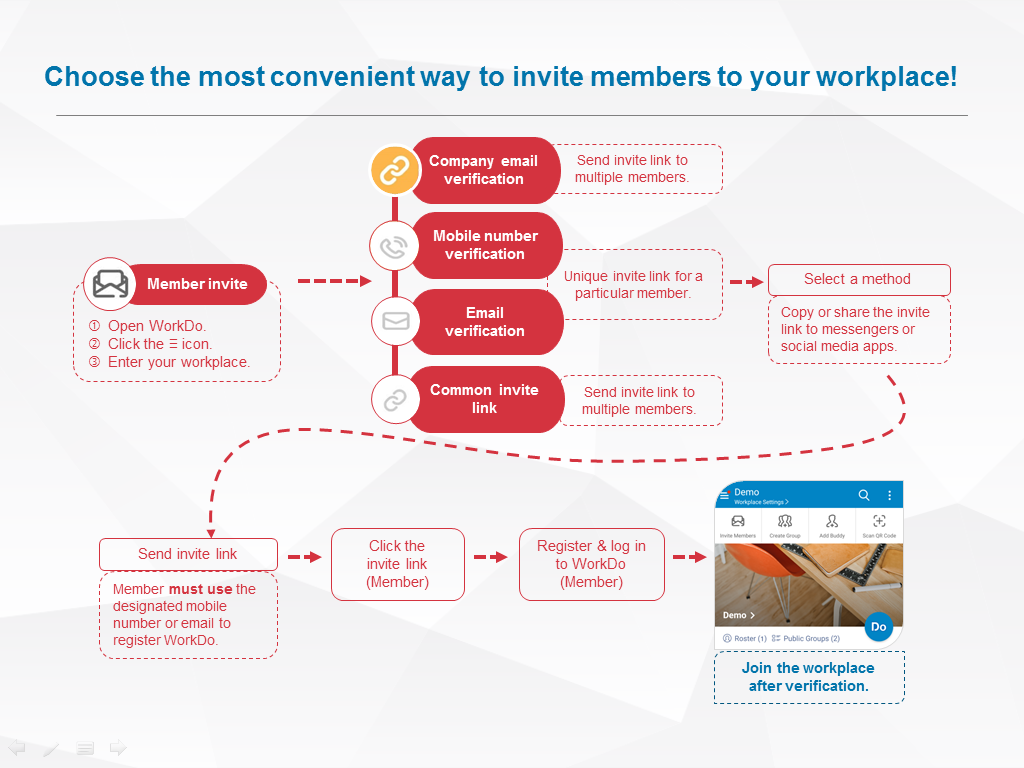
There are a number of ways team members could join a workplace and we’ll explain more here.
You could invite team members to the workplace if you are a workplace admin or the Workplace Privacy setting is set to everyone is allowed to invite other members to the workplace.
Invite New Members to a Workplace
Steps:
- On the workplace page.
- Click the Invite Members button on the upper-left corner of the screen.
- Select verification method.
- Verify with company email address.
- Verify by mobile number.
- Verify by email address.
- Verify via invite link, invite Network buddies or member search.
- Send invite link.
- App │ Send the invite link via Facebook, LINE, Whatsapp, WeChat, or copy and paste invite link to external apps.
- Web │ Copy and paste an uniquely generated invite link to other external software.
Reminder
In Step 3, depending on the verification method selected, WorkDo will generate unique invite links for the unregistered users, this in term, will affect whether the users have to be approved by the workplace admins upon joining the workplaces.
Next, we’ll go through the 3 primary ways for members to join workplaces.
- Self-join a Workplace
Download and register WorkDo and the user will be guided to the Join/Create Workplace screen. Click Join Workplace and fill in the personal company domain email address to join the workplace.
- Invite Members to a Workplace
WorkDo will generate invite links based on the verification method selected and the invitees have to use the specified email address or mobile number to register before joining the workplace.- Verify with Company Email Address:Send The invite link can be sent to all the users who are using the same company email domain and will automatically join the workplace upon signing on.
- Verify by mobile number:Target invite users with specified mobile numbers who don’t use company email addresses to the workplace.
- Verify by Email Address:Target invite users with specified mobile numbers who don’t use company email addresses to the workplace.
- Invite Link, Network Buddy or Search:This method is suitable for companies that don’t have a company email domain. The invite link generated can be sent to all users, however, the workplace admins have to manually approve each individual before joining the workplace.
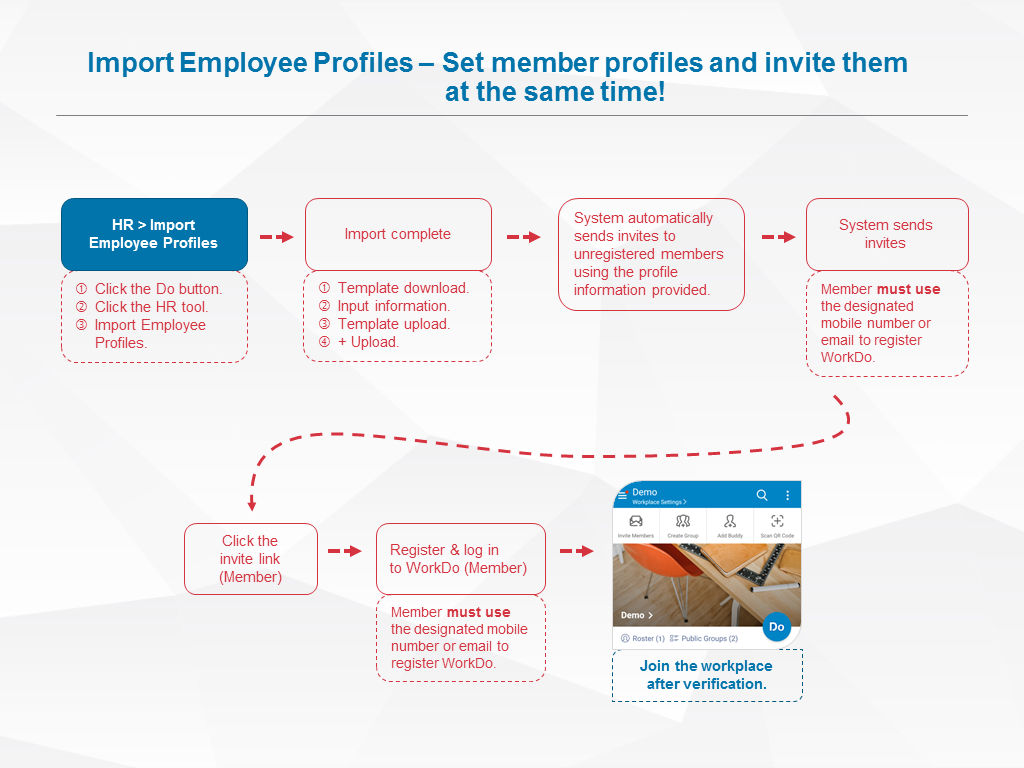
- Batch-import Employee Profiles
The workplace admins have to use the HR tool to batch-import employee profiles to WorkDo, in doing so, the system will send an invite link to everyone who has not signed on to WorkDo using either the email address or mobile number.
 Note!
Note!
- Please note that although the permission for member invite is marked for workplace members and admins, however, this is entirely dependent on the privacy settings of the workplace.
- When members are invited or join the workplace on their own, please use the HR tool to edit their employee profiles.
Relevant Questions
Set your workplace in 5 steps
Can I join the company workplace on my own?
What do I need to do for the new employees joining the workplace?
Get notifications when members join and leave.
Having problems importing employee profiles?
What to do when employees resign?
How do I sign up for WorkDo?
Can I interact with a member individually instead of with all members?
Can I bind the company email domain when I created the workplace using a free email domain?
Sign up/Log in
FAQ-ID:1019
Not sure what to do after registration? Take it easy, now we’ll show how to get your workplace up and running in 5 simple steps!
With the correct settings and user-defined rules, a virtual workplace in WorkDo can perform real-life routine practices and operations of your workplace. Here’s how!
Start WorkDo in 5 Steps
STEP 1 │ Create a Workplace
The first thing you should do after registration is to create a virtual workplace, then you can follow the next step and bring your teammates and collaborate on board.
View file:WorkDo Quick Start Settings
STEP 2 │ Invite Teammates to Your Workplace
In this step you could either ask your teammates to join your workplace or have the workplace admin send join invites.
- Trial run:We recommend you invite at least 1 to 3 people assigned with different roles into the workplace to help try out all the tools and features in the trial run.
- Adoption:Invite the rest of the your team into the workplace and deligate their roles accordingly by repearting Step 3 and 4.
How to invite people to a workplace?
Can I join the company workplace on my own?
View file:WorkDo Quick Start Settings
STEP 3 │ Set Workplace Admins
You are assigned as the workplace owner by default upon creating the workplace. The ownership can be transferred if need be, you should also assign other members, typically HR and/or IT staff, as admins to help manage the workplace and various settings.
How to add admins to workplaces or groups?
View file:WorkDo Quick Start Settings
STEP 4 │ Set Tool Roles
Wanna enable payroll management, automated leave system, overtime calculation or Wi-Fi / GPS clock in / out? Whatever you need, they are in the tool box!
Just as a company has different people and managers to access different data and files, the tool roles in WorkDo ensure that members would use the tools and access the data with their permission for information compartmentalization.
How to activate / deactivate a tool?
Why do I have limited tool access?
View file:WorkDo Quick Start Settings
STEP 5 │ Customize Tool Settings
Taking into consideration that each workplace operates differently, the tools in WorkDo are just as flexible to cater to workplaces of various industries and team cultures. In this step, you will learn how to customize the tool settings that can best represent how your workplace truly operates.
View file:WorkDo Quick Start Advanced Tools
Reminders
- Although listed as admins only, all users are able to create workplaces, i.e. Step 1, however, from Step 2 forward, are only the admins are allowed.
- By now, your workplace should be up and running, but if you need more detailed explanation, please use the guides below.
Download Quick Start Settings (Step 1 to 4) Download User Guides (Step 5)
Relevant Questions
What do different roles do in a workplace/group?
How do I sign up for WorkDo?
How to create a workplace?
Can I join the company workplace on my own?
How to invite people to a workplace?
How to add admins to workplace or groups?
What are tools?
How to activate / deactivate a tool?
Why do I have limited tool access?
What’s the difference between “Leave” and “Leave Pro”?
Main Settings
FAQ-ID:1064
Just like a real company, everybody all plays a different role to work and grow together, this concept is the same in WorkDo.
There are 3 key roles in a WorkDo workplace, and they are member, admin and owner, each with a different purpose and role to play to facilitate the running of the company.
Furthermore, with each tool, there are team members that are responsible for maintaining the settings and records other than using it, so each tool also has a tool role that limits team members’ permissions on what they can do with each tool.(Know more!)
Now let have a closer look at each of the 3 roles in WorkDo!
1 │ Member
- Employees │
- Join, leave workplaces, groups: Join workplaces, create groups, join public groups, leave groups, add buddies, join WorkDo network and use private space.
- Feature shortcuts: View all posts on the wall, personal dashboard.
- Use collaboration tools: Post announcements, create events, track task progresses, share files, vote, chat and use group calls.
- Activate advanced tools: Eform application, track eform progresses.
- Account and notification settings: Change notification setting, use federated login, subscribe to an external calendar, set user DO-ID and change user password.
- Managers │ When members are assigned as managers with the HR tool, they hold the responsibility of signing off on various approvals and eforms and are allowed to view certain team and workplace data.
2 │ Admin
An admin is responsible for managing the settings of the workplace, group or between buddies. Each level could have more than one admins and they can do everything a member can on top of…
- Deleting or editing posts.
- Deleting comments.
- Managing members, including inviting, approving, removing members from workplaces and groups, whether to allow members to invite other people , block members, as well as employee termination settings.
- Level Management
- Workplace Settings – Maintain company information, admin management, set wall post permission, set special notifications, manage employee profile information, group creation permission, payment information(send payment, set billing information and credit card information), set company email domain, insert APIs (available in the web version), etc. It is recommended to have your HR staff and/or IT staff to take on the admin roles.
- Group Settings – Add admins set group privacy, invite members, remove members and set notifications.
- Buddy Settings – Set buddy information (for personal reference only).
- Activate or deactivate advanced tools and set tool roles
3 │ Owner
The owner of the workplace or group, the owner has the higheat authorization. The owner can also…
Who is the owner or admin?
- On the workplace page.
- Select a workplace, group or buddy level.
- Workplace – Click the workplace settings (Click the gear icon for the web version).
- Group – Click the Groups tab on the workplace page and hold the desired group and swipe right, click the settings (Click the gear icon for the web version).
- Buddy – Click the Buddies tab on the workplace page and hold the desired buddy and swipe right, click the settings (Click the gear icon for the web version).
- Select the Manage Admin option. The red crown is assigned to the owner, the blue crown is assigned the admin.
Reminders
- The owner and admin have almost the same authority. In a way of speaking, they are both “admins”, so unless otherwise specified, in all the WorkDo documents either one can be referred to as an admin.
- Since the buddy level only has two members, both parties are admins.
Relevant Questions
WorkDo web general navigation.
WorkDo app general navigation.
How to add admins to the workplaces or groups I own?
How to transfer my workplace/group ownership to others?
How to activate / deactivate a tool?
What is a tool box?
What are the differences between tool admins and workplace admins?
FAQ-ID:1065
The admins is present in workplaces, groups or between buddies, the function of their role is to maintain the settings and permissions of each level.
The “Manage Admin” option is an important setting when onboarding WorkDo, please select the persons responsible for maintaining the workplace settings.
Plan:![]() All palns
All palns
Permission:![]() Member
Member ![]() Admin
Admin ![]() Owner
Owner
Interface:![]() App
App ![]() Web
Web
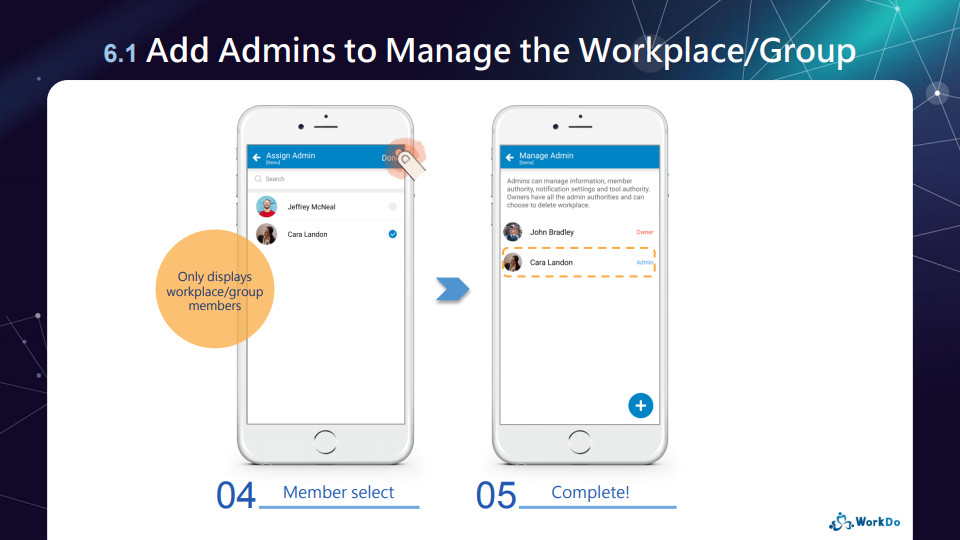
STEPS │ Assign Workplace / Group Admins
- Select workplace / group / buddy level.
- Workplace │ Tap on the workplace settings (Tap on the gear icon for the Web version).
- Group │ From the workplace page tap on the groups tab, then swipe righ and click on the gear icon.
- Select Manage Admin.
- Add admin.
- App │ Click the + icon.
- Web │ Click Add Admin.
- Select the applicable members.
- Click Done.
STEPS │ Remove Admin
- Select workplace / group / buddy level.
- Workplace │ Tap on the workplace settings (Tap on the gear icon for the Web version).
- Group │ From the workplace page tap on the groups tab, then swipe righ and click on the gear icon.
- Select Manage Admin.
- Remove Admin
- App │ Swipe left on the admin tap on the Remove button then confirm the action.
- Web │ Click on Remove next to the admin then confirm the action.
Reminder
- The buddy level consists of two people, but both are admins by default.
FAQ-ID:1066
You can transfer the ownership to others if you are the workplace or group owner.
(Topic of interest – How to add admins to the workplaces or groups I own?)
Transfer ownership to another admin
Instructions:
- Select the workplace or group for change of ownership.
- Workplace │ Tap on the workplace settings (Tap on the gear icon for the Web version).
- Group │ From the workplace page tap on the groups tab, then swipe right and click on the gear icon.
- Click Advanced.
- Click on Change Owner and select a member from the list.
- App │ Click Change and confirm the action.
- Web │ Click Change and confirm the action.
Reminder
- The ownership concept is not applicable on the buddy level.
- The workplace owner must transfer the ownership first before leaving the workplace.
FAQ-ID:1063
There is a setting for admins which controls whether to go by members’ real names or the nicknames they created. By using their real names could avoids members having difficulty telling who’s who.
HR Names or Workplace Names
Steps:
- On the workplace page.
- Click Workplace Settings then Workplace Privacy.
- Scroll down to find the Member Names Display to choose whether to go by their HR names or the names they set for themselves.
Reminder
- When the HR Names are selected, members can only go to the buddy settings view their nicknames.
FAQ-ID:1062
Do you know who are allowed to invite other people to join your workplace or groups?
By default, only the workplace admins and group admins are able to invite people. However, this setting can be changed to allow any member to invite others into the workplace or groups.
And here’s how!
Who can Invite Members
Steps:
- Enter the workplace or group.
- Click Workplace Settings / Group Settings, followed by Workplace Privacy / Group Privacy.
- Who can Invite Members option.
- Owner and Admin
- Everyone
Setting Recommendation
- Inviting new members into the workplace could involve other settings such as their HR profiles, therefore, it is recommended that only the Workplace Admins are allowed to invite new members. Whereas, group collaboration may often bring in other members, so it is recommended that everyone is allowed to invite new members into the groups.
Relevant Questions
Can I set only admins are allowed to post at the workplace level?
Can I control members from creating public or private groups?
Allow members to use their nickname?
What do different roles do in a workplace or group?
How to add admins to workplaces or groups?
How do I join other public groups in the workplace?
FAQ-ID:1068
You may keep the workplace level for admins only. By doing so, admins could use the workplace level to post company-wide announcements and important policies.
This setting only applies to the workplace level, team members can still chat, collaborate and use the tools at the group level and buddy level.
Set Admins-Only Workplace Level
Steps:
- Click the Workplace Settings.
- Select Workplace Privacy.
- Select an option in Who Can Post.
- Owner and Admin.
- Everyone.
Reminder
- There are three levels in WorkDo design for different types of collaboration. If you intend to use the workplace level for company announcements, then the team members can still freely use the group level and buddy level to collaborate.
Relevant Questions
Allow members to use their nickname?
Can I control members from creating public or private groups?
Can I use the workplace-level chatroom for admins only?
Who is allowed to invite new members into workplaces or groups?
What do different roles do in a workplace or group?
How to add admins to workplaces or groups?
Can I bind the company email domain when I created the workplace using a free email domain?
Share a post or forward a post?
FAQ-ID:1000
If you are a workplace admin, you may edit the company information including company name, workplace image, description, operating hours, address, contact number, website, even the welcome message, etc.
You may use this function to keep the your workplace information up to date.
Edit Workplace Information
Steps:
- Click the Workplace Settings.
- Scroll down to Workplace Profile.
- App │ Select Workplace Info then click the Edit button.
- Web │ Click the Edit button next to the company name.
- Fill out or update all the necessary information.
- Click Done / Save to finish.
Reminders
- When the workplace name or image is changed, a message will be sent to the chatrooms notifying members of the change made instead of a notification, since this does not affect members’ daily workflow.
- Workplace Address in the Workplace info does not have to be the same address listed in the billing information.
Relevant Questions
Who is allowed to invite new members into workplaces or groups?
Can I use the workplace level for admins only?
Should I allow members to use their nicknames?
Can I control members from creating public or private groups?
Billing information update.
Credit card information update.
What do different roles do in a workplace or group?
How to add admins to workplaces or groups?
FAQ-ID:1052
No problem, you can bind the company email domain even if you originally used a free email domain to create a workplace in WorkDo!
Whether you use Google’s Gmail, Apple’s iCould Mail, Yahoo! Mail, AOL Mail or whatever free email service to create a workplace, whenever you decide to bring your team on board, you can bind the company email domain to quick have everyone joined to your workplace.
If you are a workplace admin, you can follow to instrunctions below to bind your company email domain.
Company Email Domain Binding
Steps:
- Enter the Workplace Settings.
- Scroll down and click Workplace Binding.
- Click Add Binding email.
- Input your company email address.
- Click Submit and verify the correctness of the email address.
- Press Cancel to go back.
- Press Confirm to proceed email verification process.
- Check your company email inbox for the verification code and input it back to the screen.
- Click Submit to complete the company email domain binding process.
FAQ-ID:1030
If you want to keep the workplace-level chatroom free from employee chatter and use it only for company-wide announcements, there is an option for that!
When the setting is on, only workplace admins are allowed to use the workplace-level chatroom. But please note that, although employees are not allowed to send texts, photos, videos, locations, and stickers in the workplace-level chatroom, they are still free to create group chatrooms to communicate and collaborate as normal.
Set Admins-Only Workplace-Level Chatroom
Steps:
- Enter the Workplace Settings.
- Click Workplace Privacy.
- Set the Who Can Chat option.
- Owner and Admin │ Only the workplace owner and admins are allowed to send chat messages in the workplace-level chatroom.
- Everyone │ All members are allowed to send chat messages in the workplace-level chatroom.
Reminder
- WorkDo has designed three levels (workplace, group & buddy) for different kinds of workplace communication and collaboration. It is intentional that settings that control communication and collaboration are separated. As such, Who Can Chat controls who is allowed to chat in the workplace-level chatroom, and Who Can Post controls who is allowed to create tool posts at the workplace level.
Relevant Questions
Sending messages.
Can I use the workplace level for admins only?
Allow members to use their nicknames?
Can I control members from creating public or private groups?
Who is allowed to invite new members into workplaces or groups?
What do different roles do in a workplace or group?
How to add admins to workplaces or groups?
FAQ-ID:1073
Can WorkDo connect to our existing software?
Well, as an all-in-one team communication and collaboration platform, WorkDo is designed to replace and eliminate the use of unintegrated software and platforms to improve team productivity. But still, we do offer the integration of software robots.
Here’s a look at some of the frequently asked questions on system integration.
1 │ Time clock software, fingerprint access control systems
WorkDo’s Attendance tool allows employees to clock in/out using designated Wi-fi hotspots and GPS via their mobile devices. And a comprehensive attendance report and logs are available for perusal. The Attendance tool is sure to replace any time clock system you are using (Attendance tool features).
2 │ Google and Outlook calendars
The notifications from the 8 basic tools in WorkDo will remind you of any upcoming work-related events, meetings and due tasks. But you can also subscribe to an external calendar and keep using your favorite calendar.
3 │ Other HRS, attendance and payroll management system
Each system’s logics and settings are different, so WorkDo does not offer integration to these systems. However, WorkDo does have corresponding tools that can get the job done just as well, if not better! We recommend that you keep using your existing systems and WorkDo in unison, then gradually shift to WorkDo when you are certain that WorkDo can completely replace them.
Here’s a look at the kind of reports and data import functions WorkDo offers!
- Import │ The HR tool and the Leave Pro tool both allow batch importing employee profiles and leaves. This is the quickest way to bring everyone into the workplace and begin working and collaborating.
- Report │ Attendance, Check In, Leave, Leave Pro, Overtime, Expenses, Payroll and We Buy tools all offer their corresponding Excel, CVS and PDF reports for download.
- Payroll Calculation │ You may use Payroll to input the variables and equations into the system to calculate employees’ pays. For companies with complex pay calculation methods, you take advantage of the system to help you calculate partially and then take over manually.
4 │ Robot APIs
WorkDo offers robot APIs that you can program and use to notify service statuses of WorkDo via chats (/chat) or notes (/note). If your workplace has engineers who can make use of the APIs, please set them as workplace admins to access the robot APIs.
Robot APIs
Steps:
- Enter Workplace Settings or Group Settings.
- Click Robot.
- Follow the instructions to complete the settings.
:
Set Up Notes
- Robot APIs are a workplace level setting, however, once set, it can be assigned to any groups.
- The robot still complies with the Who Can Chat or Post options in the Privacy section of the workplace or group, if it is set to only owner and admins are allowed to chat or post, the robot must be assigned as an admin.
- Use the feedback function to contact us for further assistance if required.
Relevant Questions
How do I subscribe to an external calendar?
Can I set only admins are allowed to post at the workplace level?
Can I use the workplace-level chatroom for admins only?
Can I control members from creating public or private groups?
Allow members to use their nicknames?
What do different roles do in a workplace or group?
How to add admins to workplaces or groups?
FAQ-ID:1131
Shouldn’t you give your new team members a warm welcome when they are on board?
And it’s important to know when team members leave so you can allocate your resources and prioritize team tasks.
Did you know there is a setting that sends notifications when members join and leave your team? Well, now is a good time to take advantage of it!
Set Workplace / Group Notifications
Steps:
- Enter the Workplace Settings.
- Scroll down to the Manage Workplace / Group section and select Workplace / Group Notifications.
- Turn on the notification settings.
- Alert When Members Join/Leave │ Turn this on to alert the owner and admins when members join or leave.
- Show Chat Message When Members Leave │
Turn this on to show a chat message in the chatroom when members leave.
Reminders
- Member join and leave messages do not count towards the badge count.
- The member join /leave notifications is shown in the personal notification certer of the owner and admins.
Relevant Questions
What is Chat Alert? And how do I change its settings?
How do I change the notification settings?
Notification delay.
Who is allowed to invite new members into workplaces or groups?
Can I set only admins are allowed to post at the workplace level?
Can I control members from creating public or private groups?
What do different roles do in a workplace or group?
Payment
FAQ-ID:1069
The workplace storage is for your team to upload and share files, photos, videos among the team, and the storage space provided should be more than sufficient for every workplace.
But in case you would like to know how much storage space is used for your workplace, please follow the steps below to ascertain your workplace’s storage space.
View Workplace Storage
Steps:
- Enter the Workplace Settings.
- Scroll down and select Workplace Statistics.
- Verify the workplace statistics.
- Workplace Statistics │ The numbers of public and private groups created.
- Tool Statistics │ The numbers of tool posts created.
- Workflow Statistics │ The numbers of leave, expense, approval post clock and appeal requests applied.
- Attachment Statistics │ The numbers of file attachments.
- Usage Statistics │ The total storage space used.
Reminders
- Please note that the statistics are not presented in real-time.
- Check out some of the tips on how to save workplace storage space.
- If you’d like to purchase additional storage space, please contact us via feedback or here.
Workplace
FAQ-ID:1035
A workplace is a place for you, your company and all your coworkers to communicate and collaborate together. The workplace is designed to be secure and safe for your company with multiple levels of privacy settings. You can also create groups within the company for different departments, projects, or topics.
Within a workplace, you can chat, create tasks, view events, upload files and even make a poll with your colleagues. Also, you can use the HR, Leave, Expense, Conf. Rm. and CRM tools to better manage your company.
The 7 benefits of having a workplace in WorkDo
-
All-in-One
WorkDo is a true all-in-one collaboration platform that integrates all to tools you need to communicate, collaborate and operate. WorkDo effectively reduces your company’s costs of having to maintain multiple servers and IT equipment on your own.
-
Secure Access Control
WorkDo only allows your colleagues to join your secure workplace. There are various ways that you could use to invite the right people to join your workplace, leave it to us to block out the unwanted individuals.
-
The Perfect Virtual Workplace
WorkDo is excellent if your workplace requires multiple discussion groups for different tasks, teams, purposes, etc. The abundant amount of tools guarantee that there’s always the right tool for the job!
-
Flexible Permissions
Each employee could have different permissions in WorkDo, and different tool permissions allow different employees to use the tools in different ways. Changing permissions is as easy as a few clicks by the workplace admins.
-
Report Export
WorkDo keeps track of all the data and records for you, may it be attendance, vacations, approvals and employee information. Download the report you need and customize it the way you want it, it’s all here!
-
Swiftly Remove Former Employees
When an employee part ways with the company, that person could no longer access the workplace data, and everything will be kept for reference, including files and chats.
-
Reduce IT Costs
No servers, no IT staff, no maintenance fees. We’ll handle the security, upgrade and maintenance, so you can focus reaching your goals, together!
Relevant Questions
How to create a workplace?
What should I do on the Start WorkDo page?
How to invite people to a workplace?
How do I edit the company information?
Can I join multiple workplaces with my account?
What are the two default groups for? How Do I use them?
Can I have sub-groups in my workplace? How to create a new group?
What do different roles do in a workplace/group?
What do different roles do in a workplace/group?
WorkDo Network notifications.
Pricing Plans
FAQ-ID:1036
Creating a workplace in WorkDo is easy! All it requires is a valid email address for account verification purposes.
When creating a workplace, you are given the choice of either using a company email address or a free email address. The differences are explained below.
Plan:![]() All plans
All plans
Permission:![]() All users
All users
Interface:![]() App
App ![]() Web
Web
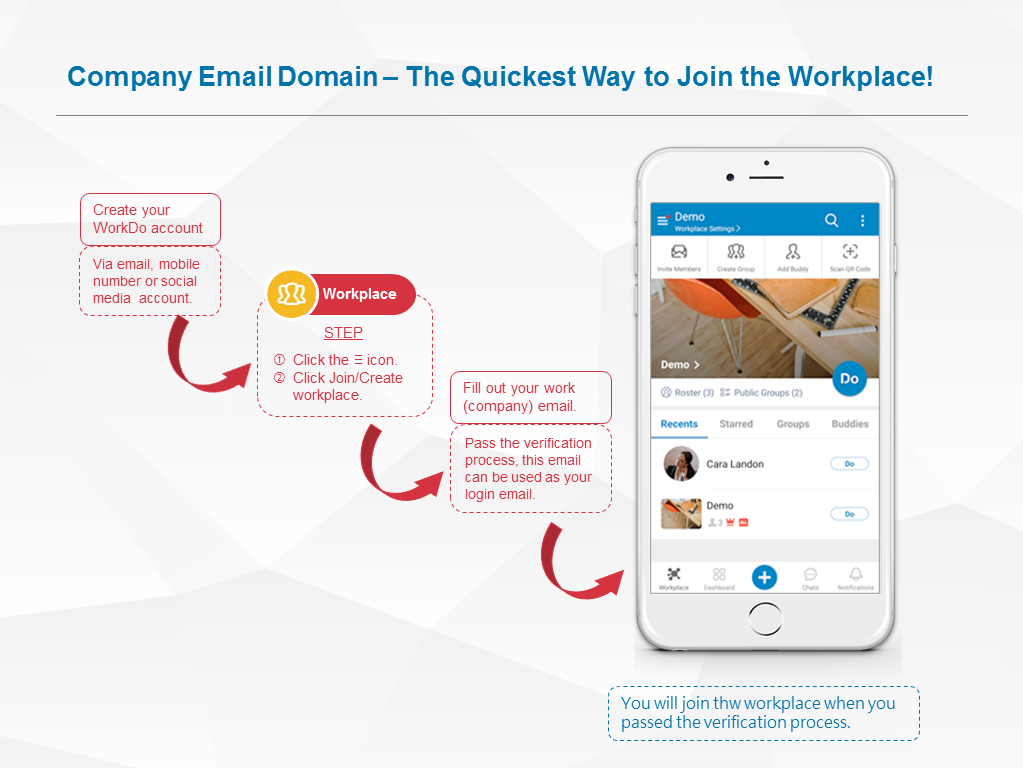
Company Email Address
Applicable: For teams that use company email addresses.
Pro: Employees that have the same company email addresses will be automatically invited to join the workplace instead of manually inviting, saving precious time.
Features
- A single company email domain can only be used to create one workplace and only members with the same company email domain will auto-join the workplace.
- Any company email address is unique and for one individual. Avoid mistaken identity!
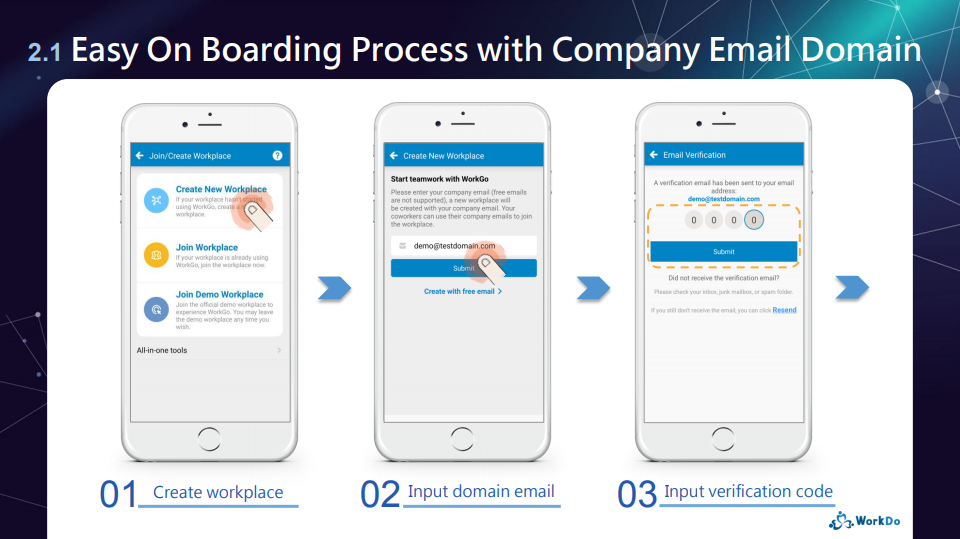
- By following the steps in creating a workplace, the first person to use the company email address and complete the account verification will be assigned as the owner of the workplace (The ownership can be transferred to other members later on).
- The rest of the team members can auto-join the workplace using the company email.
Steps
- On the Join/Create Workplace page.
- Complete the workplace registration.
- Click the Menu button (
 ) and select Join/Create Workplace.
- Click Create New Workplace.
- Enter your company email address.
- Click Submit.
- Verification process
- If you used the company email for your personal account registration, please go to step 6.
- If you used an email address that is different from your company email address, please retrieve the verification code from your company email inbox and input it on the screen.
- Enter the company information On the workplace home screen to complete.
Free Email Address
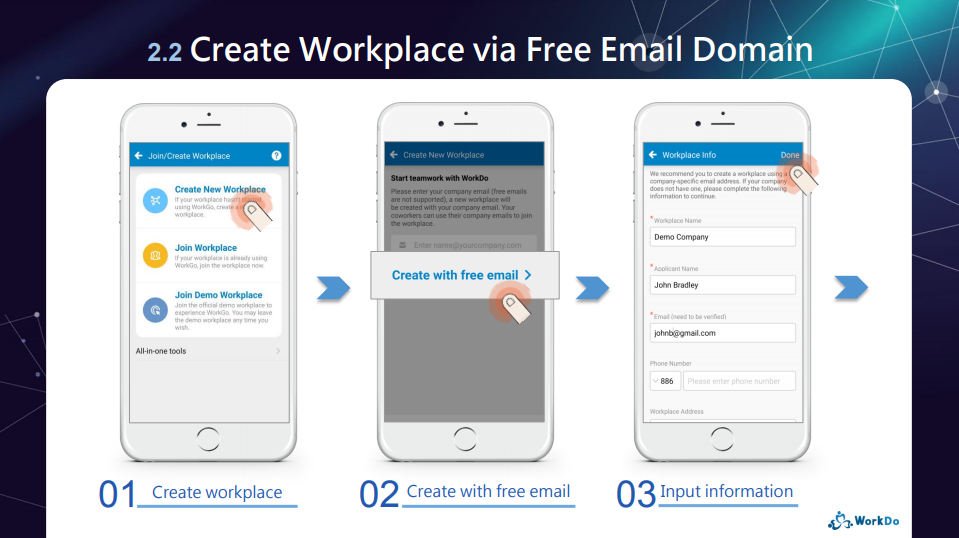
Applicable: For teams that use free email addresses(@gmail, @yahoo…etc.)
Pro: Everyone has to be manually invited and verified first before joinning the workplace.
Features
- Unique email address, no mistake of identity!
- By following the steps in creating a workplace,you will be assigned as the owner of the workplace (The ownership can be transferred to other members later on).
- Target invite members to join the workplace, verification process is no longer required.
Steps
- On the Join/Create Workplace page.
- Complete the workplace registration and you will be led to the workplace home screen.
- Click the Menu button ( ) and select Join/Create Workplace.
- Click Create New Workplace
- Click Create with free email
- Fill out the necessary information
- Click Done
- The workplace home screen will be shown indicating the registration completion.
Reminders
- A company email domain is recognized by the company name followed by the @ sign in the email address (ex. johndoe@company.com). Most company email domains are paid services, however, there are exceptions that even Google’s @gmail.com is used as a company email domain. So please check with your IT staff before registration.
- If your company is a multinational conglomerate or has branch offices, you could simply use the same account and create a new workplace and manage multiple workplaces with the same account.
- If a former employee created a workplace using the company email that is no longer needed, please ask them to delete the workplace or contact us for assistance.
Relevant Questions
What is a workplace?
What should I do on the Start WorkDo page?
How to invite people to a workplace?
How do I edit the company information?
What do different roles do in a workplace/group?
Can I join multiple workplaces with my account?
Workplaces, groups, buddies? Use each level to your advantage.
What are WorkDo’s pricing and plans?
Monthly or yearly payment plan? What’s WorkDo’s billing policy?
Can I bind the company email domain when I created the workplace using a free email domain?
Can I delete a workplace? Can deleted workplace be recovered?
FAQ-ID:1038
There are a number of ways team members could join a workplace and we’ll explain more here.
You could invite team members to the workplace if you are a workplace admin or the Workplace Privacy setting is set to everyone is allowed to invite other members to the workplace.
Invite New Members to a Workplace
Steps:
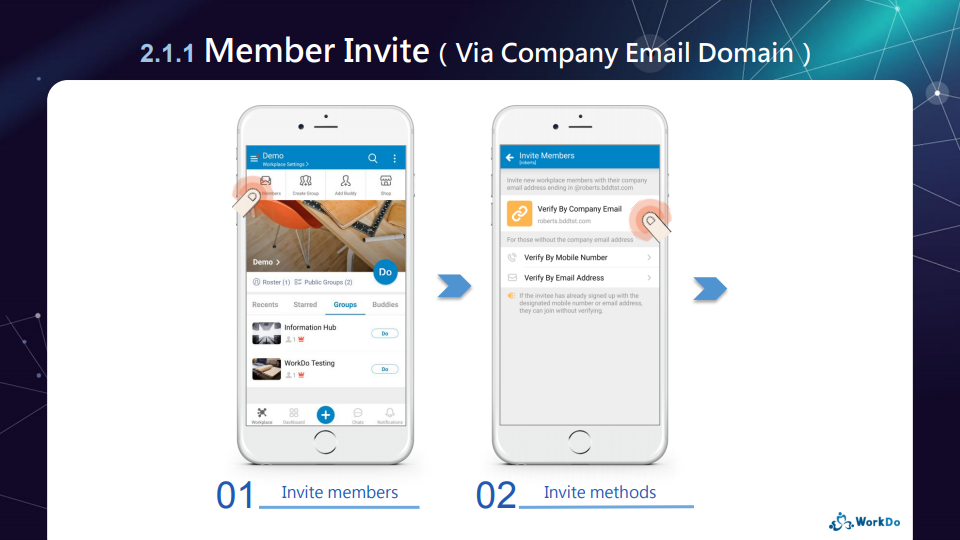
- On the workplace page.
- Click the Invite Members button on the upper-left corner of the screen.
- Select verification method.
- Verify with company email address.
- Verify by mobile number.
- Verify by email address.
- Verify via invite link, invite Network buddies or member search.
- Send invite link.
- App │ Send the invite link via Facebook, LINE, Whatsapp, WeChat, or copy and paste invite link to external apps.
- Web │ Copy and paste an uniquely generated invite link to other external software.
Reminder
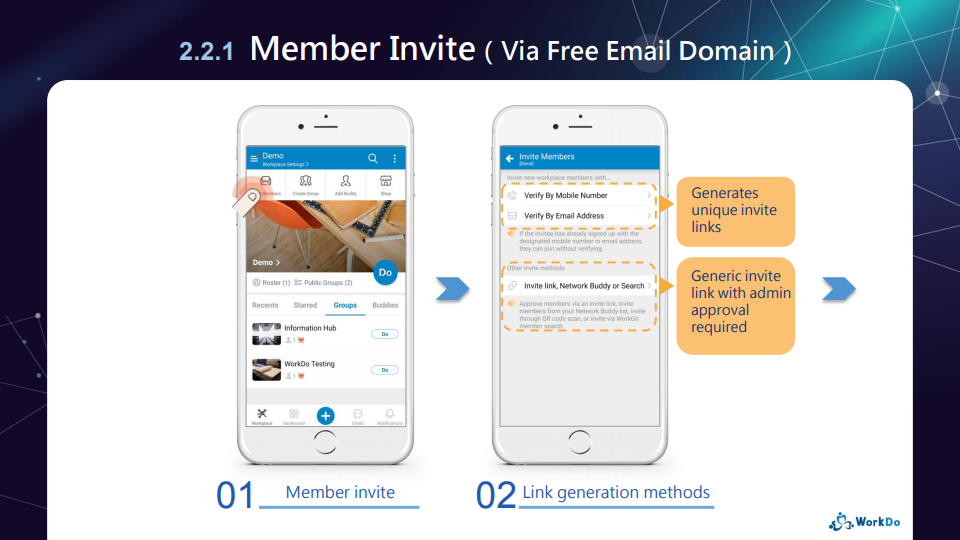
In Step 3, depending on the verification method selected, WorkDo will generate unique invite links for the unregistered users, this in term, will affect whether the users have to be approved by the workplace admins upon joining the workplaces.
Next, we’ll go through the 3 primary ways for members to join workplaces.
- Self-join a Workplace
Download and register WorkDo and the user will be guided to the Join/Create Workplace screen. Click Join Workplace and fill in the personal company domain email address to join the workplace.
- Invite Members to a Workplace
WorkDo will generate invite links based on the verification method selected and the invitees have to use the specified email address or mobile number to register before joining the workplace.- Verify with Company Email Address:Send The invite link can be sent to all the users who are using the same company email domain and will automatically join the workplace upon signing on.
- Verify by mobile number:Target invite users with specified mobile numbers who don’t use company email addresses to the workplace.
- Verify by Email Address:Target invite users with specified mobile numbers who don’t use company email addresses to the workplace.
- Invite Link, Network Buddy or Search:This method is suitable for companies that don’t have a company email domain. The invite link generated can be sent to all users, however, the workplace admins have to manually approve each individual before joining the workplace.
- Batch-import Employee Profiles
The workplace admins have to use the HR tool to batch-import employee profiles to WorkDo, in doing so, the system will send an invite link to everyone who has not signed on to WorkDo using either the email address or mobile number.
Note!
- Please note that although the permission for member invite is marked for workplace members and admins, however, this is entirely dependent on the privacy settings of the workplace.
- When members are invited or join the workplace on their own, please use the HR tool to edit their employee profiles.
Relevant Questions
Set your workplace in 5 steps
Can I join the company workplace on my own?
What do I need to do for the new employees joining the workplace?
Get notifications when members join and leave.
Having problems importing employee profiles?
What to do when employees resign?
How do I sign up for WorkDo?
Can I interact with a member individually instead of with all members?
Can I bind the company email domain when I created the workplace using a free email domain?
FAQ-ID:1064
Just like a real company, everybody all plays a different role to work and grow together, this concept is the same in WorkDo.
There are 3 key roles in a WorkDo workplace, and they are member, admin and owner, each with a different purpose and role to play to facilitate the running of the company.
Furthermore, with each tool, there are team members that are responsible for maintaining the settings and records other than using it, so each tool also has a tool role that limits team members’ permissions on what they can do with each tool.(Know more!)
Now let have a closer look at each of the 3 roles in WorkDo!
1 │ Member
- Employees │
- Join, leave workplaces, groups: Join workplaces, create groups, join public groups, leave groups, add buddies, join WorkDo network and use private space.
- Feature shortcuts: View all posts on the wall, personal dashboard.
- Use collaboration tools: Post announcements, create events, track task progresses, share files, vote, chat and use group calls.
- Activate advanced tools: Eform application, track eform progresses.
- Account and notification settings: Change notification setting, use federated login, subscribe to an external calendar, set user DO-ID and change user password.
- Managers │ When members are assigned as managers with the HR tool, they hold the responsibility of signing off on various approvals and eforms and are allowed to view certain team and workplace data.
2 │ Admin
An admin is responsible for managing the settings of the workplace, group or between buddies. Each level could have more than one admins and they can do everything a member can on top of…
- Deleting or editing posts.
- Deleting comments.
- Managing members, including inviting, approving, removing members from workplaces and groups, whether to allow members to invite other people , block members, as well as employee termination settings.
- Level Management
- Workplace Settings – Maintain company information, admin management, set wall post permission, set special notifications, manage employee profile information, group creation permission, payment information(send payment, set billing information and credit card information), set company email domain, insert APIs (available in the web version), etc. It is recommended to have your HR staff and/or IT staff to take on the admin roles.
- Group Settings – Add admins set group privacy, invite members, remove members and set notifications.
- Buddy Settings – Set buddy information (for personal reference only).
- Activate or deactivate advanced tools and set tool roles
3 │ Owner
The owner of the workplace or group, the owner has the higheat authorization. The owner can also…
Who is the owner or admin?
- On the workplace page.
- Select a workplace, group or buddy level.
- Workplace – Click the workplace settings (Click the gear icon for the web version).
- Group – Click the Groups tab on the workplace page and hold the desired group and swipe right, click the settings (Click the gear icon for the web version).
- Buddy – Click the Buddies tab on the workplace page and hold the desired buddy and swipe right, click the settings (Click the gear icon for the web version).
- Select the Manage Admin option. The red crown is assigned to the owner, the blue crown is assigned the admin.
Reminders
- The owner and admin have almost the same authority. In a way of speaking, they are both “admins”, so unless otherwise specified, in all the WorkDo documents either one can be referred to as an admin.
- Since the buddy level only has two members, both parties are admins.
Relevant Questions
WorkDo web general navigation.
WorkDo app general navigation.
How to add admins to the workplaces or groups I own?
How to transfer my workplace/group ownership to others?
How to activate / deactivate a tool?
What is a tool box?
What are the differences between tool admins and workplace admins?
FAQ-ID:1065
The admins is present in workplaces, groups or between buddies, the function of their role is to maintain the settings and permissions of each level.
The “Manage Admin” option is an important setting when onboarding WorkDo, please select the persons responsible for maintaining the workplace settings.
Plan:![]() All palns
All palns
Permission:![]() Member
Member ![]() Admin
Admin ![]() Owner
Owner
Interface:![]() App
App ![]() Web
Web
STEPS │ Assign Workplace / Group Admins
- Select workplace / group / buddy level.
- Workplace │ Tap on the workplace settings (Tap on the gear icon for the Web version).
- Group │ From the workplace page tap on the groups tab, then swipe righ and click on the gear icon.
- Select Manage Admin.
- Add admin.
- App │ Click the + icon.
- Web │ Click Add Admin.
- Select the applicable members.
- Click Done.
STEPS │ Remove Admin
- Select workplace / group / buddy level.
- Workplace │ Tap on the workplace settings (Tap on the gear icon for the Web version).
- Group │ From the workplace page tap on the groups tab, then swipe righ and click on the gear icon.
- Select Manage Admin.
- Remove Admin
- App │ Swipe left on the admin tap on the Remove button then confirm the action.
- Web │ Click on Remove next to the admin then confirm the action.
Reminder
- The buddy level consists of two people, but both are admins by default.
FAQ-ID:1116
The biggest difference between a level admin and a tool admin is that one has control over the entire level’s settings and the other only has control over the settings and data of a particular tool. Let’s put it this way…
- Scenario 1 │ Mike is the IT Technician who is responsible for maintaining the overall settings of the workplace in WorkDo, but he should have access to employees’ profiles. What’s his role?
- Scenario 2 │ Richard is the head of the company and is the workplace admin in WorkDo, so how come he can’t view the employee profiles and their leave records?
The two scenarios represent a common misconception of authority and access control. Which is why WorkDo intend to separate the administrators and managers to satisfy different types of data management.
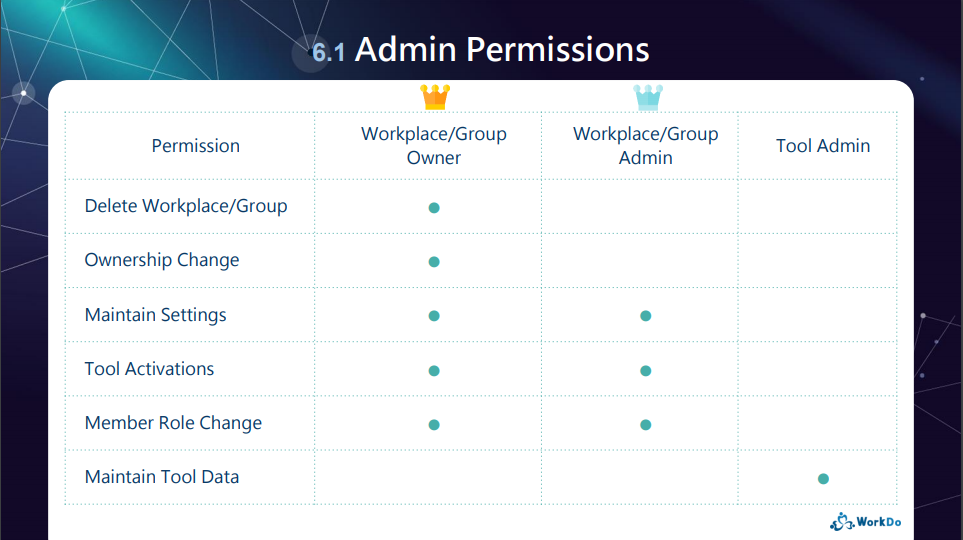
│ Admin Permissions(WorkDo Quick Start Settings) │
1 │ Level Admins
Much like a real company is run by executives, managers and employees, WorkDo reflect these roles as members, admins and owners. (Click to learn more)
2 │ Tool Admins
Of course, there is a lot to running a company, different departments are in charge of different data and files. For example, the HR, Accounting and Marketing departments don’t exchange information. And it is with this mindset, WorkDo also designed different roles for different tools, and each role is only privy to what is allowed for that role. (Click to learn more)
 Scenario Sulutions
- Scenario 1 │ Set Mike as the workplace admin to maintain the workplace settings, but for tools like HR, Attendance, Leave and Payroll, set the appropreiate personnel as the managers instead.
- Scenario 2 │ Richard, the head of the company should also be set as the tool admin to gain access to detailed information.
Reminder
- Only the advanced tools have different tool roles for access control, and these tools are only for paid plan. Upon creating your first workplace, users have a 30-day trial period to try out all the tools and features of WorkDo. It is high recommended that all users take the opportunity and get an in-depth experience of WorkDo!
FAQ-ID:1066
You can transfer the ownership to others if you are the workplace or group owner.
(Topic of interest – How to add admins to the workplaces or groups I own?)
Transfer ownership to another admin
Instructions:
- Select the workplace or group for change of ownership.
- Workplace │ Tap on the workplace settings (Tap on the gear icon for the Web version).
- Group │ From the workplace page tap on the groups tab, then swipe right and click on the gear icon.
- Click Advanced.
- Click on Change Owner and select a member from the list.
- App │ Click Change and confirm the action.
- Web │ Click Change and confirm the action.
Reminder
- The ownership concept is not applicable on the buddy level.
- The workplace owner must transfer the ownership first before leaving the workplace.
FAQ-ID:1040
Certainly. We understand that subsidiaries of global corporates and conglomerates collaborate on a different scale, so in WorkDo you could use one account to join different workplaces.
Simply put, once you register an account, you could create and join multiple workplaces, the workplace data and configuration are unique, independent and secure, perfect for operating remote teams!
- Create, Join Workplaces
You can create multiple workplaces and/or join other workplaces with different profiles, each workplace’s data is independent to reflect how your real-world workplace operates. - Collaboration in WorkDo Network
WorkDo Network is created for you to collaborate with people from other companies. You could collaborate and create groups just like you would in the regular workplace. - Private Space
The Private Space is for you to use any way you see fit. You could use it to save important notes, make a to-do list or create reminders, any way you want, and it’s entirely for you only!
Switching workplaces
Steps:
- Click the workplace menu on the upper-left corner and a list of workplaces you are in will be displayed.
- Click on desire the workplace to switch workplace domain.
Reminder
Your WorkDo account is your own, in the event that you no longer work for the former company, you may use your account to join the new company.
Relevant Question
WorkDo web general navigation.
WorkDo app general navigation.
How to create a workplace?
Can I join the company workplace on my own?
How to invite people to a workplace?
What is WorkDo Network?
WorkDo Network, Workplace, Private Space, what are they?
What is All Upcoming on the bottom of the workplace list?
Sending messages.
FAQ-ID:1037
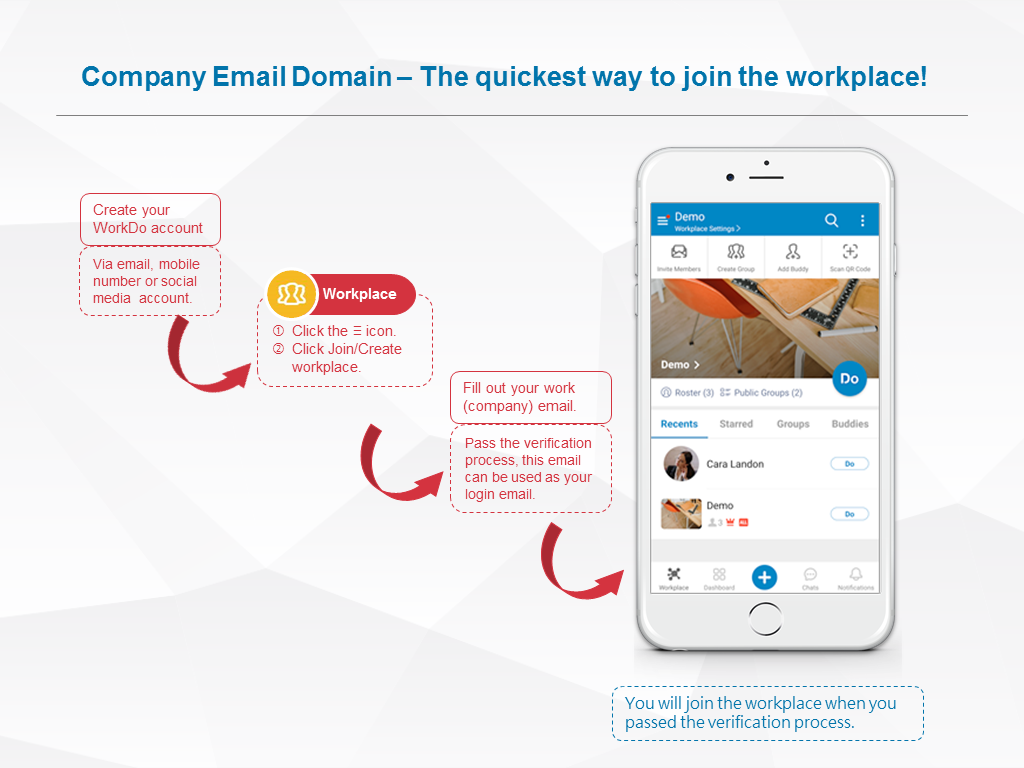
There are three ways you can join your company workplace: being invited via a team member, being invited when the company HR imported the employee profiles, or join the workplace on your own.
If your workplace has bound a company email domain, then you may join the workplace with your company email.
│ Steps for employees join the workplace(Click to enlarge) │
Onboard Workplace – Employees
STEP 1 │ Upon WorkDo Account Sign Up
- Donwload WorkDo then sign up and you will be directed to the Join/Create Workplace screen.
- Click Join Workplace.
- Enter your company email.
- Email verification
- Unverified │ A verification code will send to this email address, submit the code to complete the email confirmation to join the workplace.
- Verified │ Joins the company workplace immediately.
STEP 2 │ Join Multiple Workplaces
- Click the icon on the upper-left-hand corner..
- Click Join/Create Workplace.
- Click Join Workplace.
- Enter your company email.
- Emailverification
- Unverified │ A verification code will send to this email address, submit the code to complete the email confirmation to join the workplace.
- Verified │ Joins the company workplace immediately.
Reminders
- If the workplace is created with free email domain or you do not have a company email, the workplace admin will need to send you an invite to join the workplace.
- An employee profile will be automatically created in the HR tool upon joining a workplace. Only by completing the rest of the settings in the employee profile will the employee be able to clock in/out, send overtime, approvals, expenses requests, apply for leaves, and receive pay slips, etc.
FAQ-ID:1039
“Can I leave the demo workplace if I had tried out all the features?”
“I joined the wrong workplace by mistake, how do I leave?”
Of course, you came to the right place!
However, if you are resigning, be sure to work out all the details with your managers and the HR Staff as mentioned here.
 Caution
- When you leave a workplace, you are not allowed to join it again without permission.
- When employees leave the workplace, all buddy-level contents, including chat histories and posts are erased as well, so be sure to ask other members to backup necessary contents before then.
- If the member rejoins the workplace using the same account within one year, all buddy-level contents will be restored when you befriend your colleagues again.
Leave the Workplace
STEPS │ App & Web
- Enter the Workplace Settings.
- Scroll down to the buttom and click Leave This Workplace.
- Confirm and follow the on screen procedure to leave the workplace and you will be moved to the WorkDo Network.
Reminders
- If you are the only member in the workplace, your workplace will be deleted once you leave.
- If you are the workplace owner, you will be asked to transfer the ownership before leaving the workplace.
FAQ-ID:1124
Would you like to delete your trial workplace and start anew?
Can I recover a deleted workplace?
These are the two common questions users ask about deleting workplaces. Well, typically, if you created a workplace, you become the owner of the workplace by default, and unless the ownership is transferred, you can delete the workplace if you want.
Caution!
Once you delete a workplace, all the files and data pertained within will be gone for good, and the process is irreversible. Therefore, we strongly recommend you back up all necessary files before performing this move.
Workplace Deletion
- Enter the workplace you’d like to delete.
- Enter the Workplace Settings.
- Select Delete Workplace.
- Enter the confirmation code.
- Delete.
- Upon workplace deletion, all members are removed from the workplace and entering the WorkDo Network.
- You can create a new workplace or join other workplaces as you see fit.
Reminders
- A company email domain is recognized by the company name followed by the @ sign in the email address (ex. johndoe@company.com). Most company email domains are paid services, however, there are exceptions that even Google’s @gmail.com is used as a company email domain. So please check with your IT staff before registration.
- You can only create one workplace using the same company email domain.
- If the workplace owner did not transfer the ownership to another user before leaving the workplace, then you have no way of deleting the workplace on your own. You may contact us for assistance should this be your case.
Groups
FAQ-ID:1064
Just like a real company, everybody all plays a different role to work and grow together, this concept is the same in WorkDo.
There are 3 key roles in a WorkDo workplace, and they are member, admin and owner, each with a different purpose and role to play to facilitate the running of the company.
Furthermore, with each tool, there are team members that are responsible for maintaining the settings and records other than using it, so each tool also has a tool role that limits team members’ permissions on what they can do with each tool.(Know more!)
Now let have a closer look at each of the 3 roles in WorkDo!
1 │ Member
- Employees │
- Join, leave workplaces, groups: Join workplaces, create groups, join public groups, leave groups, add buddies, join WorkDo network and use private space.
- Feature shortcuts: View all posts on the wall, personal dashboard.
- Use collaboration tools: Post announcements, create events, track task progresses, share files, vote, chat and use group calls.
- Activate advanced tools: Eform application, track eform progresses.
- Account and notification settings: Change notification setting, use federated login, subscribe to an external calendar, set user DO-ID and change user password.
- Managers │ When members are assigned as managers with the HR tool, they hold the responsibility of signing off on various approvals and eforms and are allowed to view certain team and workplace data.
2 │ Admin
An admin is responsible for managing the settings of the workplace, group or between buddies. Each level could have more than one admins and they can do everything a member can on top of…
- Deleting or editing posts.
- Deleting comments.
- Managing members, including inviting, approving, removing members from workplaces and groups, whether to allow members to invite other people , block members, as well as employee termination settings.
- Level Management
- Workplace Settings – Maintain company information, admin management, set wall post permission, set special notifications, manage employee profile information, group creation permission, payment information(send payment, set billing information and credit card information), set company email domain, insert APIs (available in the web version), etc. It is recommended to have your HR staff and/or IT staff to take on the admin roles.
- Group Settings – Add admins set group privacy, invite members, remove members and set notifications.
- Buddy Settings – Set buddy information (for personal reference only).
- Activate or deactivate advanced tools and set tool roles
3 │ Owner
The owner of the workplace or group, the owner has the higheat authorization. The owner can also…
Who is the owner or admin?
- On the workplace page.
- Select a workplace, group or buddy level.
- Workplace – Click the workplace settings (Click the gear icon for the web version).
- Group – Click the Groups tab on the workplace page and hold the desired group and swipe right, click the settings (Click the gear icon for the web version).
- Buddy – Click the Buddies tab on the workplace page and hold the desired buddy and swipe right, click the settings (Click the gear icon for the web version).
- Select the Manage Admin option. The red crown is assigned to the owner, the blue crown is assigned the admin.
Reminders
- The owner and admin have almost the same authority. In a way of speaking, they are both “admins”, so unless otherwise specified, in all the WorkDo documents either one can be referred to as an admin.
- Since the buddy level only has two members, both parties are admins.
Relevant Questions
WorkDo web general navigation.
WorkDo app general navigation.
How to add admins to the workplaces or groups I own?
How to transfer my workplace/group ownership to others?
How to activate / deactivate a tool?
What is a tool box?
What are the differences between tool admins and workplace admins?
FAQ-ID:1065
The admins is present in workplaces, groups or between buddies, the function of their role is to maintain the settings and permissions of each level.
The “Manage Admin” option is an important setting when onboarding WorkDo, please select the persons responsible for maintaining the workplace settings.
Plan:![]() All palns
All palns
Permission:![]() Member
Member ![]() Admin
Admin ![]() Owner
Owner
Interface:![]() App
App ![]() Web
Web
STEPS │ Assign Workplace / Group Admins
- Select workplace / group / buddy level.
- Workplace │ Tap on the workplace settings (Tap on the gear icon for the Web version).
- Group │ From the workplace page tap on the groups tab, then swipe righ and click on the gear icon.
- Select Manage Admin.
- Add admin.
- App │ Click the + icon.
- Web │ Click Add Admin.
- Select the applicable members.
- Click Done.
STEPS │ Remove Admin
- Select workplace / group / buddy level.
- Workplace │ Tap on the workplace settings (Tap on the gear icon for the Web version).
- Group │ From the workplace page tap on the groups tab, then swipe righ and click on the gear icon.
- Select Manage Admin.
- Remove Admin
- App │ Swipe left on the admin tap on the Remove button then confirm the action.
- Web │ Click on Remove next to the admin then confirm the action.
Reminder
- The buddy level consists of two people, but both are admins by default.
FAQ-ID:1116
The biggest difference between a level admin and a tool admin is that one has control over the entire level’s settings and the other only has control over the settings and data of a particular tool. Let’s put it this way…
- Scenario 1 │ Mike is the IT Technician who is responsible for maintaining the overall settings of the workplace in WorkDo, but he should have access to employees’ profiles. What’s his role?
- Scenario 2 │ Richard is the head of the company and is the workplace admin in WorkDo, so how come he can’t view the employee profiles and their leave records?
The two scenarios represent a common misconception of authority and access control. Which is why WorkDo intend to separate the administrators and managers to satisfy different types of data management.
│ Admin Permissions(WorkDo Quick Start Settings) │
1 │ Level Admins
Much like a real company is run by executives, managers and employees, WorkDo reflect these roles as members, admins and owners. (Click to learn more)
2 │ Tool Admins
Of course, there is a lot to running a company, different departments are in charge of different data and files. For example, the HR, Accounting and Marketing departments don’t exchange information. And it is with this mindset, WorkDo also designed different roles for different tools, and each role is only privy to what is allowed for that role. (Click to learn more)
Scenario Sulutions
- Scenario 1 │ Set Mike as the workplace admin to maintain the workplace settings, but for tools like HR, Attendance, Leave and Payroll, set the appropreiate personnel as the managers instead.
- Scenario 2 │ Richard, the head of the company should also be set as the tool admin to gain access to detailed information.
Reminder
- Only the advanced tools have different tool roles for access control, and these tools are only for paid plan. Upon creating your first workplace, users have a 30-day trial period to try out all the tools and features of WorkDo. It is high recommended that all users take the opportunity and get an in-depth experience of WorkDo!
FAQ-ID:1066
You can transfer the ownership to others if you are the workplace or group owner.
(Topic of interest – How to add admins to the workplaces or groups I own?)
Transfer ownership to another admin
Instructions:
- Select the workplace or group for change of ownership.
- Workplace │ Tap on the workplace settings (Tap on the gear icon for the Web version).
- Group │ From the workplace page tap on the groups tab, then swipe right and click on the gear icon.
- Click Advanced.
- Click on Change Owner and select a member from the list.
- App │ Click Change and confirm the action.
- Web │ Click Change and confirm the action.
Reminder
- The ownership concept is not applicable on the buddy level.
- The workplace owner must transfer the ownership first before leaving the workplace.
Buddies
FAQ-ID:1055
Although WorkDo encourages team collaboration and communication, there are still times when you need to engage in one-to-one conversations, this is when you need to add a buddy or two.
Toggle among workplaces, , buddies to make sure you are always informed on what’s happening!
Switch among Workplaces, Groups and Buddies
STEP │ App
- Switch Workplaces
- Level Select – Workplaces, groups, buddies.
- Workplace │ Click the Workplace Domain button on the upper-left-hand corner and select from your list of workplaces.
- Group │ Click the Groups tab on the workplace page and select from your list of groups in the workplace.
- Buddy │ Click the Buddies tab on the workplace page and select from you list of buddies in the workplace.
- You will be brought to the chatroom immediately.
- You can begin chatting or use the Do button on the upper-right-hand corner to use other collaboration tools.
STEP │ Web
- Switch workplaces with the Workplace icon.
- Click the phonebook icon
 .
. - Select a tab.
- Groups │ Select a group from the list.
- Buddies │ Select a buddy from the list.
- You will be brought to the chatroom immediately.
- You can begin chatting, use a collaboration tool from the tool listed above the chatroom or select one with the Do button.
 Reminders
There are two ways to enter a level.
- Search the chat history and enter from the chatroom.
- Select a post from the Dashboard Wall.
Chats
FAQ-ID:1030
If you want to keep the workplace-level chatroom free from employee chatter and use it only for company-wide announcements, there is an option for that!
When the setting is on, only workplace admins are allowed to use the workplace-level chatroom. But please note that, although employees are not allowed to send texts, photos, videos, locations, and stickers in the workplace-level chatroom, they are still free to create group chatrooms to communicate and collaborate as normal.
Set Admins-Only Workplace-Level Chatroom
Steps:
- Enter the Workplace Settings.
- Click Workplace Privacy.
- Set the Who Can Chat option.
- Owner and Admin │ Only the workplace owner and admins are allowed to send chat messages in the workplace-level chatroom.
- Everyone │ All members are allowed to send chat messages in the workplace-level chatroom.
Reminder
- WorkDo has designed three levels (workplace, group & buddy) for different kinds of workplace communication and collaboration. It is intentional that settings that control communication and collaboration are separated. As such, Who Can Chat controls who is allowed to chat in the workplace-level chatroom, and Who Can Post controls who is allowed to create tool posts at the workplace level.
Relevant Questions
Sending messages.
Can I use the workplace level for admins only?
Allow members to use their nicknames?
Can I control members from creating public or private groups?
Who is allowed to invite new members into workplaces or groups?
What do different roles do in a workplace or group?
How to add admins to workplaces or groups?
Tool Box
FAQ-ID:1116
The biggest difference between a level admin and a tool admin is that one has control over the entire level’s settings and the other only has control over the settings and data of a particular tool. Let’s put it this way…
- Scenario 1 │ Mike is the IT Technician who is responsible for maintaining the overall settings of the workplace in WorkDo, but he should have access to employees’ profiles. What’s his role?
- Scenario 2 │ Richard is the head of the company and is the workplace admin in WorkDo, so how come he can’t view the employee profiles and their leave records?
The two scenarios represent a common misconception of authority and access control. Which is why WorkDo intend to separate the administrators and managers to satisfy different types of data management.
│ Admin Permissions(WorkDo Quick Start Settings) │
1 │ Level Admins
Much like a real company is run by executives, managers and employees, WorkDo reflect these roles as members, admins and owners. (Click to learn more)
2 │ Tool Admins
Of course, there is a lot to running a company, different departments are in charge of different data and files. For example, the HR, Accounting and Marketing departments don’t exchange information. And it is with this mindset, WorkDo also designed different roles for different tools, and each role is only privy to what is allowed for that role. (Click to learn more)
Scenario Sulutions
- Scenario 1 │ Set Mike as the workplace admin to maintain the workplace settings, but for tools like HR, Attendance, Leave and Payroll, set the appropreiate personnel as the managers instead.
- Scenario 2 │ Richard, the head of the company should also be set as the tool admin to gain access to detailed information.
Reminder
- Only the advanced tools have different tool roles for access control, and these tools are only for paid plan. Upon creating your first workplace, users have a 30-day trial period to try out all the tools and features of WorkDo. It is high recommended that all users take the opportunity and get an in-depth experience of WorkDo!
FAQ-ID:1110
 All the tools you need in one place, just Do it!
Communication, collaboration, resource management, WorkDo knows what you need! WorkDo amassed all the tools you need to collaborate seamlessly, allowing employees to be more flexible, responsive and productive.
Tap the Do button to switch instantly tools or enter the toolbox!
 A dedicated toolbox for workplace, group and buddy level collaboration.
A toolbox for each level offers a clear line of authorization. Admins are able to set permissions for all employees and everyone can check their permission in the workplace, group and buddy toolbox for details.
 Use the basic tools to collaborate with high efficiency!
The basic tools allow for more streamlined workflow and focused communication. Post company announcements, assign tasks, share files, send event notifications, make calls and send messages, there is a tool for it! Use them wisely and watch your team’s productivity soar!
- Basic Tool
- Workplace
- Groups
- Buddies
- Announcement


- Notes
- Tasks
- Events
- Albums
- Files
- Links
- Polls
- Dashboard
- Wall
- Calendar
- Workflow
- Chats
- Audio Call
- Video Call
- Group Call
View All Basic Tools Features
Download Basic Tools Quick Start Guide
 Advanced tools for improved resource management!
The advanced tools are flexible to meet all team’s work style and company policies and they are interconnected to provide a marvelous team collaboration experience!
- Advanced Tool
- Workplace
- Groups
- Buddies
 HR tool must be enabled.
- HR
- Payroll
- Attendance
- Check In
- Leave
- Leave Pro
- Shift
- Overtime
- Timesheet
- Expenses
- Approvals
- Conf. Rm
- CRM
- Cashbook
- Phonebook
- We Buy
- IOU
Download Advanced Tools Quick Start Guide
 User guides available for detailed step-by-step walkthrough.
For every tool there is a detailed user guide showing users the set up process with examples, perfect for any newcomer! You can download them in the Resource Center or in the toolbox.。
FAQ-ID:1112
Can’t find the tools you are looking for? Are there tools that your team doesn’t need? Want a cleaner UI?
Tools like Attendance, HR, and Approvals that help improve your workflow and operations are what we categorize as advanced tools, and you can choose to activate and deactivate these tools if you so desire. This is solely dependent on whether your team needs them for its daily routine or not.
Some of the advanced tools are automatically enabled upon workplace creation, but you can deactivate the tools that you don’t need and activate those you need.
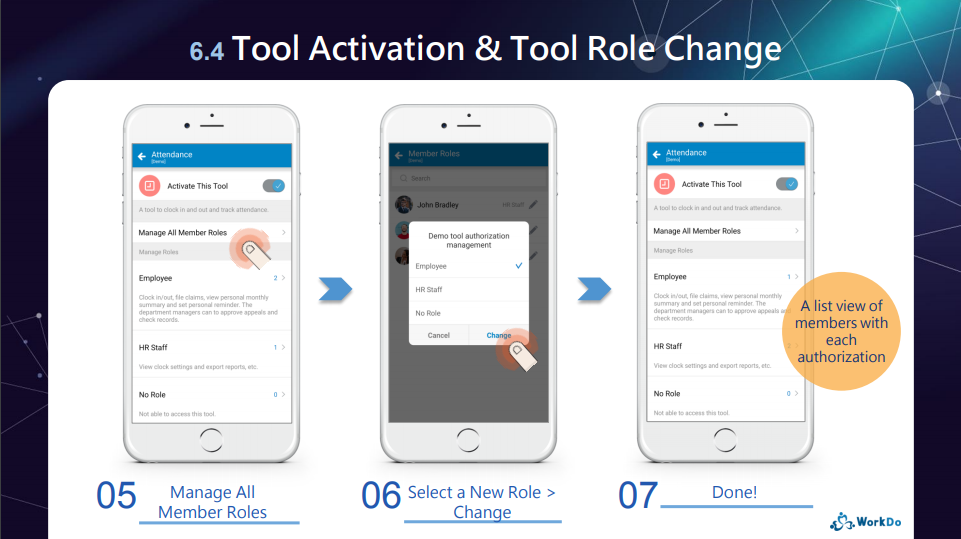
Tool Activation / Deactivation
Steps
- Select the level (workplace, group, buddy) of the tools you wish to activate or deactivate.
- Workplace – Click the name of the workplace for the workplace settings (Click the gear icon for the web version).
- Group – Click the Groups tab on the workplace page then swipe right for Settings.
- Buddy – Click the Buddies tab on the workplace page then swipe right for Settings.
- Click Tool Box
- Select the tool
- Activate or deactivate
- Activate – Click Activate to enable the tool.
- Deactivate – Click Manage then tap the switch to deactivate the tool.
Reminders
- The advanced tools are available to the customers of the paid plans. However, all users have a 30-day trial period to try out all the advanced tools and features. After 30 days, all users will be switch to the Free Plan, at which point you will not be able to access the advanced tools unless you subscribe to one of the paid plans.
- Only the admins of their respective levels (workplace, group, buddy) are able to activate and deactivate advanced tools.
FAQ-ID:1114
Here’s a few possibilities if there are tools that are not available for use.
- Unable to use Notes, Tasks, Events or other basic tools.
This is due to the option Who Can Post is set to owner and admins in the the Workplace Privacy. - Unable to use Attendance, Leave Pro, CRM or other advanced tools.
Only the workplace admins and group admins have the authority to decide what advanced tools to make available to team members. If you are unable to use any of the advanced tools, please check whether the tools have been activated or your permission to use the tools, aka, your tool roles.
Check Your Tool Roles
Steps:
- Choose the workplace, group or buddy level.
- Click Tool Box in the settings.
- Check tool activation status or tool role.
- Permission (Tool Role)
On the Activated tool tab, the role below each tool will display your authorization. - Request
Click Request on the tool tab to send a notification to the workplace admins asking to enable a tool for use.
- Permission (Tool Role)
Reminders
- The advanced tools are for paid plans only. During the trial period, users will have 30 days to try out all the tools upon creating a workplace. After the trial period expires, users will no longer be able to use the advanced tools.
- Instead of the Request button for most users, the admins will have the tool activation button in its place.
- In the buddy level, both parties are admins by default, unless otherwise changed.
FAQ-ID:1111
For an all-in-one collaboration app, WorkDo houses many tools, and the “Do” button shows all the services and tools you can use within your workplace, group, or buddies. It also a shortcut that takes you to the toolbox to see all the available tools you can use.
Whatever you need, just hit the Do button!
Tool switch using the Do button
Steps:
- Enter the workplace page.
- Simply click the Do button on the right side of the screen to switch tools.
- Depending on the workplace, groups and buddies, the available tools may be different.
HR
FAQ-ID:1156
When a new member joins a workplace, an employee profile will be created for this person automatically, however, in special instances, a duplicated employee profile could be created of the same person.
- Member leaves then rejoins the workplace again.
- Error during the Import Employee Profiles process.
- Member registered a new WorkDo account then rejoins the workplace.
- Reemployment.
Whichever the case may be, once a person leaves the company, it is wise to mark his/her employee profile as terminated so they can no longer access the workplace’s data.
You may configure the settings using the web version of WorkDo if you are the HR Staff of the HR tool.
Troubleshooting Duplicate Employee Profiles
STEPS │ Continue using the old profile: All past records and data are inherited.
As the HR tool is interconnected to tools like Attendance, Check In, Leave Pro, Leave, Overtime, Expenses and Approvals, it is crucial that every member’s profile is correctly set.
Every member’s Login Email or Mobile Number is used bind the person to their profile, and it cannot be occupied by other account. So you need to delete the newly created employee profile then set the old profile to Activate.
- Switch to the HR tool.
- Click Employee Profiles.
- Delete the newly created employee profile.
- Locate the old employee profile using the filters provided.
- Checkmark the employee.
- Click the yellow Activate button.
- Click Confirm in the pop-up window to complete.
STEPS │ Use the new employee profile.
Generally, when a company rehires an old employee, everything starts from scratch, so using a new employee profile is fine in this case.
- You do not need to do anything to the old profile.
- Simply edit all the require information in the new employee profile as needed.
Reminders
- By default, all employee profiles displayed are currently in employment. If you would like to view profiles in other statuses, please use the filter provided.
- When a member rejoins the workplace all buddy-to-buddy data would recovery when they add all friends and colleagues back.
FAQ-ID:1157
It is possible that duplicated employee profiles got created during your trial period trying to bring employees into your workplace. “So how do I delete the duplicated profiles?” you ask. Well, just change the status of the profiles to Suspend or Terminate then you can delete the profiles for good.
If an employee’s profile has been deleted but he/she has not left the workplace, then he/she can only use the basic tools from this point on; all other advanced tools that require an employee profile to function will be locked. However, said employee’s past records and data will be kept for perusal.
Under normal circumstances, every employee only has one employee profile, and the workplace HR Staff could change the profile status accordingly to reflect the employment status.
Delete Employee Profiles
Steps:
- Use the filters to search the profiles.
- Check the boxes to select the profiles.
- Change the profiles to Suspend or Terminate.
- Select the profiles again and click the Delete status to permanently delete the profile.
Reminder
- Please refer to your local labor laws on how long you need to keep resigned employees’ profiles and records for perusal purposes.
FAQ-ID:1155
When employees left the workplace on their own or were removed by the workplace HR Staff, they can no longer access the workplace data and files. As such, when employees resign from their posts, the HR Staff must verify their last day of work then remove them from the workplace or ask them to leave the workplace.
However, should you accidentally removed an employee or they left the workplace by mistake, here’s how you can rectify it!
Just invite the employee to rejoin the workplace and make sure the employee profile is intact, then everything is all set! These settings require the help of workplace admins and HR Staff to maintain to safeguard workplace information security.
Rectification Method
STEP 1|Rejoin
Depending on the situation, you can either ask the employee to rejoin on their own or send them an invitation to join the workplace using their existing WorkDo account.
How to invite people to a workplace?
Can I join the company workplace on my own?
STEP 2|Employee Profile Adjustment
There is an employee profile of every workplace employee found in the HR tool. When an employee rejoins the workplace, a duplicated employee profile will be created. So please follow the below FAQs to make the necessary adjustments in the employee profile. This will allow the employee to resume using the advanced tools that are tied to the HR settings.
Why is there’s a member with two employee profiles?
What settings in HR are required for new employees?
Reminders
- Please note that when employees leave the workplace, all their chat histories and tool posts will be erased.
- If a resigned employee rejoins the workplace using their original account within a year, all their chat histories and tool posts will be recovered in the web version of WorkDo, the app version, however, will only recover the tool posts only.
FAQ-ID:1034
Typically, the company benefits are paused for employees who are on leave without pay (LWOP). So how to process employees who are on leave without pay in WorkDo?
Employee tenure will be paused for those who are on leave without pay. And, for workplaces that have enabled Leave Pro, it will stop delving out leaves for them. So this is a necessary and important setting that the workplace HR staff must know!
If you have a leave type for leave without pay for your team to select, or the employee has formally filed a request for taking leave without pay, it is still strongly recommended that you set the employee status to suspend through the HR tool to accurately reflect this change.
Set LWOP Employee Status to Suspend
- Leave without Pay │ It is recommended that the employee sends a request for taking leave without pay for the workplace HR staff as a reference, then follow the steps below and set the employee status to suspend.
- Parental Leave | For employees who would like to apply for parental leave, we recommend that they use Leave or Leave Pro to apply for parental leave first, then have the HR Staff set their employee status to suspend.
If your role is HR Staff in the HR tool, you may use the web version of WorkDo and follow the steps below to set LWOP employees to suspend status.
Suspend / Resume
1 │ Suspend
- Switch to the HR tool.
- Click Employee Profiles.
- Use the filter to select applicable employees.
- Click the Suspend button.
- Fill in the reason and return date information.
- Click Suspend and confirm the action. This suspension record can be viewed in the Suspension option.
2 │ Resume
- Switch to the HR tool.
- Click Employee Profiles.
- Use the filter to select applicable employees.
- Click the Resume button and confirm the action.
Reminders
- Suspended employees are still able to use and access WorkDo. Only their tenures and Leave Pro’s automatic leave granting function are paused.
- Suspended employees are still in the workplace and do not need to be removed from the workplace.
- Should suspended employees resign, it can also be done by following similar steps.
Relevant Questions
How does WorkDo handle the data and records of resigned employees?
What do I do when employees resign from their posts?
Why is there’s a member with two employee profiles?
An employee left the workplace or was removed by mistake, is there a way to rectify it?
Why do I have limited tool access?
The HR tool setup.
What settings in HR are required for new employees?
FAQ-ID:1002
Does WorkDo retain the messages, posts and records of resigned employees?
For a virtual workspace to operate seamlessly, it is important to know how data is being handled, especially for resigned employees. Fortunately, you came to the right place!
When employees are suspended, terminated even deleted, so long they haven’t left the workplace, all their chat histories, posts, files, records and data are still intact. However, when they have left the workplace, then things will be a little different.
1 │ Buddy Level
- When an employee leaves the workplace, all colleagues are unbuddied, therefore, posts and chat histories between buddies are all erased. So please be sure to inform the workplace members and have them back up all necessary posts and files before their departure.
- With the exception of chat histories, all posts can be restored if the resigned employee rejoins the workplace and adds their buddies back within one year.
2 │ Group and Workplace levels
- Chat histories are retained for 5 year. │ All messages sent in the group or workplace chatrooms are retained for up to 5 years, including texts, photos, videos, locations, stickers and audio messages. We recommend that users save important project and task information using other tool posts.
- Posts and Records │ All tool posts and records, unless otherwise deleted by the tool admins, are kept forever.
3 │ Private Space & WorkDo Network
Employee claims the ownership of his/her WorkDo account, and the posts in their Private Space and the WorkDo Network are retained forever unless deleted by them.
Reminder
- The Employees Profiles in the HR tool can be deleted, but before doing so, please make sure that you have surpassed the record keeping period mandated by your local labor regulations.