Account
FAQ-ID:1026
Every WorkDo user has a unique QR code upon sign up. Share your QR code with other users and they can quickly and easily add you as a buddy (friend) or add you into groups.
There are numerous ways to share user QR code depending on the situation or user preference. Users can also refresh and update thie QR code when needed.
Join groups or add buddies via QR code
Step:
- My QR Code
- App │ Click the
 icon on the upper-right-hand corner and select My QR Code.
 - Web │ Click the
 icon on the upper-right-hand corner and click App Settings and you can find My QR Code option on the side menu.
- App │ Click the
- Sharing Methods
- Display QR Code
Display your WorkDo QR code for other users to scan and add you as a buddy. Users can also add members via QR code in the group settings to add you into groups. - Save QR Code
Save the QR code to your device and share it with other users. The web version users can right-click the QR code and save it to your PC. - Copy Link
Acting the same as the QR code, you can share your link to other users to add you as a buddy. - Scan QR Code
Available to the app version only, use this option to scan other users’ QR codes to add them as buddies or add them into groups. - Refresh QR Code
A user QR code QR code will not expire, should situation arise that you no longer want your QR code to stay active, simply refresh your QR code to update it.
- Display QR Code
 Reminders
- Other users will always add you as a buddy when clicking your link.
- Click Group Settings > Add Members > QR Code to scan user QR code or select a user QR code that is saved on your device to add this member into the group.
Main Settings
FAQ-ID:1064
Just like a real company, everybody all plays a different role to work and grow together, this concept is the same in WorkDo.
There are 3 key roles in a WorkDo workplace, and they are member, admin and owner, each with a different purpose and role to play to facilitate the running of the company.
Furthermore, with each tool, there are team members that are responsible for maintaining the settings and records other than using it, so each tool also has a tool role that limits team members’ permissions on what they can do with each tool.(Know more!)
Now let have a closer look at each of the 3 roles in WorkDo!
1 │ Member
- Employees │
- Join, leave workplaces, groups: Join workplaces, create groups, join public groups, leave groups, add buddies, join WorkDo network and use private space.
- Feature shortcuts: View all posts on the wall, personal dashboard.
- Use collaboration tools: Post announcements, create events, track task progresses, share files, vote, chat and use group calls.
- Activate advanced tools: Eform application, track eform progresses.
- Account and notification settings: Change notification setting, use federated login, subscribe to an external calendar, set user DO-ID and change user password.
- Managers │ When members are assigned as managers with the HR tool, they hold the responsibility of signing off on various approvals and eforms and are allowed to view certain team and workplace data.
2 │ Admin
An admin is responsible for managing the settings of the workplace, group or between buddies. Each level could have more than one admins and they can do everything a member can on top of…
- Deleting or editing posts.
- Deleting comments.
- Managing members, including inviting, approving, removing members from workplaces and groups, whether to allow members to invite other people , block members, as well as employee termination settings.
- Level Management
- Workplace Settings – Maintain company information, admin management, set wall post permission, set special notifications, manage employee profile information, group creation permission, payment information(send payment, set billing information and credit card information), set company email domain, insert APIs (available in the web version), etc. It is recommended to have your HR staff and/or IT staff to take on the admin roles.
- Group Settings – Add admins set group privacy, invite members, remove members and set notifications.
- Buddy Settings – Set buddy information (for personal reference only).
- Activate or deactivate advanced tools and set tool roles
3 │ Owner
The owner of the workplace or group, the owner has the higheat authorization. The owner can also…
Who is the owner or admin?
- On the workplace page.
- Select a workplace, group or buddy level.
- Workplace – Click the workplace settings (Click the gear icon for the web version).
- Group – Click the Groups tab on the workplace page and hold the desired group and swipe right, click the settings (Click the gear icon for the web version).
- Buddy – Click the Buddies tab on the workplace page and hold the desired buddy and swipe right, click the settings (Click the gear icon for the web version).
- Select the Manage Admin option. The red crown is assigned to the owner, the blue crown is assigned the admin.
Reminders
- The owner and admin have almost the same authority. In a way of speaking, they are both “admins”, so unless otherwise specified, in all the WorkDo documents either one can be referred to as an admin.
- Since the buddy level only has two members, both parties are admins.
Relevant Questions
WorkDo web general navigation.
WorkDo app general navigation.
How to add admins to the workplaces or groups I own?
How to transfer my workplace/group ownership to others?
How to activate / deactivate a tool?
What is a tool box?
What are the differences between tool admins and workplace admins?
FAQ-ID:1065
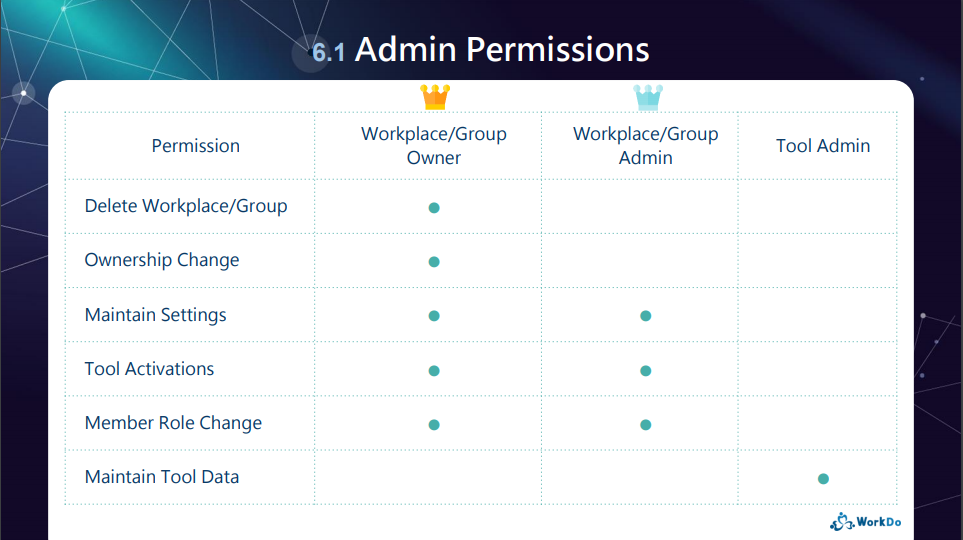
The admins is present in workplaces, groups or between buddies, the function of their role is to maintain the settings and permissions of each level.
The “Manage Admin” option is an important setting when onboarding WorkDo, please select the persons responsible for maintaining the workplace settings.
Plan:![]() All palns
All palns
Permission:![]() Member
Member ![]() Admin
Admin ![]() Owner
Owner
Interface:![]() App
App ![]() Web
Web
STEPS │ Assign Workplace / Group Admins
- Select workplace / group / buddy level.
- Workplace │ Tap on the workplace settings (Tap on the gear icon for the Web version).
- Group │ From the workplace page tap on the groups tab, then swipe righ and click on the gear icon.
- Select Manage Admin.
- Add admin.
- App │ Click the + icon.
- Web │ Click Add Admin.
- Select the applicable members.
- Click Done.
STEPS │ Remove Admin
- Select workplace / group / buddy level.
- Workplace │ Tap on the workplace settings (Tap on the gear icon for the Web version).
- Group │ From the workplace page tap on the groups tab, then swipe righ and click on the gear icon.
- Select Manage Admin.
- Remove Admin
- App │ Swipe left on the admin tap on the Remove button then confirm the action.
- Web │ Click on Remove next to the admin then confirm the action.
Reminder
- The buddy level consists of two people, but both are admins by default.
FAQ-ID:1062
Do you know who are allowed to invite other people to join your workplace or groups?
By default, only the workplace admins and group admins are able to invite people. However, this setting can be changed to allow any member to invite others into the workplace or groups.
And here’s how!
Who can Invite Members
Steps:
- Enter the workplace or group.
- Click Workplace Settings / Group Settings, followed by Workplace Privacy / Group Privacy.
- Who can Invite Members option.
- Owner and Admin
- Everyone
Setting Recommendation
- Inviting new members into the workplace could involve other settings such as their HR profiles, therefore, it is recommended that only the Workplace Admins are allowed to invite new members. Whereas, group collaboration may often bring in other members, so it is recommended that everyone is allowed to invite new members into the groups.
Relevant Questions
Can I set only admins are allowed to post at the workplace level?
Can I control members from creating public or private groups?
Allow members to use their nickname?
What do different roles do in a workplace or group?
How to add admins to workplaces or groups?
How do I join other public groups in the workplace?
FAQ-ID:1067
As a workplace admin, you can choose not to allow members to create groups, public or private. And because this limitation does not apply to workplace admins, only workplace members, so workplace admins can still create groups whenever they need to.
- Public Groups │ Searchable by anyone in the workplace and are open to all members.
- Private Groups │ Unsearchable by anyone in the workplace and must be invited to join the groups.
Enable or Disable Group Creation
Steps:
- Click Workplace Settings.
- Select Workplace Privacy.
- Check appropriate options in the Members Can Create Groups section.
- Public Groups │ Allow members to create public groups.
- Private Groups │ Allow members to create private groups.
- Both Turned On │ Members can freely create public or private groups.
- Both Turned Off │ Members are not allowed to create groups.
Reminder
- WorkDo designed workplace, group and buddy levels for different types of collaboration, so generally speaking, we do not recommend that you disallow members from creating both public and private groups. However, if you are concerned about certain sensitive information, you may opt to disable members from creating private groups.
Relavent Questions
Who is allowed to invite new members into workplaces or groups?
Allow members to use their nickname?
Can I use the workplace level for admins only?
Can I bind the company email domain when I created the workplace using a free email domain?
What do different roles do in a workplace or group?
How to add admins to workplaces or groups?
How do I join other public groups in the workplace?
Why can’t I find groups to join?
FAQ-ID:1000
If you are a workplace admin, you may edit the company information including company name, workplace image, description, operating hours, address, contact number, website, even the welcome message, etc.
You may use this function to keep the your workplace information up to date.
Edit Workplace Information
Steps:
- Click the Workplace Settings.
- Scroll down to Workplace Profile.
- App │ Select Workplace Info then click the Edit button.
- Web │ Click the Edit button next to the company name.
- Fill out or update all the necessary information.
- Click Done / Save to finish.
Reminders
- When the workplace name or image is changed, a message will be sent to the chatrooms notifying members of the change made instead of a notification, since this does not affect members’ daily workflow.
- Workplace Address in the Workplace info does not have to be the same address listed in the billing information.
Relevant Questions
Who is allowed to invite new members into workplaces or groups?
Can I use the workplace level for admins only?
Should I allow members to use their nicknames?
Can I control members from creating public or private groups?
Billing information update.
Credit card information update.
What do different roles do in a workplace or group?
How to add admins to workplaces or groups?
FAQ-ID:1131
Shouldn’t you give your new team members a warm welcome when they are on board?
And it’s important to know when team members leave so you can allocate your resources and prioritize team tasks.
Did you know there is a setting that sends notifications when members join and leave your team? Well, now is a good time to take advantage of it!
Set Workplace / Group Notifications
Steps:
- Enter the Workplace Settings.
- Scroll down to the Manage Workplace / Group section and select Workplace / Group Notifications.
- Turn on the notification settings.
- Alert When Members Join/Leave │ Turn this on to alert the owner and admins when members join or leave.
- Show Chat Message When Members Leave │
Turn this on to show a chat message in the chatroom when members leave.
Reminders
- Member join and leave messages do not count towards the badge count.
- The member join /leave notifications is shown in the personal notification certer of the owner and admins.
Relevant Questions
What is Chat Alert? And how do I change its settings?
How do I change the notification settings?
Notification delay.
Who is allowed to invite new members into workplaces or groups?
Can I set only admins are allowed to post at the workplace level?
Can I control members from creating public or private groups?
What do different roles do in a workplace or group?
Workplace
FAQ-ID:1064
Just like a real company, everybody all plays a different role to work and grow together, this concept is the same in WorkDo.
There are 3 key roles in a WorkDo workplace, and they are member, admin and owner, each with a different purpose and role to play to facilitate the running of the company.
Furthermore, with each tool, there are team members that are responsible for maintaining the settings and records other than using it, so each tool also has a tool role that limits team members’ permissions on what they can do with each tool.(Know more!)
Now let have a closer look at each of the 3 roles in WorkDo!
1 │ Member
- Employees │
- Join, leave workplaces, groups: Join workplaces, create groups, join public groups, leave groups, add buddies, join WorkDo network and use private space.
- Feature shortcuts: View all posts on the wall, personal dashboard.
- Use collaboration tools: Post announcements, create events, track task progresses, share files, vote, chat and use group calls.
- Activate advanced tools: Eform application, track eform progresses.
- Account and notification settings: Change notification setting, use federated login, subscribe to an external calendar, set user DO-ID and change user password.
- Managers │ When members are assigned as managers with the HR tool, they hold the responsibility of signing off on various approvals and eforms and are allowed to view certain team and workplace data.
2 │ Admin
An admin is responsible for managing the settings of the workplace, group or between buddies. Each level could have more than one admins and they can do everything a member can on top of…
- Deleting or editing posts.
- Deleting comments.
- Managing members, including inviting, approving, removing members from workplaces and groups, whether to allow members to invite other people , block members, as well as employee termination settings.
- Level Management
- Workplace Settings – Maintain company information, admin management, set wall post permission, set special notifications, manage employee profile information, group creation permission, payment information(send payment, set billing information and credit card information), set company email domain, insert APIs (available in the web version), etc. It is recommended to have your HR staff and/or IT staff to take on the admin roles.
- Group Settings – Add admins set group privacy, invite members, remove members and set notifications.
- Buddy Settings – Set buddy information (for personal reference only).
- Activate or deactivate advanced tools and set tool roles
3 │ Owner
The owner of the workplace or group, the owner has the higheat authorization. The owner can also…
Who is the owner or admin?
- On the workplace page.
- Select a workplace, group or buddy level.
- Workplace – Click the workplace settings (Click the gear icon for the web version).
- Group – Click the Groups tab on the workplace page and hold the desired group and swipe right, click the settings (Click the gear icon for the web version).
- Buddy – Click the Buddies tab on the workplace page and hold the desired buddy and swipe right, click the settings (Click the gear icon for the web version).
- Select the Manage Admin option. The red crown is assigned to the owner, the blue crown is assigned the admin.
Reminders
- The owner and admin have almost the same authority. In a way of speaking, they are both “admins”, so unless otherwise specified, in all the WorkDo documents either one can be referred to as an admin.
- Since the buddy level only has two members, both parties are admins.
Relevant Questions
WorkDo web general navigation.
WorkDo app general navigation.
How to add admins to the workplaces or groups I own?
How to transfer my workplace/group ownership to others?
How to activate / deactivate a tool?
What is a tool box?
What are the differences between tool admins and workplace admins?
FAQ-ID:1065
The admins is present in workplaces, groups or between buddies, the function of their role is to maintain the settings and permissions of each level.
The “Manage Admin” option is an important setting when onboarding WorkDo, please select the persons responsible for maintaining the workplace settings.
Plan:![]() All palns
All palns
Permission:![]() Member
Member ![]() Admin
Admin ![]() Owner
Owner
Interface:![]() App
App ![]() Web
Web
STEPS │ Assign Workplace / Group Admins
- Select workplace / group / buddy level.
- Workplace │ Tap on the workplace settings (Tap on the gear icon for the Web version).
- Group │ From the workplace page tap on the groups tab, then swipe righ and click on the gear icon.
- Select Manage Admin.
- Add admin.
- App │ Click the + icon.
- Web │ Click Add Admin.
- Select the applicable members.
- Click Done.
STEPS │ Remove Admin
- Select workplace / group / buddy level.
- Workplace │ Tap on the workplace settings (Tap on the gear icon for the Web version).
- Group │ From the workplace page tap on the groups tab, then swipe righ and click on the gear icon.
- Select Manage Admin.
- Remove Admin
- App │ Swipe left on the admin tap on the Remove button then confirm the action.
- Web │ Click on Remove next to the admin then confirm the action.
Reminder
- The buddy level consists of two people, but both are admins by default.
FAQ-ID:1116
The biggest difference between a level admin and a tool admin is that one has control over the entire level’s settings and the other only has control over the settings and data of a particular tool. Let’s put it this way…
- Scenario 1 │ Mike is the IT Technician who is responsible for maintaining the overall settings of the workplace in WorkDo, but he should have access to employees’ profiles. What’s his role?
- Scenario 2 │ Richard is the head of the company and is the workplace admin in WorkDo, so how come he can’t view the employee profiles and their leave records?
The two scenarios represent a common misconception of authority and access control. Which is why WorkDo intend to separate the administrators and managers to satisfy different types of data management.
│ Admin Permissions(WorkDo Quick Start Settings) │
1 │ Level Admins
Much like a real company is run by executives, managers and employees, WorkDo reflect these roles as members, admins and owners. (Click to learn more)
2 │ Tool Admins
Of course, there is a lot to running a company, different departments are in charge of different data and files. For example, the HR, Accounting and Marketing departments don’t exchange information. And it is with this mindset, WorkDo also designed different roles for different tools, and each role is only privy to what is allowed for that role. (Click to learn more)
 Scenario Sulutions
- Scenario 1 │ Set Mike as the workplace admin to maintain the workplace settings, but for tools like HR, Attendance, Leave and Payroll, set the appropreiate personnel as the managers instead.
- Scenario 2 │ Richard, the head of the company should also be set as the tool admin to gain access to detailed information.
Reminder
- Only the advanced tools have different tool roles for access control, and these tools are only for paid plan. Upon creating your first workplace, users have a 30-day trial period to try out all the tools and features of WorkDo. It is high recommended that all users take the opportunity and get an in-depth experience of WorkDo!
Groups
FAQ-ID:1048
If you think WorkDo is another run-of-the-mill messenger app, it can’t be further from the truth! WorkDo is far more powerful than that! We’ll explain further.
- What’s the difference in terms of workplace and groups in WorkDo? How is WorkDo better than conventional messengers?
- When should I create groups?
- How do I create groups?
1 │ Workplace or groups?
Workplace is the highest level in WorkDo, and it comprises every member in the workplace, so if there are company-wide tasks or discussions, we recommend you stick to the workplace, otherwise, you could create groups based on departments, projects, topics for dedicated purposes.
With the kind of flexibility WorkDo provides, focused conversations and information compartmentalization are sure to follow.
Pros in Group :
-
- Engaged Conversation
Unlike other messengers, you could create groups for topic-oriented discussions, keep everyone in the loop, and most importantly, cut down your decision-making time. - Reduced Interferences & Focused Effort
Think of it this way, in principle, anything posted in the workplace is viewable by everyone, thus, a group becomes an independent workspace and only group members are notified when things happening are pertaining to the group. This effectively reduces workplace interferences and allows members to stay focused on the tasks at hand.ExampleIn a team of 30 members, Group A has 7 people. You will only receive notifications from Group A if you are part of the group. You will not be notified about anything in this group even if you are the workplace creator or admin.
- Engaged Conversation
- Collaboration Tools for Improved Efficiency
Tools such as Tasks, Events, Notes, Polls, etc. are designed to help your team track project progress, focus effort and improve communication with different groups and channels.
2 │ Can I Create Groups?
If the workplace admins allow members to create groups, memebr are able to freely create groups upon joining the workplace.
Group Creation Permission Check
Steps:
- At the workplace page.
- Click the Workplace Settings (Click the gear icon for the web version).
- Select Workplace Privacy.
- View the option of Members Can Create Groups for permission.
3 │ Create Groups
If permission allows, you are free to create groups based on teams, departments, projects or any topics you wish to enhance your team communication.
Create Groups
Steps:
- At the workplace page.
- Click Create Group.
- Fill out the group name, description and image. At this step, the web version is allowed to set the group privacy.
- Click Done to finish. (If you are using the App version, you will continue the following steps).
- A pop-up window asking to set the group privacy, auto accept join requests and who are allowed to send invitations.
- Click Next to select group members.
- And there, you are done!
Reminders
- All members are free to view all the public information at the workplace level, unless
- The items are designated to specific members upon posting.
- Tools that are only available to specific members.
- Group Privacy can be changed at a later date using the Group Settings.
Relevant Questions
Can I join multiple workplaces with my account?
How do I join other public groups in the workplace?
Can I control members from creating public or private groups?
How to add admins to the workplaces or groups I own?
How to activate / deactivate a tool?
How do I chat and use audio calls?
How do I delete a group?
FAQ-ID:1050
Joining the right groups not only improves your collaboration effort but also helps you assimilate into the company culture. Wanna know what public groups in the workplace you can join? Find out now!
Click the Public Groups on the Workplace page and you will find all the public groups available to join.
Join Public Groups
STEPS │ App
- Click the Workplace tab. (See WorkDo app general navigation)
- Click the Public Groups next to the Do button.
- Select groups and click Join.
STEPS │ Web
- Click the
 icon. (See WorkDo web general navigation)
 - Click Public Groups.
- Select groups and click Join.
- Alternatively, you can click the public groups icon on the side menu to join groups.
 Reminders
- Public Groups (N): The N represents the avilable public groups you can join.
- If the Auto Accept option is turned off, your join request needs to be approved by the group admin before joining the groups
- If the Auto Accept option is turned on, you will join the groups immediately.
FAQ-ID:1064
Just like a real company, everybody all plays a different role to work and grow together, this concept is the same in WorkDo.
There are 3 key roles in a WorkDo workplace, and they are member, admin and owner, each with a different purpose and role to play to facilitate the running of the company.
Furthermore, with each tool, there are team members that are responsible for maintaining the settings and records other than using it, so each tool also has a tool role that limits team members’ permissions on what they can do with each tool.(Know more!)
Now let have a closer look at each of the 3 roles in WorkDo!
1 │ Member
- Employees │
- Join, leave workplaces, groups: Join workplaces, create groups, join public groups, leave groups, add buddies, join WorkDo network and use private space.
- Feature shortcuts: View all posts on the wall, personal dashboard.
- Use collaboration tools: Post announcements, create events, track task progresses, share files, vote, chat and use group calls.
- Activate advanced tools: Eform application, track eform progresses.
- Account and notification settings: Change notification setting, use federated login, subscribe to an external calendar, set user DO-ID and change user password.
- Managers │ When members are assigned as managers with the HR tool, they hold the responsibility of signing off on various approvals and eforms and are allowed to view certain team and workplace data.
2 │ Admin
An admin is responsible for managing the settings of the workplace, group or between buddies. Each level could have more than one admins and they can do everything a member can on top of…
- Deleting or editing posts.
- Deleting comments.
- Managing members, including inviting, approving, removing members from workplaces and groups, whether to allow members to invite other people , block members, as well as employee termination settings.
- Level Management
- Workplace Settings – Maintain company information, admin management, set wall post permission, set special notifications, manage employee profile information, group creation permission, payment information(send payment, set billing information and credit card information), set company email domain, insert APIs (available in the web version), etc. It is recommended to have your HR staff and/or IT staff to take on the admin roles.
- Group Settings – Add admins set group privacy, invite members, remove members and set notifications.
- Buddy Settings – Set buddy information (for personal reference only).
- Activate or deactivate advanced tools and set tool roles
3 │ Owner
The owner of the workplace or group, the owner has the higheat authorization. The owner can also…
Who is the owner or admin?
- On the workplace page.
- Select a workplace, group or buddy level.
- Workplace – Click the workplace settings (Click the gear icon for the web version).
- Group – Click the Groups tab on the workplace page and hold the desired group and swipe right, click the settings (Click the gear icon for the web version).
- Buddy – Click the Buddies tab on the workplace page and hold the desired buddy and swipe right, click the settings (Click the gear icon for the web version).
- Select the Manage Admin option. The red crown is assigned to the owner, the blue crown is assigned the admin.
Reminders
- The owner and admin have almost the same authority. In a way of speaking, they are both “admins”, so unless otherwise specified, in all the WorkDo documents either one can be referred to as an admin.
- Since the buddy level only has two members, both parties are admins.
Relevant Questions
WorkDo web general navigation.
WorkDo app general navigation.
How to add admins to the workplaces or groups I own?
How to transfer my workplace/group ownership to others?
How to activate / deactivate a tool?
What is a tool box?
What are the differences between tool admins and workplace admins?
FAQ-ID:1065
The admins is present in workplaces, groups or between buddies, the function of their role is to maintain the settings and permissions of each level.
The “Manage Admin” option is an important setting when onboarding WorkDo, please select the persons responsible for maintaining the workplace settings.
Plan:![]() All palns
All palns
Permission:![]() Member
Member ![]() Admin
Admin ![]() Owner
Owner
Interface:![]() App
App ![]() Web
Web
STEPS │ Assign Workplace / Group Admins
- Select workplace / group / buddy level.
- Workplace │ Tap on the workplace settings (Tap on the gear icon for the Web version).
- Group │ From the workplace page tap on the groups tab, then swipe righ and click on the gear icon.
- Select Manage Admin.
- Add admin.
- App │ Click the + icon.
- Web │ Click Add Admin.
- Select the applicable members.
- Click Done.
STEPS │ Remove Admin
- Select workplace / group / buddy level.
- Workplace │ Tap on the workplace settings (Tap on the gear icon for the Web version).
- Group │ From the workplace page tap on the groups tab, then swipe righ and click on the gear icon.
- Select Manage Admin.
- Remove Admin
- App │ Swipe left on the admin tap on the Remove button then confirm the action.
- Web │ Click on Remove next to the admin then confirm the action.
Reminder
- The buddy level consists of two people, but both are admins by default.
FAQ-ID:1116
The biggest difference between a level admin and a tool admin is that one has control over the entire level’s settings and the other only has control over the settings and data of a particular tool. Let’s put it this way…
- Scenario 1 │ Mike is the IT Technician who is responsible for maintaining the overall settings of the workplace in WorkDo, but he should have access to employees’ profiles. What’s his role?
- Scenario 2 │ Richard is the head of the company and is the workplace admin in WorkDo, so how come he can’t view the employee profiles and their leave records?
The two scenarios represent a common misconception of authority and access control. Which is why WorkDo intend to separate the administrators and managers to satisfy different types of data management.
│ Admin Permissions(WorkDo Quick Start Settings) │
1 │ Level Admins
Much like a real company is run by executives, managers and employees, WorkDo reflect these roles as members, admins and owners. (Click to learn more)
2 │ Tool Admins
Of course, there is a lot to running a company, different departments are in charge of different data and files. For example, the HR, Accounting and Marketing departments don’t exchange information. And it is with this mindset, WorkDo also designed different roles for different tools, and each role is only privy to what is allowed for that role. (Click to learn more)
Scenario Sulutions
- Scenario 1 │ Set Mike as the workplace admin to maintain the workplace settings, but for tools like HR, Attendance, Leave and Payroll, set the appropreiate personnel as the managers instead.
- Scenario 2 │ Richard, the head of the company should also be set as the tool admin to gain access to detailed information.
Reminder
- Only the advanced tools have different tool roles for access control, and these tools are only for paid plan. Upon creating your first workplace, users have a 30-day trial period to try out all the tools and features of WorkDo. It is high recommended that all users take the opportunity and get an in-depth experience of WorkDo!
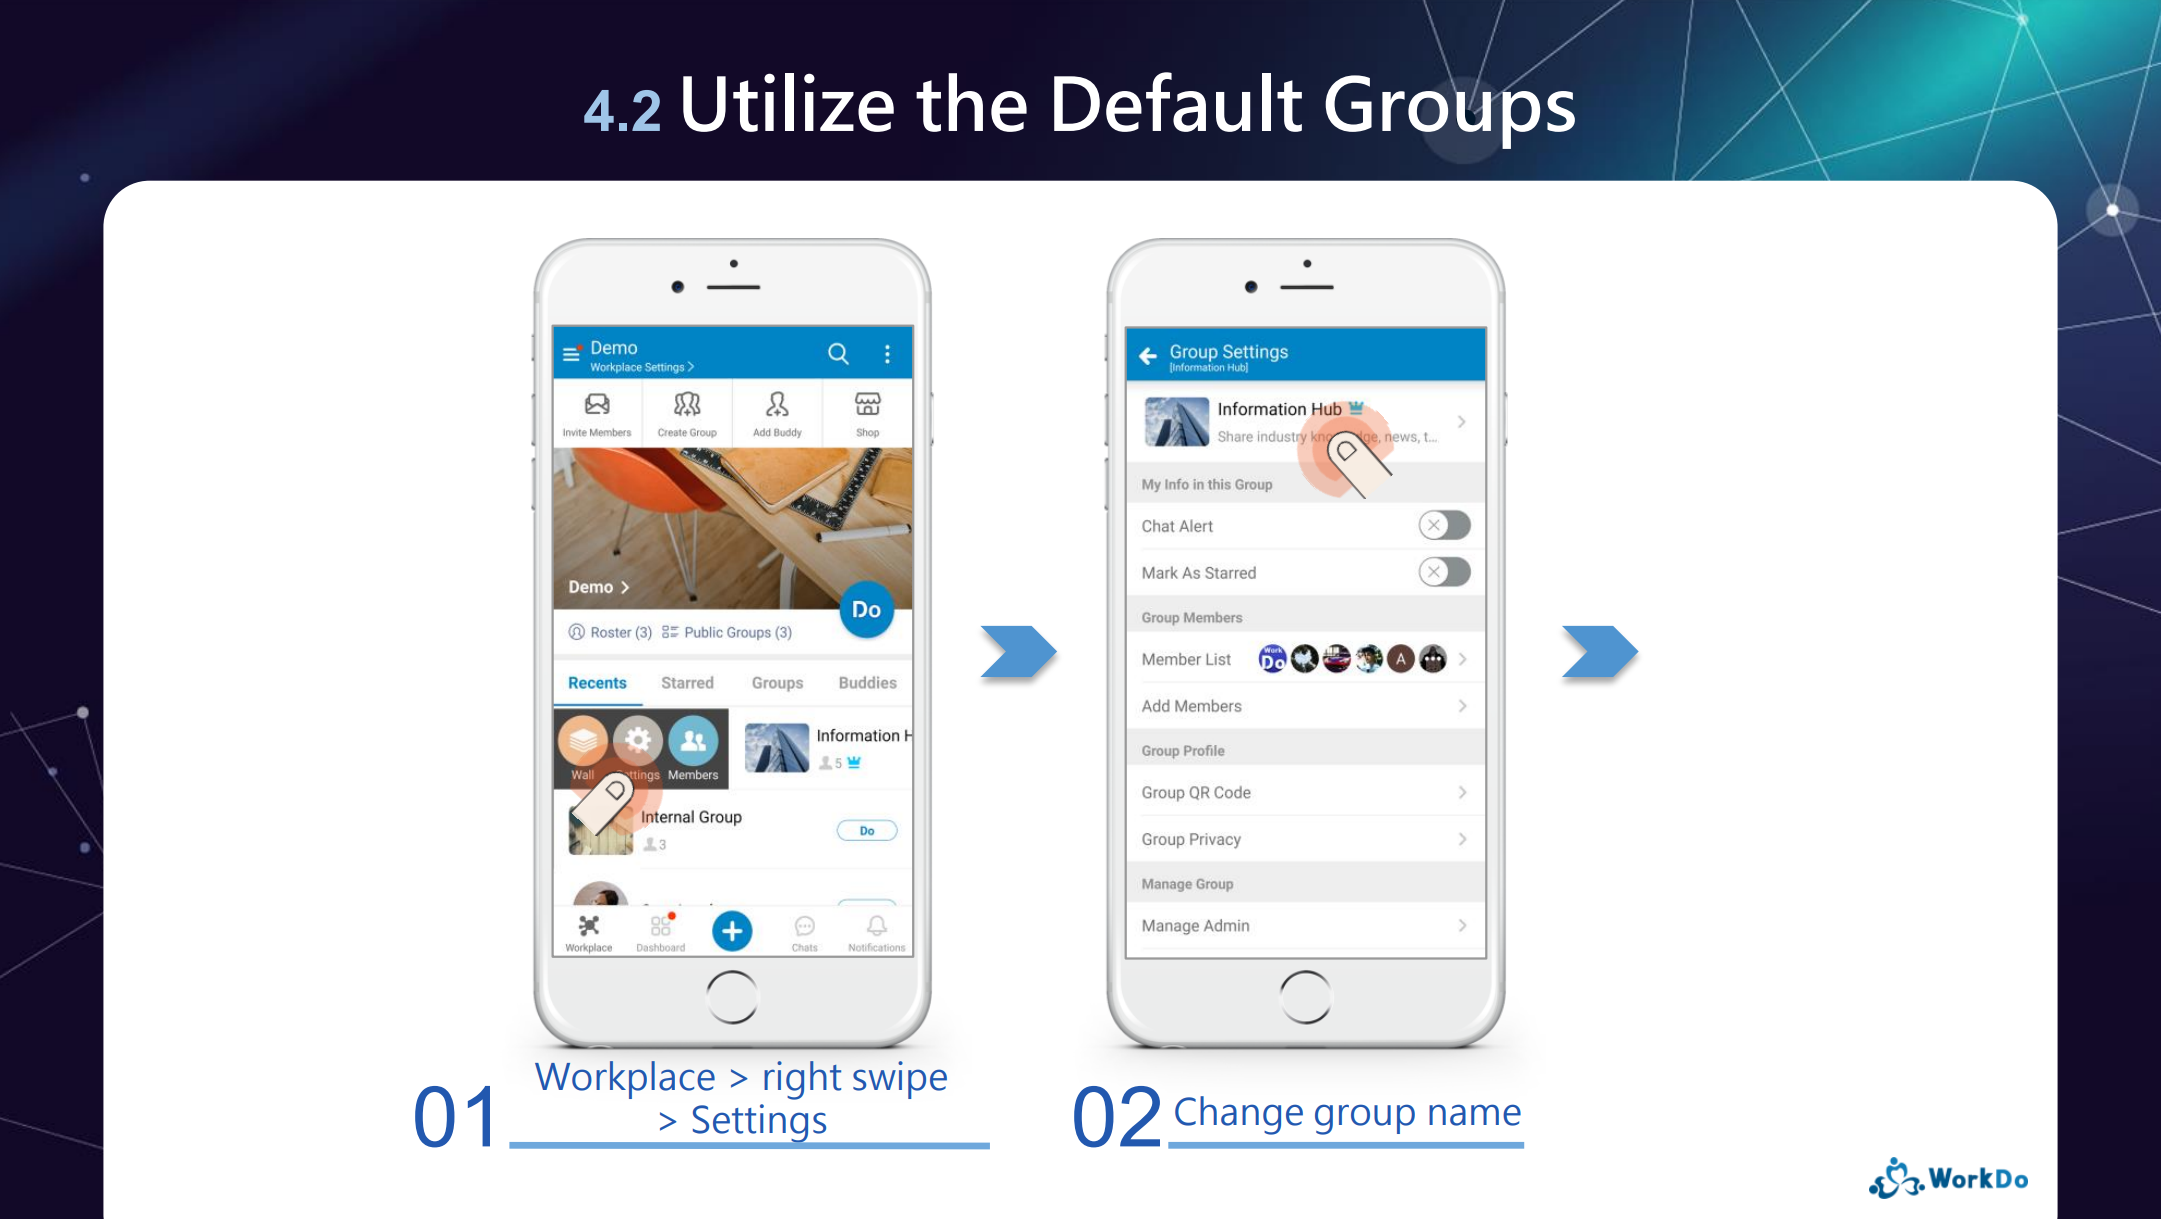
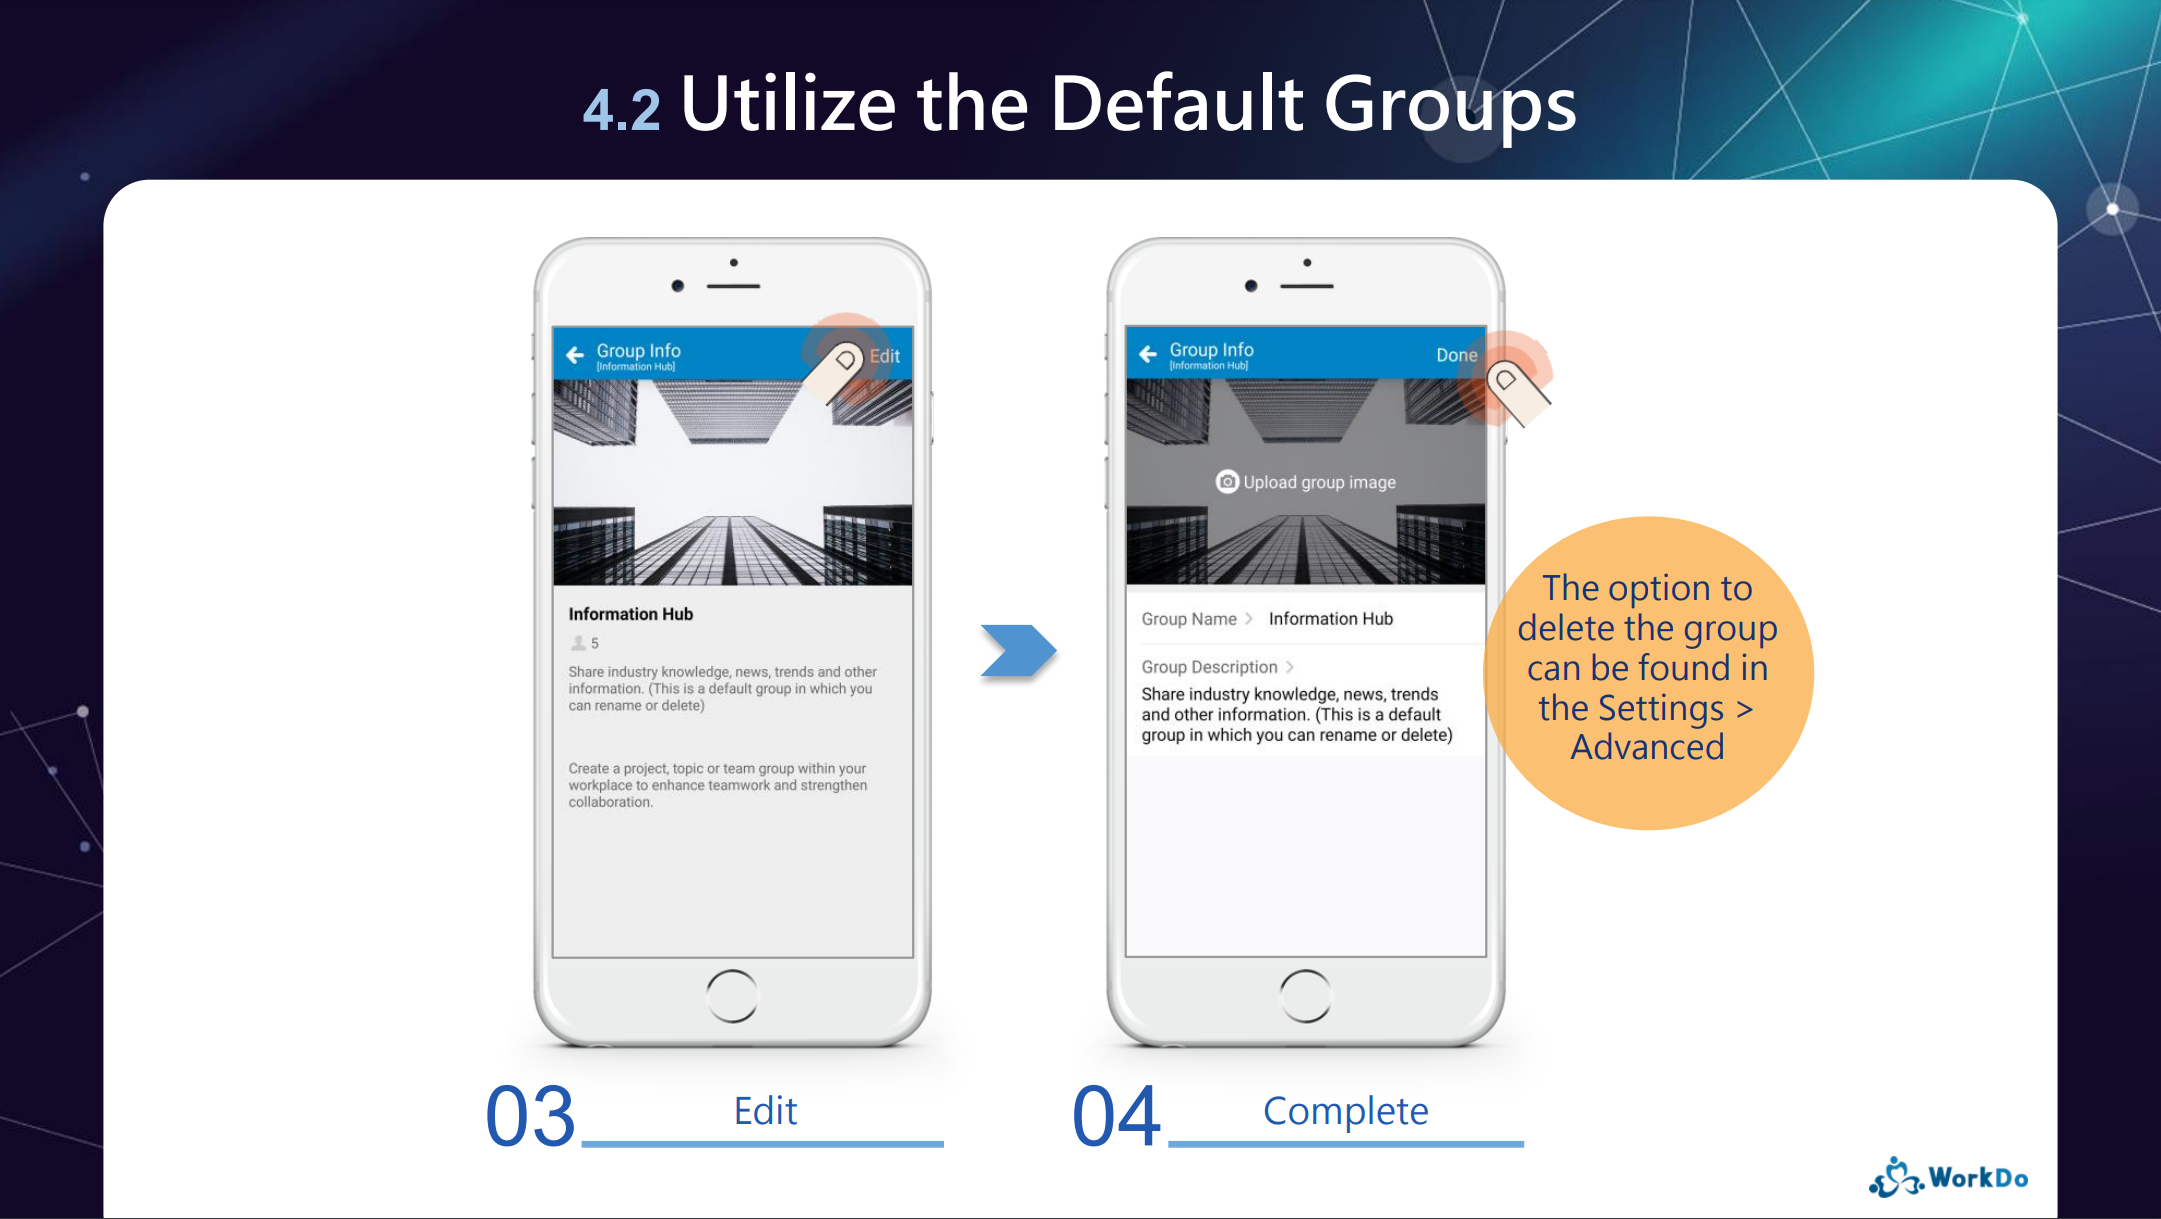
FAQ-ID:1047
The Information Hub and WorkDo Testing are two default groups that come with your new workplace when it is created. All members will automatically join these groups as they onboard WorkDo. These groups are designed for members who are unfamiliar with WorkDo to have a place to discuss features and how to use WorkDo.
Of course, you could rename the groups and change any of the group settings to suit your team purpose any way you see fit, or you could delete them if you so desire.
FAQ-ID:1049
Whether is team collaboration or group discussion, you need to be able to instantly bring the right people into the group to reduce the decision-making time and avoid the golden opportunity passing by.
WorkDo offers multiple ways to invite team members into the groups, including invites via QR code, from workplace roster, buddy list, or Do-ID, etc, just go with what works for you!
Plan:![]() All plans
All plans
Permission:![]() Group members
Group members ![]() Group admins
Group admins
Interface:![]() App
App ![]() Web
Web
Invite New Members into Groups via Group QR Code, Link
- Enter the Group Settings.
- Click Group QR Code.
- Select a sharing method.
- Display QR Code
Display the group QR code for members to scan and join the group. - Save QR Code
Download the QR code and share it however you wish. Right click then svae the file for the web version. - Copy Link
Share the group QR code as a link and share it as you would normally. - Refresh QR Code
The group QR code doesn’t expire, however, in certain situations, you might want to refresh it. Simply click the icon on the QR code screen and select Refresh to update the QR code.
- Display QR Code
Invite New Members into Groups via Add Members Method
- Enter the Group Settings.
- Click Add Members.
- Select an invite method.
- Workplace Roster │ Select members from the entire workplace roster.
- Groups │ Add members from your other groups into the current group.
- Buddies │ Select from your buddy list into the current group.
- Scan QR Code │ Scan a QR code to join the group.
This is an app-only function. Click the QR Code tab to turn on your QR code scanner and scan the QR code to join the group. - Search Do-ID │ Use the Do-ID to search a member to add to the group, and this method will work for members who have set their Do-IDs.
Click the Do-ID tab and input a member’s Do-ID to send a group invite.
Reminder
- The workplace admins have the authority to decide whether members are allowed to create groups in the workplace.
- If the Add Members option is not available to you, it means that this group only allows admins to invite new members.
- The invitees must be members of the workplace.
- WorkDo is a collaboration focused application, therefore, adding new members into the groups doesn’t require their permission.
Relevant Questions
What is my WorkDo QR code used for?
Who is allowed to invite new members into workplaces or groups?
Get notifications when members join and leave.
Workplace or groups? How to create groups?
Why can’t I find a group?
Workplace, Group, Buddy Settings.
What do different roles do in a workplace or group?
FAQ-ID:1051
There are a few possible reasons why you can’t find groups to join, such as workplace is not allowed to create groups, all groups are private or you are blocked by the groups.
Unable to Find Groups Troubleshoot
STEP 1 │ View Public Groups
All groups with privacy set to public will you be able to find them in the public groups and join.
Learn how to find public groups here!
STEP 2 │ Workplace Does Not Allow Creating Groups
See if your workplace allows group creation.
STEP 3 │ Check if Groups are Private
If your workplace allows creating groups and you are unable to find groups to join, it’s most likely that they are set to private or there aren’t any. Should this happen, you will need to ask workplace admins or team members to verify.
- No groups have been created │ Please ask someone for verify.
- Groups are private
01. Ask the group admins to check the privacy settings │ Go to Group Settings > Group Privacy > See whether the group has been set to private.
02. Ask a group member or admin to invite you to the group.
STEP 4 │ Blocked by Group Admins
When a member has been blocked by the group they are also unable to find it unless the group admin unblock them using the Group Settings..
FAQ-ID:1053
At last, the project is finished and the group is no longer needed, you may ask “how do I leave the group?”
In WorkDo, group members can leave the group whenever they wish, the group admins also have the authority to remove members from the group. The same goes for the groups in WorkDo Network.
For resigning employees, instead of leaving the groups could ask the workplace admins to remove them from the workplace and all the groups they are in with a few clicks of the button.
Remove Members
- Enter Group Settings.
- Click the Member List.
- Web: Click Remove. App: Click on a member then click Manage Member followed by Remove Member from the Group.
- Remove
Remove members from the group and they can no longer view the group posts and files unless they rejoin the group. - Block & Remove(Web only)
Blocked members can no longer rejoin the same groups with the same account. Use Block & Remove when you don’t want a member to access the group files.
- Remove
Leave Groups
- Enter Group Settings.
- Leave This Group.
- Hit Confirm to leave the group.
Reminders
- Once members are no longer in the groups, they cannot view the group data and files unless they rejoin the group.
- Only the group owner is allowed to remove admins from the group; the admins cannot kick each other out.
- Workplace owners and group owners must transfer their ownership to another admin before they are allowed to leave.
Relevant Questions
Can I leave a workplace?
How to Invite new members to a group?
How do I join other public groups in the workplace?
Why can’t I find groups to join?
Can I set only admins are allowed to post at the workplace level?
Get notifications when members join and leave.
How do I create groups in WorkDo Network?
How to transfer my workplace, group ownership?
How do I delete a group?
What to do when employees resign?
FAQ-ID:1054
You can delete a group so long as you are the group owner, however, once executed, this action is irreversible, so please make sure to save and backup all the necessary files and documents of a group before performing this move.
Group Deletion
- Enter Group Settings.
- App │ On the workplace page > click the Groups tab and swipe right on the group you wish to delete then click the Group Settings.
- Web │ Select a group on the workplace page then click the gear icon on top for the Group Settings.
- Click on Delete This Group.
- Fill out the verification code as seen on the screen then click
Delete This Group to confirm the action.
 Caution!
The group deletion action is irreversible, please make sure you have backed up all the files you need before performing this action.
Buddies
FAQ-ID:1055
Although WorkDo encourages team collaboration and communication, there are still times when you need to engage in one-to-one conversations, this is when you need to add a buddy or two.
Toggle among workplaces, , buddies to make sure you are always informed on what’s happening!
Switch among Workplaces, Groups and Buddies
STEP │ App
- Switch Workplaces
- Level Select – Workplaces, groups, buddies.
- Workplace │ Click the Workplace Domain button on the upper-left-hand corner and select from your list of workplaces.
- Group │ Click the Groups tab on the workplace page and select from your list of groups in the workplace.
- Buddy │ Click the Buddies tab on the workplace page and select from you list of buddies in the workplace.
- You will be brought to the chatroom immediately.
- You can begin chatting or use the Do button on the upper-right-hand corner to use other collaboration tools.
STEP │ Web
- Switch workplaces with the Workplace icon.
- Click the phonebook icon .
- Select a tab.
- Groups │ Select a group from the list.
- Buddies │ Select a buddy from the list.
- You will be brought to the chatroom immediately.
- You can begin chatting, use a collaboration tool from the tool listed above the chatroom or select one with the Do button.
Reminders
There are two ways to enter a level.
- Search the chat history and enter from the chatroom.
- Select a post from the Dashboard Wall.
WorkDo Network
FAQ-ID:1061
Is WorkDo for internal use only? What if I would like to use WorkDo with clients, customers and partners? But I can’t allow them to access company documents and data, so what do I do?
We understand your concern, a situation like this is exactly what WorkDo Network is for! Just add them as buddies in WorkDo Network and you can use WorkDo with your clients the same way you do internally!
This FAQ will answer 3 questions about WorkDo Network.
- Do groups in WorkDo Network work the same way as groups in the workplace?
- Can I create groups in WorkDo Network? How?
- How do I invite clients, customers and partners to the groups?
1 │ Do groups in WorkDo Network work the same way as groups in the workplace?
Much like you create groups to collaborate in a WorkDo internally, you too, can collaborate in groups using the WorkDo Network externally.
Tools like Tasks, Events, Announcements, Notes, Polls and other basic tools are available for you and your clients to communicate and collaborate. In WorkDo Network, your joint effort will be more productive and seamless.
2 │ Can I create groups in WorkDo Network? How?
Of course! You can create groups in WorkDo Network, simply switch between the workplace and WorkDo Network to collaborate internally and externally.
Group Creation in WorkDo Network
Steps:
- Switch to WorkDo Network.
- Click Create Group.
- Fill out all required information: Group Name, Group Description, Image.
- Click Done to finish.
- Web │ Once you are in the group wall page it means you have created a group successfully.
- App
- A prompt will pop up asking to set the group privacy and it is recommended that you do it now before bring people into the group.
- Click Next to invite members to your group.
- Once you are in the group wall page it means you have created a group successfully.
3 │ How do I invite clients, customers and partners to the groups?
Due to the sensitive nature, all groups in WorkDo Network are private. Users have to be invited by the group admins or members to join the groups.
Plan:![]() All plans
All plans
Permission:![]() Group members
Group members ![]() Group admins
Group admins
Device:![]() App
App ![]() Web
Web
Invite Group Members via QR Code or Invite Link
- Enter the Group Settings page.
- Click Group QR Code.
- Select sharing method.
- Display QR Code
Display the group QR code for scanning to join the group when your clients, customers or partners are right next to you. - Save QR Code
Save the group QR code to your device and share it with other people to join the group. Right-click the mouse and select save the image if you are using the web version. - Copy Link
A link corresponds to the QR code will be generated that can be copied and shared with the preferred people to join the group. - Update QR Code
In rare situations, you may want to get a new QR Code, simply click the icon and click the icon to update it.
- Display QR Code
Invite Group Members via Add Members Function
- Enter the Group Settings page.
- Click Add Members.
- Select an invite method.
- From groups │ Select members from other groups to join the current group.
- From buddies │ Select your buddies to join the current group.
- Scan the QR Code │ An App-only feature. Present the QR code for scanning to join the group.
- Search Do-ID │ Search a member via their Do-ID to join the group.
Reminders
- Upon joining a group in WorkDo Network, all public information is available to the members, unless otherwise mentioned by the post creators.
- The Auto Accept function in the Personal Settings determines whether a member would automatically accept invites or requires their approvals.
Relevant Questions
Why can’t I add buddies using their User ID, email or mobile number?
Workplaces, groups, buddies? Use each level to your advantage.
Send messages.
Switch between workplace and WorkDo Network.
Use WorkDo Network with your customers!
What is WorkDo Network?
How to add admins to workplaces or groups?
How do I delete a group?
Chats
FAQ-ID:1076
In terms of team collaboration, it is recommended that you create groups to tackle different tasks. When a group is created, members can use various tools to communicate and collaborate, etc.
However, in certain instances, if a simple chatroom is all you need to get things running, you can create a temporary chatroom to message other members. And if they aren’t your buddy, you can ask one of the participants to invite them into the temporary chatroom.
Create a Temporary Chatroom
Steps:
- Select the workplace domain.
- Click Chats.
- Click + New Chat.
- Select participants.
- Click Done if you are using the WorkDo app, and Confirm if you are using the web version.
Reminders
- If you would like to invite participants who are not your buddies into the chatroom, you can ask other participants who are their buddies to invite them.
- A temporary chatroom is for messaging only; therefore, no collaboration tools are provided. If you need to use the collaboration tools, you can either create a group or upgrade the chatroom to a group.
Tool Box
FAQ-ID:1116
The biggest difference between a level admin and a tool admin is that one has control over the entire level’s settings and the other only has control over the settings and data of a particular tool. Let’s put it this way…
- Scenario 1 │ Mike is the IT Technician who is responsible for maintaining the overall settings of the workplace in WorkDo, but he should have access to employees’ profiles. What’s his role?
- Scenario 2 │ Richard is the head of the company and is the workplace admin in WorkDo, so how come he can’t view the employee profiles and their leave records?
The two scenarios represent a common misconception of authority and access control. Which is why WorkDo intend to separate the administrators and managers to satisfy different types of data management.
│ Admin Permissions(WorkDo Quick Start Settings) │
1 │ Level Admins
Much like a real company is run by executives, managers and employees, WorkDo reflect these roles as members, admins and owners. (Click to learn more)
2 │ Tool Admins
Of course, there is a lot to running a company, different departments are in charge of different data and files. For example, the HR, Accounting and Marketing departments don’t exchange information. And it is with this mindset, WorkDo also designed different roles for different tools, and each role is only privy to what is allowed for that role. (Click to learn more)
Scenario Sulutions
- Scenario 1 │ Set Mike as the workplace admin to maintain the workplace settings, but for tools like HR, Attendance, Leave and Payroll, set the appropreiate personnel as the managers instead.
- Scenario 2 │ Richard, the head of the company should also be set as the tool admin to gain access to detailed information.
Reminder
- Only the advanced tools have different tool roles for access control, and these tools are only for paid plan. Upon creating your first workplace, users have a 30-day trial period to try out all the tools and features of WorkDo. It is high recommended that all users take the opportunity and get an in-depth experience of WorkDo!
FAQ-ID:1110
 All the tools you need in one place, just Do it!
Communication, collaboration, resource management, WorkDo knows what you need! WorkDo amassed all the tools you need to collaborate seamlessly, allowing employees to be more flexible, responsive and productive.
Tap the Do button to switch instantly tools or enter the toolbox!
 A dedicated toolbox for workplace, group and buddy level collaboration.
A toolbox for each level offers a clear line of authorization. Admins are able to set permissions for all employees and everyone can check their permission in the workplace, group and buddy toolbox for details.
 Use the basic tools to collaborate with high efficiency!
The basic tools allow for more streamlined workflow and focused communication. Post company announcements, assign tasks, share files, send event notifications, make calls and send messages, there is a tool for it! Use them wisely and watch your team’s productivity soar!
- Basic Tool
- Workplace
- Groups
- Buddies
- Announcement


- Notes
- Tasks
- Events
- Albums
- Files
- Links
- Polls
- Dashboard
- Wall
- Calendar
- Workflow
- Chats
- Audio Call
- Video Call
- Group Call
View All Basic Tools Features
Download Basic Tools Quick Start Guide
 Advanced tools for improved resource management!
The advanced tools are flexible to meet all team’s work style and company policies and they are interconnected to provide a marvelous team collaboration experience!
- Advanced Tool
- Workplace
- Groups
- Buddies
 HR tool must be enabled.
- HR
- Payroll
- Attendance
- Check In
- Leave
- Leave Pro
- Shift
- Overtime
- Timesheet
- Expenses
- Approvals
- Conf. Rm
- CRM
- Cashbook
- Phonebook
- We Buy
- IOU
Download Advanced Tools Quick Start Guide
 User guides available for detailed step-by-step walkthrough.
For every tool there is a detailed user guide showing users the set up process with examples, perfect for any newcomer! You can download them in the Resource Center or in the toolbox.。
FAQ-ID:1111
For an all-in-one collaboration app, WorkDo houses many tools, and the “Do” button shows all the services and tools you can use within your workplace, group, or buddies. It also a shortcut that takes you to the toolbox to see all the available tools you can use.
Whatever you need, just hit the Do button!
Tool switch using the Do button
Steps:
- Enter the workplace page.
- Simply click the Do button on the right side of the screen to switch tools.
- Depending on the workplace, groups and buddies, the available tools may be different.