Top 10 Qs You'd want to know
FAQ-ID:1019
Not sure what to do after registration? Take it easy, now we’ll show how to get your workplace up and running in 5 simple steps!
With the correct settings and user-defined rules, a virtual workplace in WorkDo can perform real-life routine practices and operations of your workplace. Here’s how!
Start WorkDo in 5 Steps
STEP 1 │ Create a Workplace
The first thing you should do after registration is to create a virtual workplace, then you can follow the next step and bring your teammates and collaborate on board.
View file:WorkDo Quick Start Settings
STEP 2 │ Invite Teammates to Your Workplace
In this step you could either ask your teammates to join your workplace or have the workplace admin send join invites.
- Trial run:We recommend you invite at least 1 to 3 people assigned with different roles into the workplace to help try out all the tools and features in the trial run.
- Adoption:Invite the rest of the your team into the workplace and deligate their roles accordingly by repearting Step 3 and 4.
How to invite people to a workplace?
Can I join the company workplace on my own?
View file:WorkDo Quick Start Settings
STEP 3 │ Set Workplace Admins
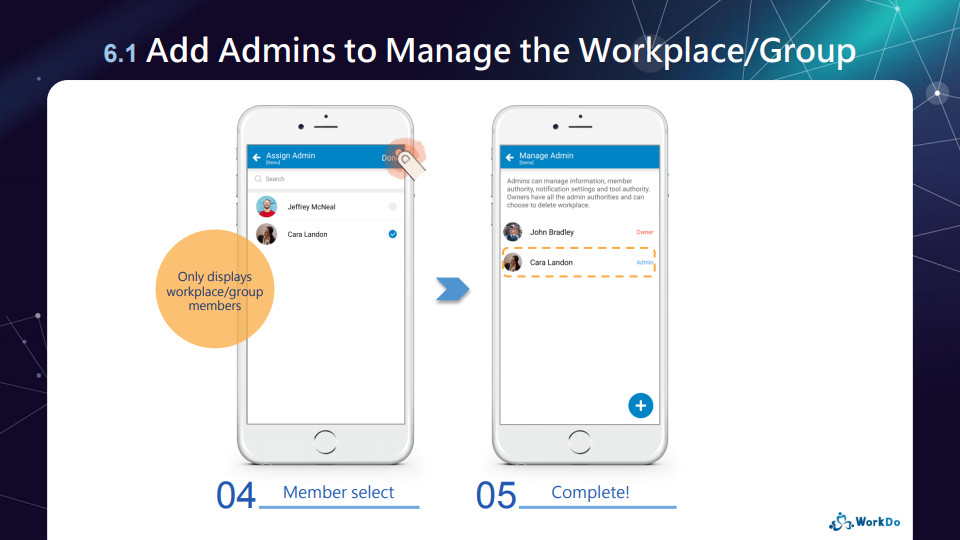
You are assigned as the workplace owner by default upon creating the workplace. The ownership can be transferred if need be, you should also assign other members, typically HR and/or IT staff, as admins to help manage the workplace and various settings.
How to add admins to workplaces or groups?
View file:WorkDo Quick Start Settings
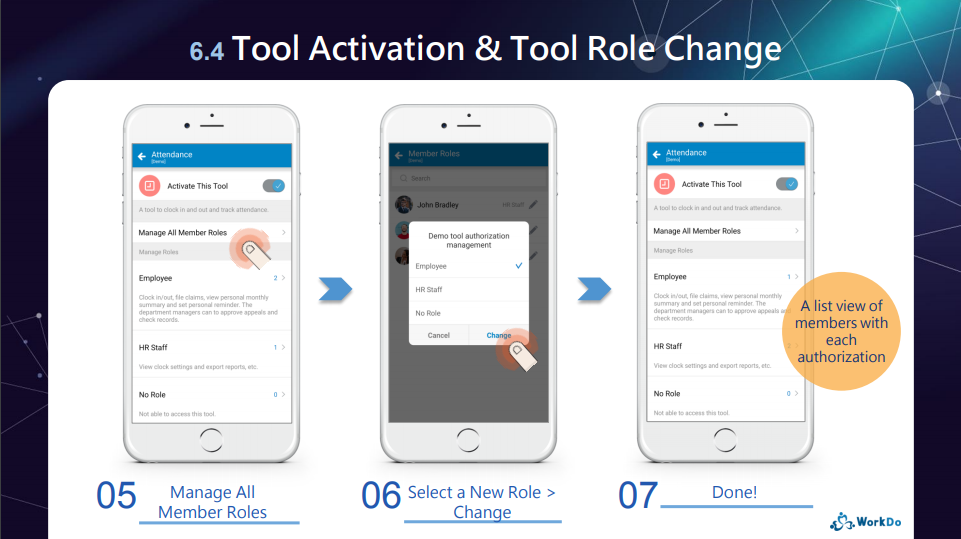
STEP 4 │ Set Tool Roles
Wanna enable payroll management, automated leave system, overtime calculation or Wi-Fi / GPS clock in / out? Whatever you need, they are in the tool box!
Just as a company has different people and managers to access different data and files, the tool roles in WorkDo ensure that members would use the tools and access the data with their permission for information compartmentalization.
How to activate / deactivate a tool?
Why do I have limited tool access?
View file:WorkDo Quick Start Settings
STEP 5 │ Customize Tool Settings
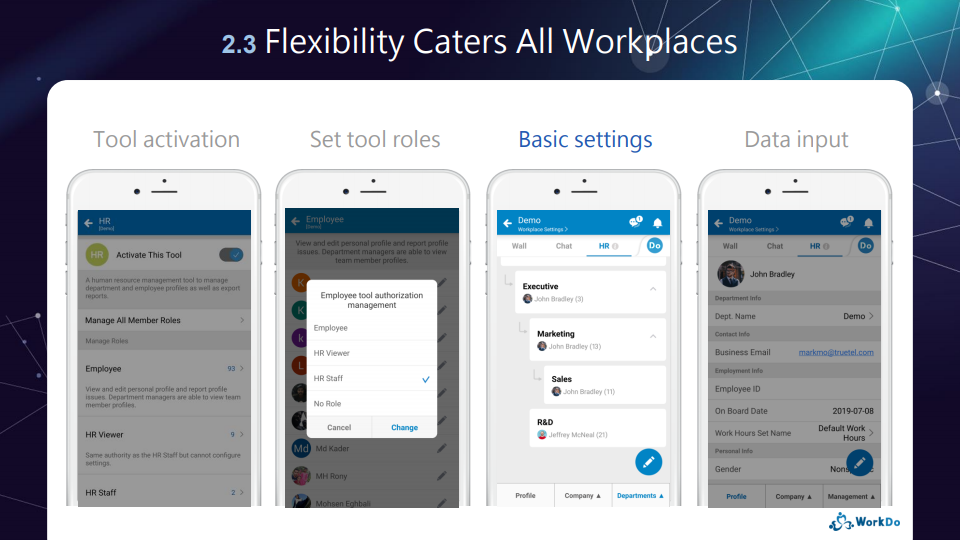
Taking into consideration that each workplace operates differently, the tools in WorkDo are just as flexible to cater to workplaces of various industries and team cultures. In this step, you will learn how to customize the tool settings that can best represent how your workplace truly operates.
View file:WorkDo Quick Start Advanced Tools
 Reminders
- Although listed as admins only, all users are able to create workplaces, i.e. Step 1, however, from Step 2 forward, are only the admins are allowed.
- By now, your workplace should be up and running, but if you need more detailed explanation, please use the guides below.
Download Quick Start Settings (Step 1 to 4) Download User Guides (Step 5)
Relevant Questions
What do different roles do in a workplace/group?
How do I sign up for WorkDo?
How to create a workplace?
Can I join the company workplace on my own?
How to invite people to a workplace?
How to add admins to workplace or groups?
What are tools?
How to activate / deactivate a tool?
Why do I have limited tool access?
What’s the difference between “Leave” and “Leave Pro”?
Sign up/Log in
FAQ-ID:1019
Not sure what to do after registration? Take it easy, now we’ll show how to get your workplace up and running in 5 simple steps!
With the correct settings and user-defined rules, a virtual workplace in WorkDo can perform real-life routine practices and operations of your workplace. Here’s how!
Start WorkDo in 5 Steps
STEP 1 │ Create a Workplace
The first thing you should do after registration is to create a virtual workplace, then you can follow the next step and bring your teammates and collaborate on board.
View file:WorkDo Quick Start Settings
STEP 2 │ Invite Teammates to Your Workplace
In this step you could either ask your teammates to join your workplace or have the workplace admin send join invites.
- Trial run:We recommend you invite at least 1 to 3 people assigned with different roles into the workplace to help try out all the tools and features in the trial run.
- Adoption:Invite the rest of the your team into the workplace and deligate their roles accordingly by repearting Step 3 and 4.
How to invite people to a workplace?
Can I join the company workplace on my own?
View file:WorkDo Quick Start Settings
STEP 3 │ Set Workplace Admins
You are assigned as the workplace owner by default upon creating the workplace. The ownership can be transferred if need be, you should also assign other members, typically HR and/or IT staff, as admins to help manage the workplace and various settings.
How to add admins to workplaces or groups?
View file:WorkDo Quick Start Settings
STEP 4 │ Set Tool Roles
Wanna enable payroll management, automated leave system, overtime calculation or Wi-Fi / GPS clock in / out? Whatever you need, they are in the tool box!
Just as a company has different people and managers to access different data and files, the tool roles in WorkDo ensure that members would use the tools and access the data with their permission for information compartmentalization.
How to activate / deactivate a tool?
Why do I have limited tool access?
View file:WorkDo Quick Start Settings
STEP 5 │ Customize Tool Settings
Taking into consideration that each workplace operates differently, the tools in WorkDo are just as flexible to cater to workplaces of various industries and team cultures. In this step, you will learn how to customize the tool settings that can best represent how your workplace truly operates.
View file:WorkDo Quick Start Advanced Tools
Reminders
- Although listed as admins only, all users are able to create workplaces, i.e. Step 1, however, from Step 2 forward, are only the admins are allowed.
- By now, your workplace should be up and running, but if you need more detailed explanation, please use the guides below.
Download Quick Start Settings (Step 1 to 4) Download User Guides (Step 5)
Relevant Questions
What do different roles do in a workplace/group?
How do I sign up for WorkDo?
How to create a workplace?
Can I join the company workplace on my own?
How to invite people to a workplace?
How to add admins to workplace or groups?
What are tools?
How to activate / deactivate a tool?
Why do I have limited tool access?
What’s the difference between “Leave” and “Leave Pro”?
Workplace
FAQ-ID:1035
A workplace is a place for you, your company and all your coworkers to communicate and collaborate together. The workplace is designed to be secure and safe for your company with multiple levels of privacy settings. You can also create groups within the company for different departments, projects, or topics.
Within a workplace, you can chat, create tasks, view events, upload files and even make a poll with your colleagues. Also, you can use the HR, Leave, Expense, Conf. Rm. and CRM tools to better manage your company.
The 7 benefits of having a workplace in WorkDo
-
All-in-One
WorkDo is a true all-in-one collaboration platform that integrates all to tools you need to communicate, collaborate and operate. WorkDo effectively reduces your company’s costs of having to maintain multiple servers and IT equipment on your own.
-
Secure Access Control
WorkDo only allows your colleagues to join your secure workplace. There are various ways that you could use to invite the right people to join your workplace, leave it to us to block out the unwanted individuals.
-
The Perfect Virtual Workplace
WorkDo is excellent if your workplace requires multiple discussion groups for different tasks, teams, purposes, etc. The abundant amount of tools guarantee that there’s always the right tool for the job!
-
Flexible Permissions
Each employee could have different permissions in WorkDo, and different tool permissions allow different employees to use the tools in different ways. Changing permissions is as easy as a few clicks by the workplace admins.
-
Report Export
WorkDo keeps track of all the data and records for you, may it be attendance, vacations, approvals and employee information. Download the report you need and customize it the way you want it, it’s all here!
-
Swiftly Remove Former Employees
When an employee part ways with the company, that person could no longer access the workplace data, and everything will be kept for reference, including files and chats.
-
Reduce IT Costs
No servers, no IT staff, no maintenance fees. We’ll handle the security, upgrade and maintenance, so you can focus reaching your goals, together!
Relevant Questions
How to create a workplace?
What should I do on the Start WorkDo page?
How to invite people to a workplace?
How do I edit the company information?
Can I join multiple workplaces with my account?
What are the two default groups for? How Do I use them?
Can I have sub-groups in my workplace? How to create a new group?
What do different roles do in a workplace/group?
What do different roles do in a workplace/group?
WorkDo Network notifications.
Pricing Plans
FAQ-ID:1036
Creating a workplace in WorkDo is easy! All it requires is a valid email address for account verification purposes.
When creating a workplace, you are given the choice of either using a company email address or a free email address. The differences are explained below.
Plan:![]() All plans
All plans
Permission:![]() All users
All users
Interface:![]() App
App ![]() Web
Web
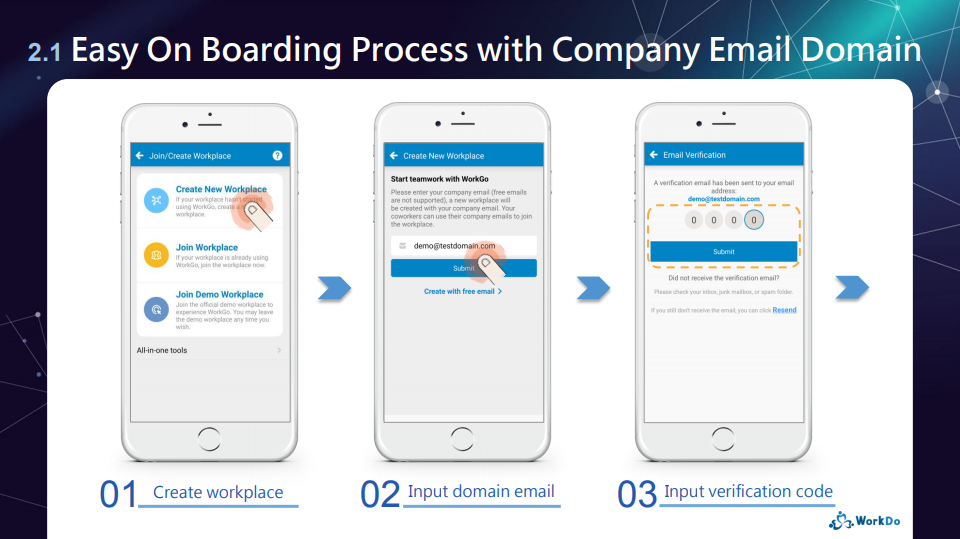
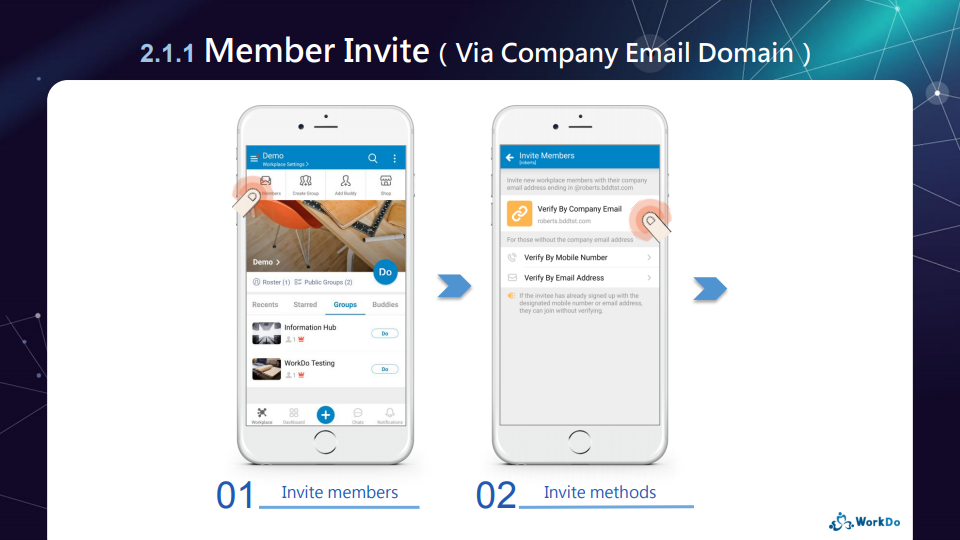
Company Email Address
Applicable: For teams that use company email addresses.
Pro: Employees that have the same company email addresses will be automatically invited to join the workplace instead of manually inviting, saving precious time.
Features
- A single company email domain can only be used to create one workplace and only members with the same company email domain will auto-join the workplace.
- Any company email address is unique and for one individual. Avoid mistaken identity!
- By following the steps in creating a workplace, the first person to use the company email address and complete the account verification will be assigned as the owner of the workplace (The ownership can be transferred to other members later on).
- The rest of the team members can auto-join the workplace using the company email.
Steps
- On the Join/Create Workplace page.
- Complete the workplace registration.
- Click the Menu button (
 ) and select Join/Create Workplace.
- Click Create New Workplace.
- Enter your company email address.
- Click Submit.
- Verification process
- If you used the company email for your personal account registration, please go to step 6.
- If you used an email address that is different from your company email address, please retrieve the verification code from your company email inbox and input it on the screen.
- Enter the company information On the workplace home screen to complete.
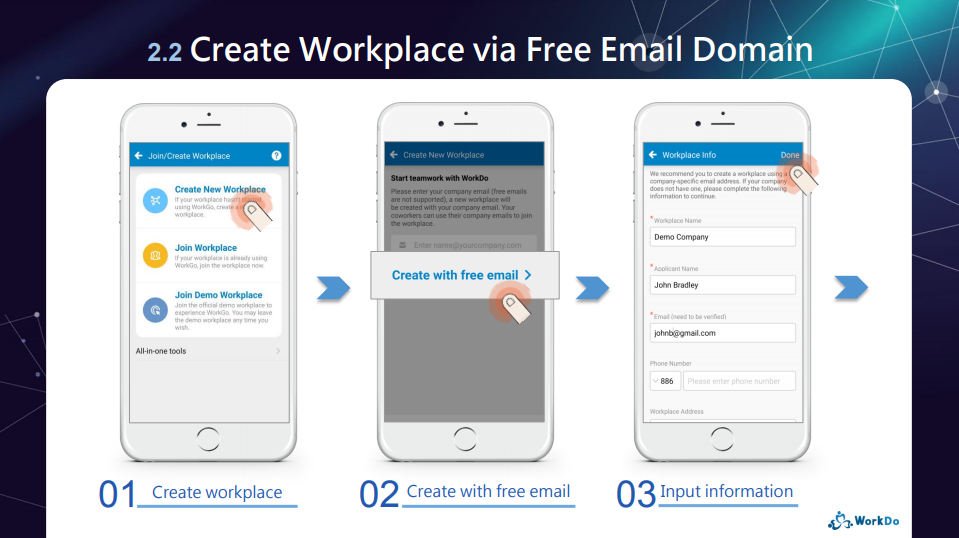
Free Email Address
Applicable: For teams that use free email addresses(@gmail, @yahoo…etc.)
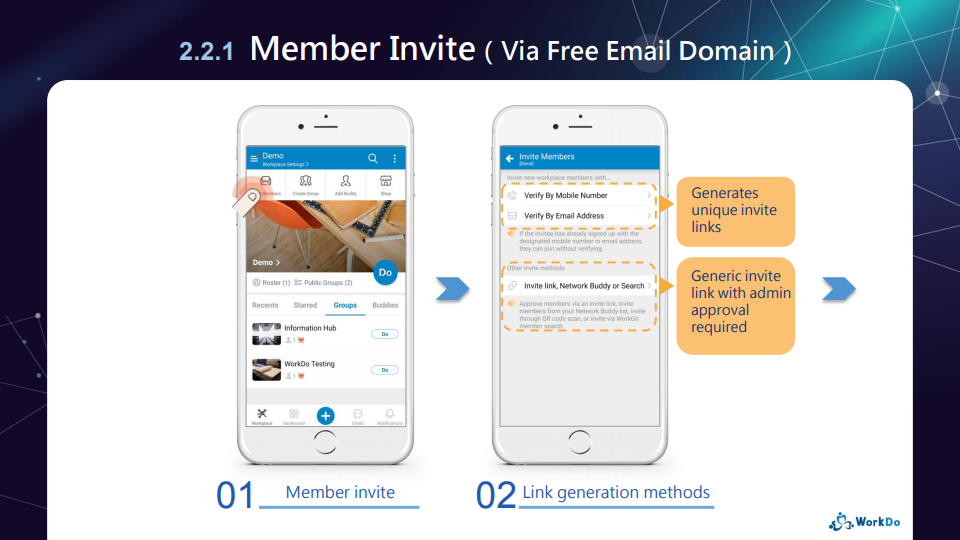
Pro: Everyone has to be manually invited and verified first before joinning the workplace.
Features
- Unique email address, no mistake of identity!
- By following the steps in creating a workplace,you will be assigned as the owner of the workplace (The ownership can be transferred to other members later on).
- Target invite members to join the workplace, verification process is no longer required.
Steps
- On the Join/Create Workplace page.
- Complete the workplace registration and you will be led to the workplace home screen.
- Click the Menu button ( ) and select Join/Create Workplace.
- Click Create New Workplace
- Click Create with free email
- Fill out the necessary information
- Click Done
- The workplace home screen will be shown indicating the registration completion.
Reminders
- A company email domain is recognized by the company name followed by the @ sign in the email address (ex. johndoe@company.com). Most company email domains are paid services, however, there are exceptions that even Google’s @gmail.com is used as a company email domain. So please check with your IT staff before registration.
- If your company is a multinational conglomerate or has branch offices, you could simply use the same account and create a new workplace and manage multiple workplaces with the same account.
- If a former employee created a workplace using the company email that is no longer needed, please ask them to delete the workplace or contact us for assistance.
Relevant Questions
What is a workplace?
What should I do on the Start WorkDo page?
How to invite people to a workplace?
How do I edit the company information?
What do different roles do in a workplace/group?
Can I join multiple workplaces with my account?
Workplaces, groups, buddies? Use each level to your advantage.
What are WorkDo’s pricing and plans?
Monthly or yearly payment plan? What’s WorkDo’s billing policy?
Can I bind the company email domain when I created the workplace using a free email domain?
Can I delete a workplace? Can deleted workplace be recovered?
FAQ-ID:1116
The biggest difference between a level admin and a tool admin is that one has control over the entire level’s settings and the other only has control over the settings and data of a particular tool. Let’s put it this way…
- Scenario 1 │ Mike is the IT Technician who is responsible for maintaining the overall settings of the workplace in WorkDo, but he should have access to employees’ profiles. What’s his role?
- Scenario 2 │ Richard is the head of the company and is the workplace admin in WorkDo, so how come he can’t view the employee profiles and their leave records?
The two scenarios represent a common misconception of authority and access control. Which is why WorkDo intend to separate the administrators and managers to satisfy different types of data management.
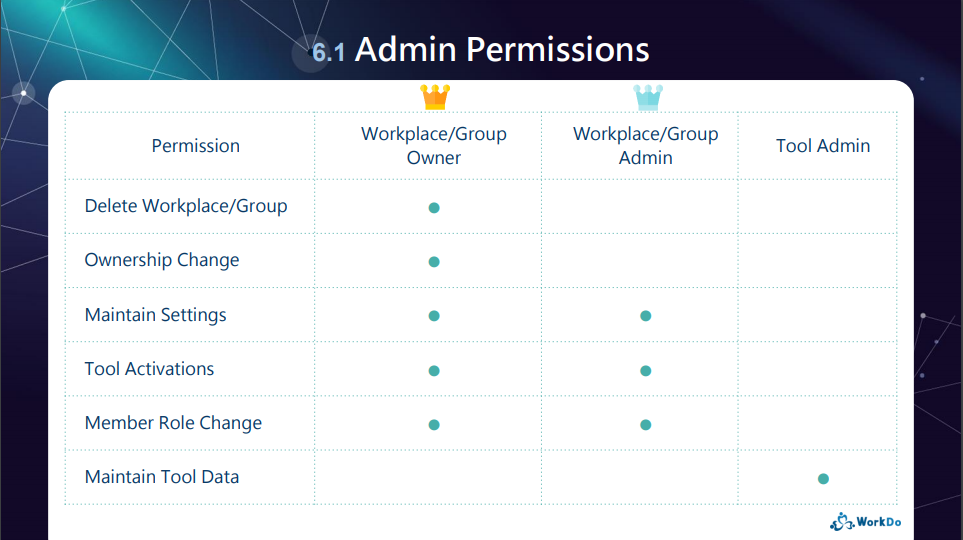
│ Admin Permissions(WorkDo Quick Start Settings) │
1 │ Level Admins
Much like a real company is run by executives, managers and employees, WorkDo reflect these roles as members, admins and owners. (Click to learn more)
2 │ Tool Admins
Of course, there is a lot to running a company, different departments are in charge of different data and files. For example, the HR, Accounting and Marketing departments don’t exchange information. And it is with this mindset, WorkDo also designed different roles for different tools, and each role is only privy to what is allowed for that role. (Click to learn more)
 Scenario Sulutions
- Scenario 1 │ Set Mike as the workplace admin to maintain the workplace settings, but for tools like HR, Attendance, Leave and Payroll, set the appropreiate personnel as the managers instead.
- Scenario 2 │ Richard, the head of the company should also be set as the tool admin to gain access to detailed information.
Reminder
- Only the advanced tools have different tool roles for access control, and these tools are only for paid plan. Upon creating your first workplace, users have a 30-day trial period to try out all the tools and features of WorkDo. It is high recommended that all users take the opportunity and get an in-depth experience of WorkDo!
Groups
FAQ-ID:1116
The biggest difference between a level admin and a tool admin is that one has control over the entire level’s settings and the other only has control over the settings and data of a particular tool. Let’s put it this way…
- Scenario 1 │ Mike is the IT Technician who is responsible for maintaining the overall settings of the workplace in WorkDo, but he should have access to employees’ profiles. What’s his role?
- Scenario 2 │ Richard is the head of the company and is the workplace admin in WorkDo, so how come he can’t view the employee profiles and their leave records?
The two scenarios represent a common misconception of authority and access control. Which is why WorkDo intend to separate the administrators and managers to satisfy different types of data management.
│ Admin Permissions(WorkDo Quick Start Settings) │
1 │ Level Admins
Much like a real company is run by executives, managers and employees, WorkDo reflect these roles as members, admins and owners. (Click to learn more)
2 │ Tool Admins
Of course, there is a lot to running a company, different departments are in charge of different data and files. For example, the HR, Accounting and Marketing departments don’t exchange information. And it is with this mindset, WorkDo also designed different roles for different tools, and each role is only privy to what is allowed for that role. (Click to learn more)
Scenario Sulutions
- Scenario 1 │ Set Mike as the workplace admin to maintain the workplace settings, but for tools like HR, Attendance, Leave and Payroll, set the appropreiate personnel as the managers instead.
- Scenario 2 │ Richard, the head of the company should also be set as the tool admin to gain access to detailed information.
Reminder
- Only the advanced tools have different tool roles for access control, and these tools are only for paid plan. Upon creating your first workplace, users have a 30-day trial period to try out all the tools and features of WorkDo. It is high recommended that all users take the opportunity and get an in-depth experience of WorkDo!
Tool Box
FAQ-ID:1116
The biggest difference between a level admin and a tool admin is that one has control over the entire level’s settings and the other only has control over the settings and data of a particular tool. Let’s put it this way…
- Scenario 1 │ Mike is the IT Technician who is responsible for maintaining the overall settings of the workplace in WorkDo, but he should have access to employees’ profiles. What’s his role?
- Scenario 2 │ Richard is the head of the company and is the workplace admin in WorkDo, so how come he can’t view the employee profiles and their leave records?
The two scenarios represent a common misconception of authority and access control. Which is why WorkDo intend to separate the administrators and managers to satisfy different types of data management.
│ Admin Permissions(WorkDo Quick Start Settings) │
1 │ Level Admins
Much like a real company is run by executives, managers and employees, WorkDo reflect these roles as members, admins and owners. (Click to learn more)
2 │ Tool Admins
Of course, there is a lot to running a company, different departments are in charge of different data and files. For example, the HR, Accounting and Marketing departments don’t exchange information. And it is with this mindset, WorkDo also designed different roles for different tools, and each role is only privy to what is allowed for that role. (Click to learn more)
Scenario Sulutions
- Scenario 1 │ Set Mike as the workplace admin to maintain the workplace settings, but for tools like HR, Attendance, Leave and Payroll, set the appropreiate personnel as the managers instead.
- Scenario 2 │ Richard, the head of the company should also be set as the tool admin to gain access to detailed information.
Reminder
- Only the advanced tools have different tool roles for access control, and these tools are only for paid plan. Upon creating your first workplace, users have a 30-day trial period to try out all the tools and features of WorkDo. It is high recommended that all users take the opportunity and get an in-depth experience of WorkDo!
FAQ-ID:1110
 All the tools you need in one place, just Do it!
Communication, collaboration, resource management, WorkDo knows what you need! WorkDo amassed all the tools you need to collaborate seamlessly, allowing employees to be more flexible, responsive and productive.
Tap the Do button to switch instantly tools or enter the toolbox!
 A dedicated toolbox for workplace, group and buddy level collaboration.
A toolbox for each level offers a clear line of authorization. Admins are able to set permissions for all employees and everyone can check their permission in the workplace, group and buddy toolbox for details.
 Use the basic tools to collaborate with high efficiency!
The basic tools allow for more streamlined workflow and focused communication. Post company announcements, assign tasks, share files, send event notifications, make calls and send messages, there is a tool for it! Use them wisely and watch your team’s productivity soar!
- Basic Tool
- Workplace
- Groups
- Buddies
- Announcement


- Notes
- Tasks
- Events
- Albums
- Files
- Links
- Polls
- Dashboard
- Wall
- Calendar
- Workflow
- Chats
- Audio Call
- Video Call
- Group Call
View All Basic Tools Features
Download Basic Tools Quick Start Guide
 Advanced tools for improved resource management!
The advanced tools are flexible to meet all team’s work style and company policies and they are interconnected to provide a marvelous team collaboration experience!
- Advanced Tool
- Workplace
- Groups
- Buddies
 HR tool must be enabled.
- HR
- Payroll
- Attendance
- Check In
- Leave
- Leave Pro
- Shift
- Overtime
- Timesheet
- Expenses
- Approvals
- Conf. Rm
- CRM
- Cashbook
- Phonebook
- We Buy
- IOU
Download Advanced Tools Quick Start Guide
 User guides available for detailed step-by-step walkthrough.
For every tool there is a detailed user guide showing users the set up process with examples, perfect for any newcomer! You can download them in the Resource Center or in the toolbox.。
FAQ-ID:1117
Upon first glance, the all-in-one WorkDo and its plentiful tools may look daunting to new users, however, if you look at the tool info and tool role descriptions, you can quickly get a clear idea of what each tool can do and how your team can focus its collaborative effort.
Tool Info & Tool Roles
Method 1 │ Enter the Tool Box and select an advanced tool
- Click the “i” icon to view your own tool role of this tool.
- Scroll down to view all the tool roles. Click on each tool role to view functions that are tied to each role.
Method 2 │ From workplace, group or buddy level
- Enter the workplace, group, buddy level settings.
- Click Manage Tools option followed by advanced tool tab.
- Select a tool to view it’s tool info.
- Scroll down to view all the tool roles. Click on each tool role to view functions that are tied to each role.
Reminders
- The advanced tools are available to premium users and new users who are on their trial period. The new users will have 30 days to try out all the tools, after the trial period expires, they will be switched to the Free plan and will no longer be able to use any advanced tools.
- Like to give the advanced tools a try? Well, if you are a level admin, you could use the advanced tools by enabling them; if you are not a level admin, you could send a request to the level admin to enable the advanced tools for use.
HR
FAQ-ID:1031
In order to satisfy and cater to a wide range of companies’ human resource management, the HR tool offers quite a few fields in the employee profiles to fill in, mostly optional, of course!
Simply put, these three options are purely for annotation purposes in the HR tool and can be used to filter different types of employees in advanced searches. So if the rest of the information is not required, filling in the Job Title will suffice.
In this FAQ, we’ll discuss
- The Employee Profiles information in the HR tool.
- Does the information in the employee profiles affect certain functions?
- Do Role, Job Title and Job Type limit certain tool access?
1 │ Employee Profiles Information
- Personal Information │ Phone Number, Home Address, Date of Birth, Education, Emergency Contact, etc.
- Work Information │ Department, Job Title, Job Type, Role, Work Hours, Dotted-Line Manager, Designated Approver, Deputies, Contract information, etc.
2 │ Does the information in the employee profiles affect certain functions?
Most of the information fields are purely for annotation and documentation purposes and don’t affect any functions and features. Just be sure to fill out the necessary fields marked with a red star sign (*).
Please be sure to read this employee HR settings FAQ to determine whether the information fields listed are important to your company and need to be filled out to facilitate the workflow.
3 │ 『Do Role, Job Title and Job Type limit certain tool access?
They don’t! WorkDo’s access control is managed by both the level admins and tool admins. So the information fields are for documentation purposes only. If they are not required to be filled out, you may leave them blank.
Role, Job Title and Job Type Examples
The Role options are built-in presets and can’t be customized, while Job Title and Job Type are completely customizable.
- Scenario 1 │ John is a Front Desk Representative intern.
His employee profile may describe him as an intern for Role, administrator for Job Title, and part-time personnel for Job Type. - Scenario 2 │ Natalie is a Senior Android Developer
Her employee profile may describe her as an Engineer for Role, Android Software Engineer for Job Title, and Senior Engineer for Job Type. - Scenario 3 │ Nora the Executive Secretary
Her employee profile may describe her as an Admin for Role or leave it blank, Executive Secretary for Job Title, and Senior Secretary for Job Type.
Reminder
- You may use the Company information field to assign employees to a brand or entity if your company is a conglomerate.
- You may use the Branch information field to assign employees to a branch office or a store location.