Groups
FAQ-ID:1048
If you think WorkDo is another run-of-the-mill messenger app, it can’t be further from the truth! WorkDo is far more powerful than that! We’ll explain further.
- What’s the difference in terms of workplace and groups in WorkDo? How is WorkDo better than conventional messengers?
- When should I create groups?
- How do I create groups?
1 │ Workplace or groups?
Workplace is the highest level in WorkDo, and it comprises every member in the workplace, so if there are company-wide tasks or discussions, we recommend you stick to the workplace, otherwise, you could create groups based on departments, projects, topics for dedicated purposes.
With the kind of flexibility WorkDo provides, focused conversations and information compartmentalization are sure to follow.
Pros in Group :
-
- Engaged Conversation
Unlike other messengers, you could create groups for topic-oriented discussions, keep everyone in the loop, and most importantly, cut down your decision-making time. - Reduced Interferences & Focused Effort
Think of it this way, in principle, anything posted in the workplace is viewable by everyone, thus, a group becomes an independent workspace and only group members are notified when things happening are pertaining to the group. This effectively reduces workplace interferences and allows members to stay focused on the tasks at hand. Example
In a team of 30 members, Group A has 7 people. You will only receive notifications from Group A if you are part of the group. You will not be notified about anything in this group even if you are the workplace creator or admin.
- Engaged Conversation
- Collaboration Tools for Improved Efficiency
Tools such as Tasks, Events, Notes, Polls, etc. are designed to help your team track project progress, focus effort and improve communication with different groups and channels.
2 │ Can I Create Groups?
If the workplace admins allow members to create groups, memebr are able to freely create groups upon joining the workplace.
Group Creation Permission Check
Steps:
- At the workplace page.
- Click the Workplace Settings (Click the gear icon for the web version).
- Select Workplace Privacy.
- View the option of Members Can Create Groups for permission.
3 │ Create Groups
If permission allows, you are free to create groups based on teams, departments, projects or any topics you wish to enhance your team communication.
Create Groups
Steps:
- At the workplace page.
- Click Create Group.
- Fill out the group name, description and image. At this step, the web version is allowed to set the group privacy.
- Click Done to finish. (If you are using the App version, you will continue the following steps).
- A pop-up window asking to set the group privacy, auto accept join requests and who are allowed to send invitations.
- Click Next to select group members.
- And there, you are done!
 Reminders
- All members are free to view all the public information at the workplace level, unless
- The items are designated to specific members upon posting.
- Tools that are only available to specific members.
- Group Privacy can be changed at a later date using the Group Settings.
Relevant Questions
Can I join multiple workplaces with my account?
How do I join other public groups in the workplace?
Can I control members from creating public or private groups?
How to add admins to the workplaces or groups I own?
How to activate / deactivate a tool?
How do I chat and use audio calls?
How do I delete a group?
FAQ-ID:1050
Joining the right groups not only improves your collaboration effort but also helps you assimilate into the company culture. Wanna know what public groups in the workplace you can join? Find out now!
Click the Public Groups on the Workplace page and you will find all the public groups available to join.
Join Public Groups
STEPS │ App
- Click the Workplace tab. (See WorkDo app general navigation)
- Click the Public Groups next to the Do button.
- Select groups and click Join.
STEPS │ Web
- Click the
 icon. (See WorkDo web general navigation)
 - Click Public Groups.
- Select groups and click Join.
- Alternatively, you can click the public groups icon on the side menu to join groups.
 Reminders
- Public Groups (N): The N represents the avilable public groups you can join.
- If the Auto Accept option is turned off, your join request needs to be approved by the group admin before joining the groups
- If the Auto Accept option is turned on, you will join the groups immediately.
FAQ-ID:1047
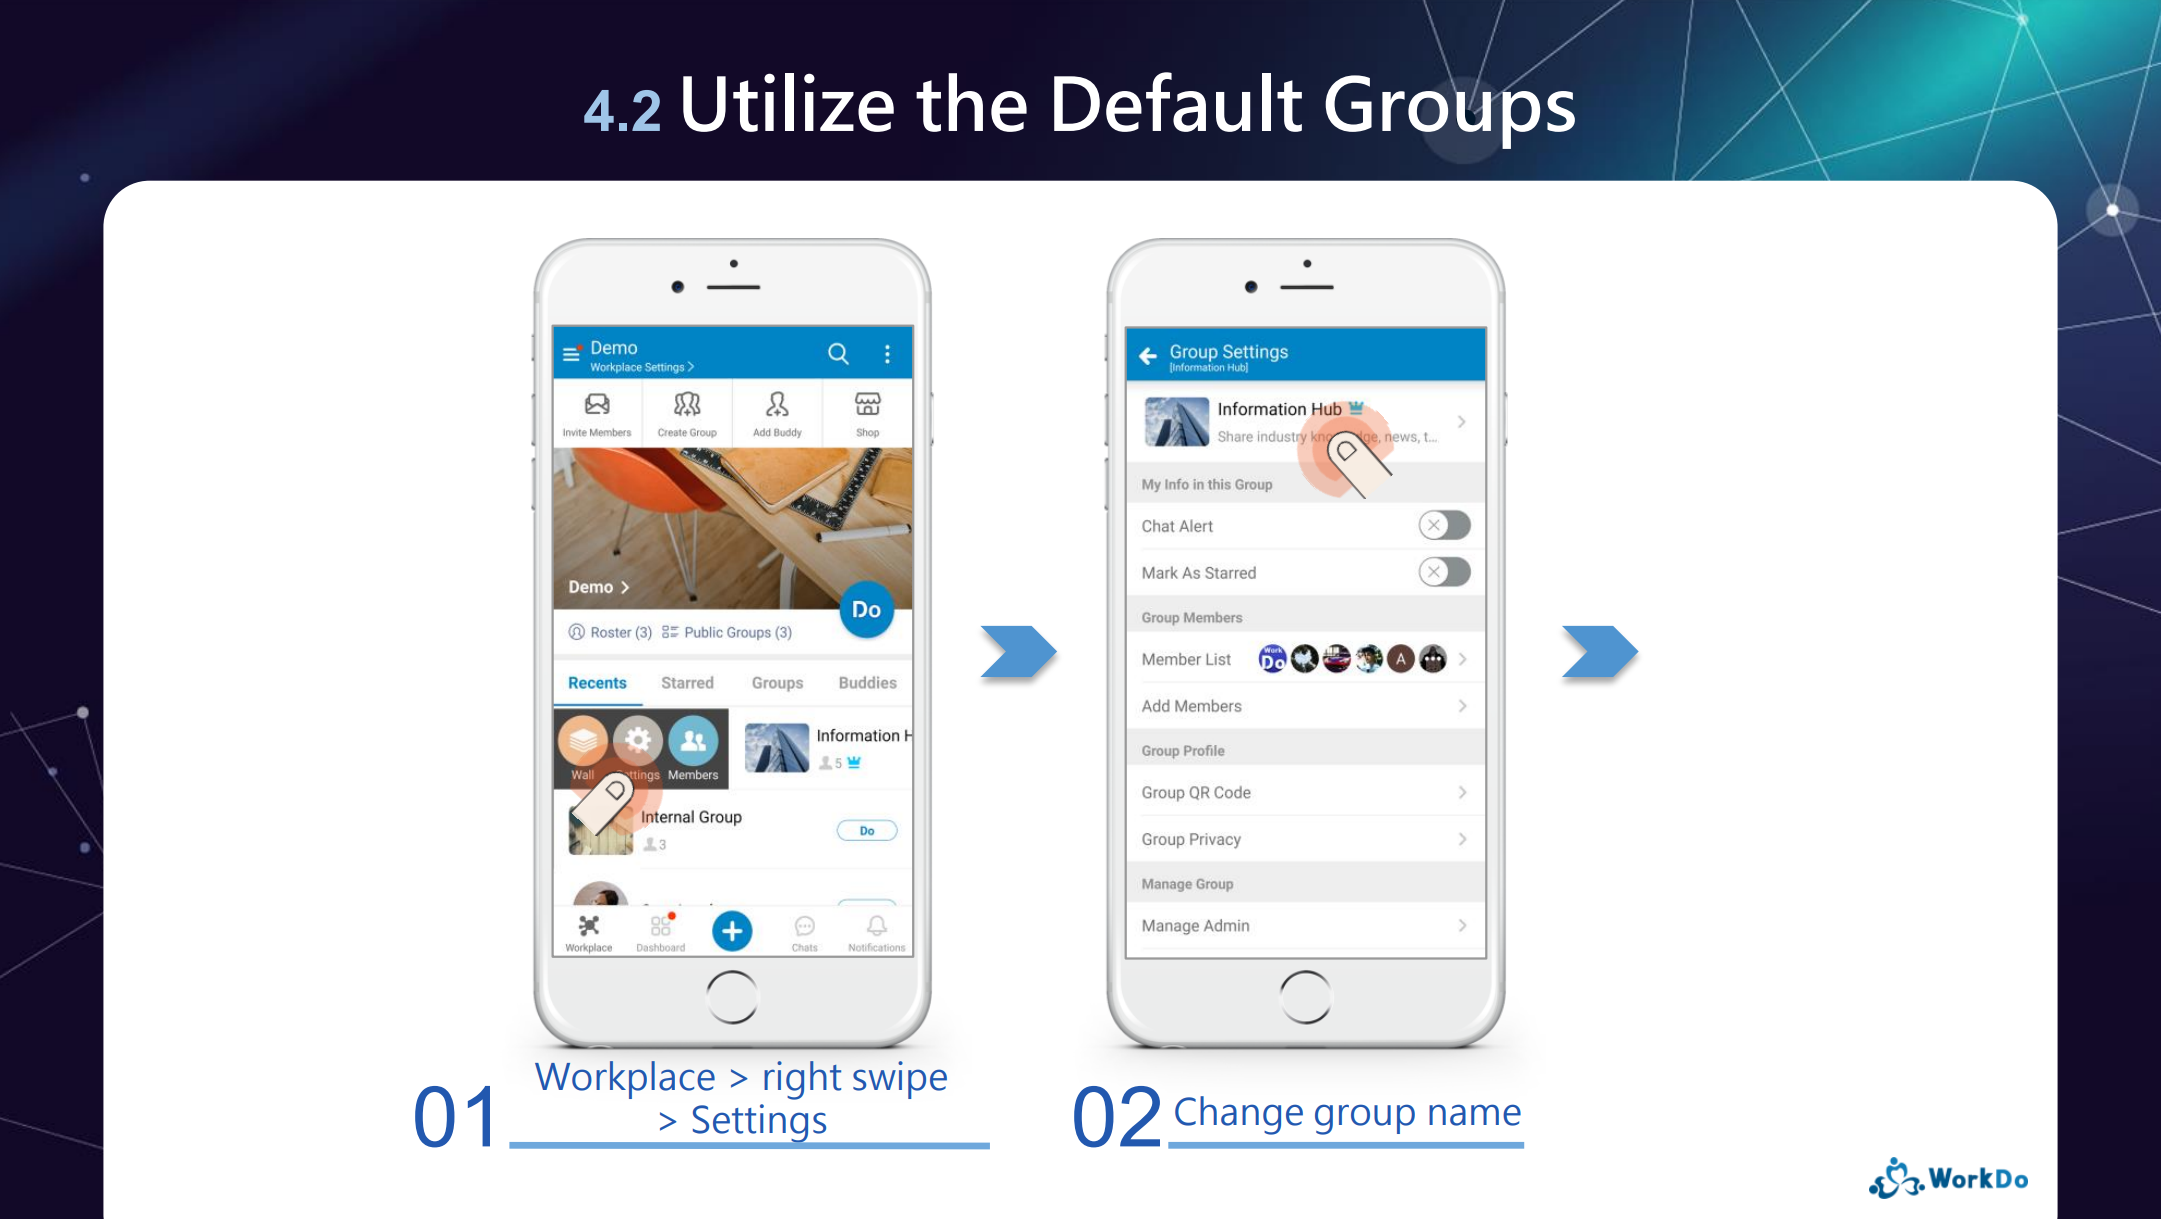
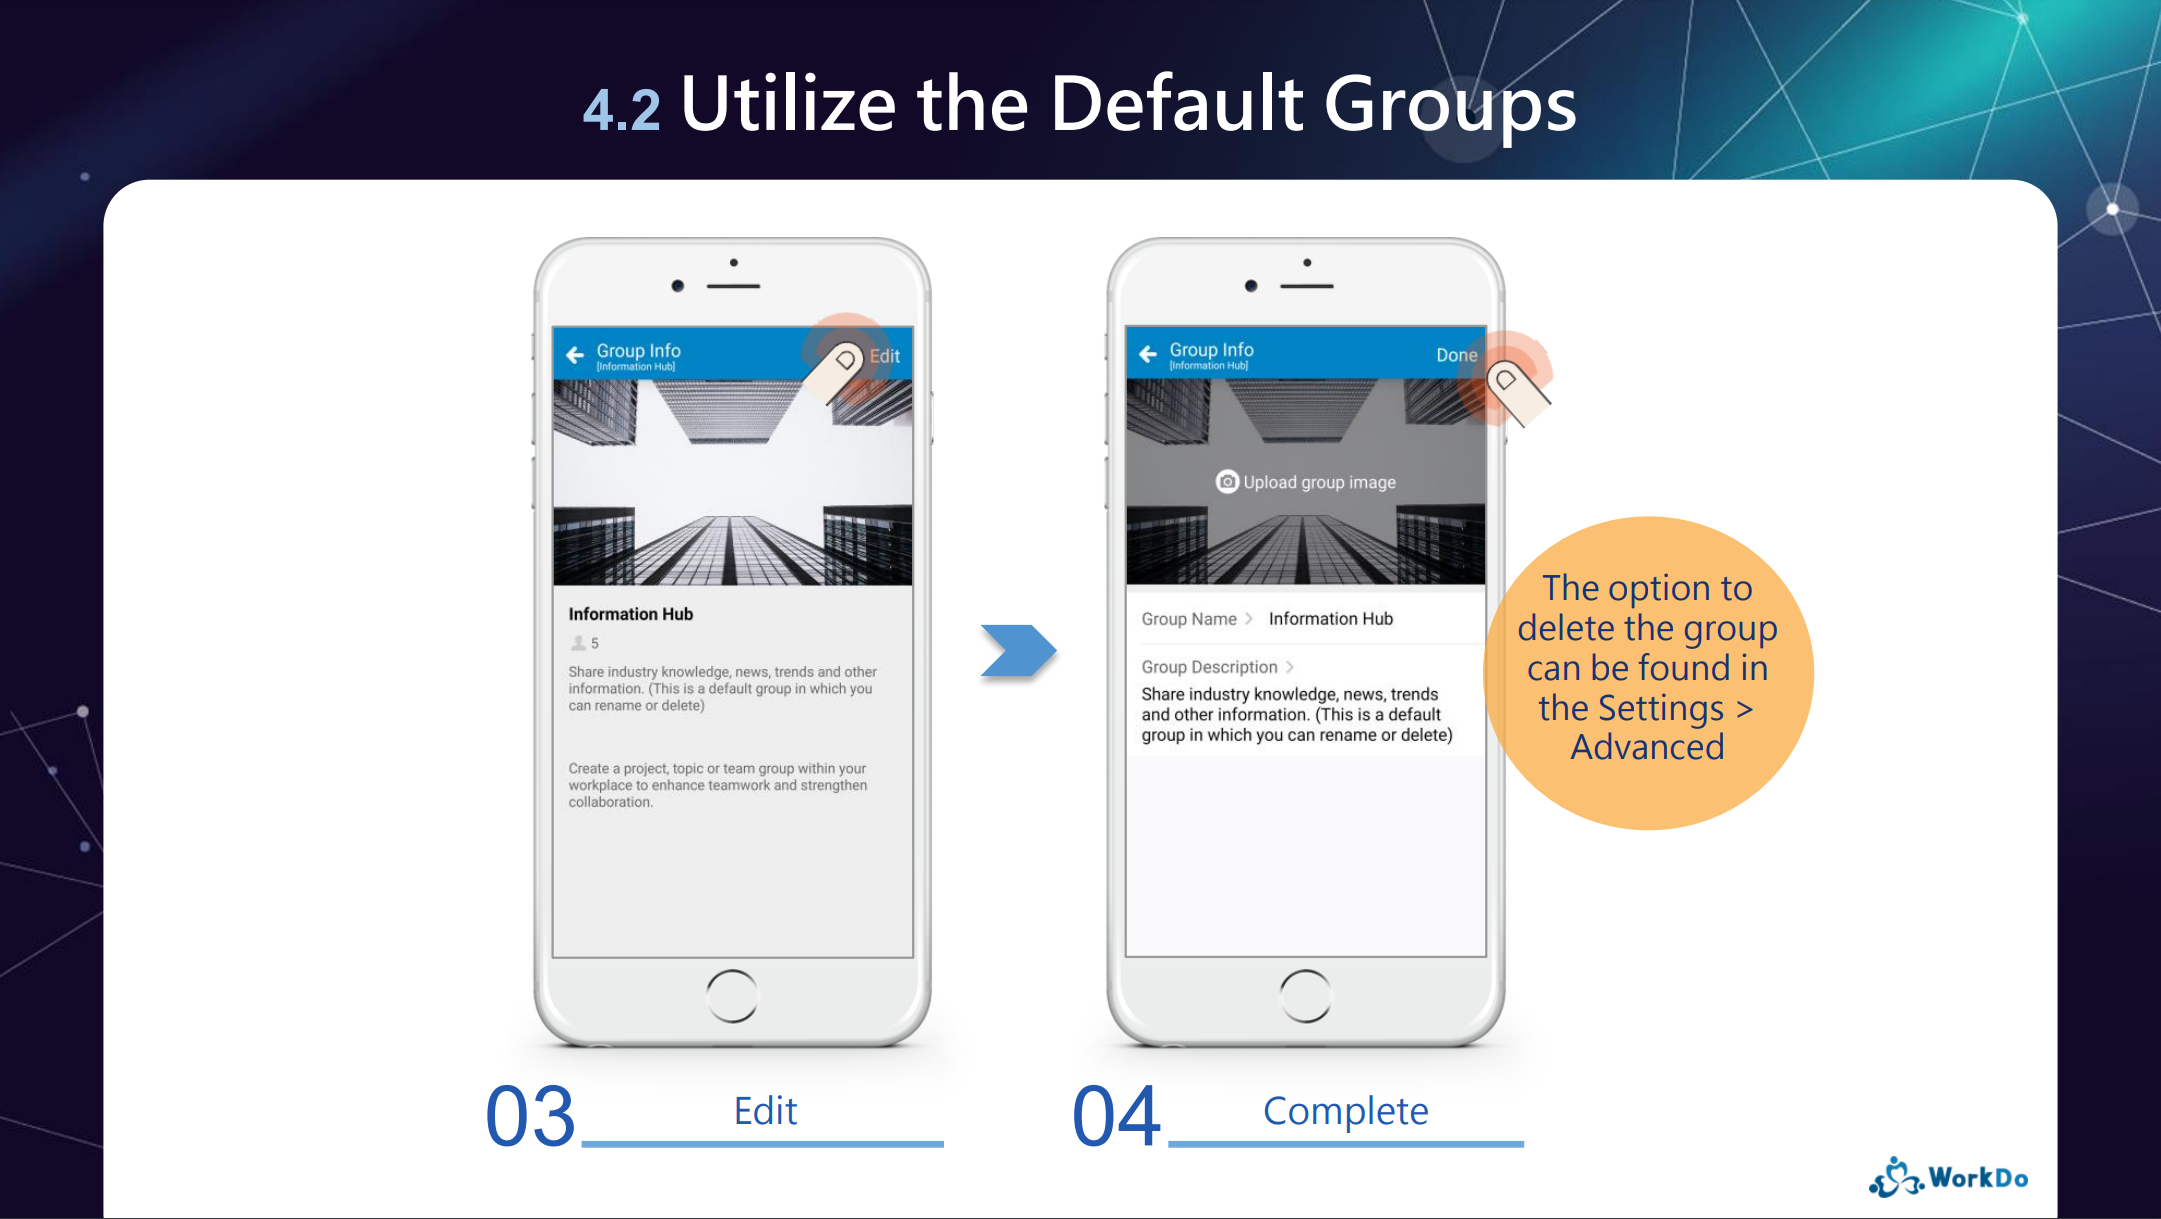
The Information Hub and WorkDo Testing are two default groups that come with your new workplace when it is created. All members will automatically join these groups as they onboard WorkDo. These groups are designed for members who are unfamiliar with WorkDo to have a place to discuss features and how to use WorkDo.
Of course, you could rename the groups and change any of the group settings to suit your team purpose any way you see fit, or you could delete them if you so desire.

FAQ-ID:1049
Whether is team collaboration or group discussion, you need to be able to instantly bring the right people into the group to reduce the decision-making time and avoid the golden opportunity passing by.
WorkDo offers multiple ways to invite team members into the groups, including invites via QR code, from workplace roster, buddy list, or Do-ID, etc, just go with what works for you!
Plan:![]() All plans
All plans
Permission:![]() Group members
Group members ![]() Group admins
Group admins
Interface:![]() App
App ![]() Web
Web
Invite New Members into Groups via Group QR Code, Link
- Enter the Group Settings.
- Click Group QR Code.
- Select a sharing method.
- Display QR Code
Display the group QR code for members to scan and join the group. - Save QR Code
Download the QR code and share it however you wish. Right click then svae the file for the web version. - Copy Link
Share the group QR code as a link and share it as you would normally. - Refresh QR Code
The group QR code doesn’t expire, however, in certain situations, you might want to refresh it. Simply click the icon on the QR code screen and select Refresh to update the QR code.
- Display QR Code
Invite New Members into Groups via Add Members Method
- Enter the Group Settings.
- Click Add Members.
- Select an invite method.
- Workplace Roster │ Select members from the entire workplace roster.
- Groups │ Add members from your other groups into the current group.
- Buddies │ Select from your buddy list into the current group.
- Scan QR Code │ Scan a QR code to join the group.
This is an app-only function. Click the QR Code tab to turn on your QR code scanner and scan the QR code to join the group. - Search Do-ID │ Use the Do-ID to search a member to add to the group, and this method will work for members who have set their Do-IDs.
Click the Do-ID tab and input a member’s Do-ID to send a group invite.
Reminder
- The workplace admins have the authority to decide whether members are allowed to create groups in the workplace.
- If the Add Members option is not available to you, it means that this group only allows admins to invite new members.
- The invitees must be members of the workplace.
- WorkDo is a collaboration focused application, therefore, adding new members into the groups doesn’t require their permission.
Relevant Questions
What is my WorkDo QR code used for?
Who is allowed to invite new members into workplaces or groups?
Get notifications when members join and leave.
Workplace or groups? How to create groups?
Why can’t I find a group?
Workplace, Group, Buddy Settings.
What do different roles do in a workplace or group?